The Best Fluffy Pancakes recipe you will fall in love with. Full of tips and tricks to help you make the best pancakes.
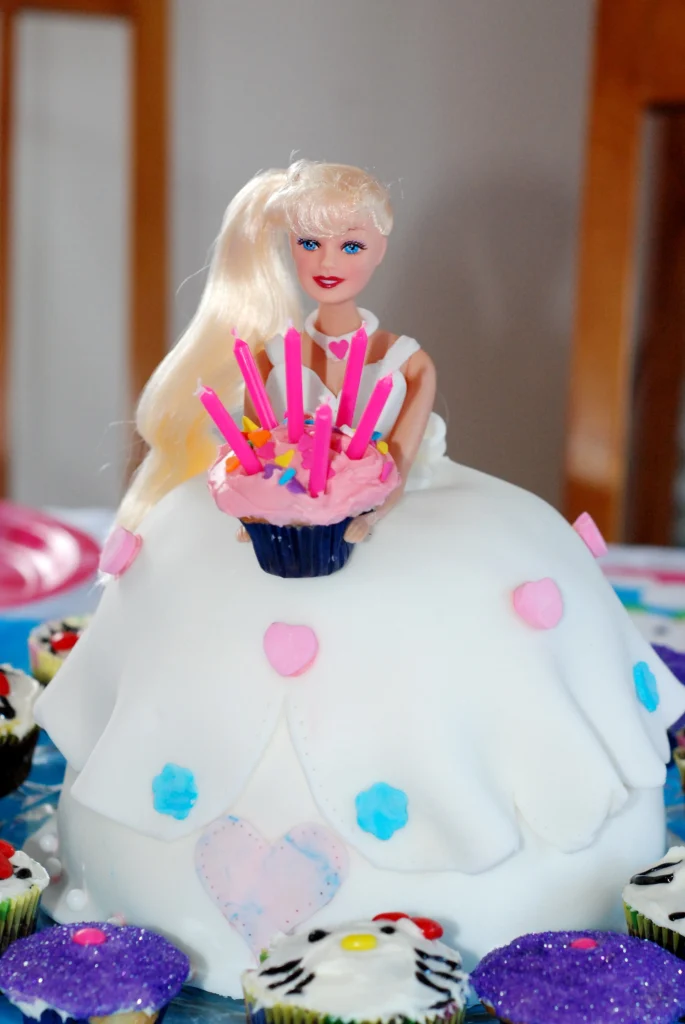
If you’re planning a magical birthday party or a special celebration for a little one who loves Barbie, a beautifully crafted Barbie cake is the perfect centerpiece to wow your guests. Whether you’re a beginner baker or a cake decorating enthusiast, creating a stunning Barbie cake is easier than you might think — and it’s a fun way to add a personal touch to the party.
In this step-by-step guide, we’ll walk you through everything from choosing the right cake recipe and decorating tools to crafting an elegant Barbie doll dress using fondant and buttercream. With simple tips and creative ideas, you’ll learn how to make a Barbie cake that’s not only delicious but also Instagram-worthy. Ready to become the ultimate party baker? Let’s dive in!
Preparing for Your Barbie Cake
Before you dive into baking and decorating, preparation is key to making your Barbie cake a stunning success. Taking some time upfront to plan and gather the right materials will save you from last-minute stress and help your creativity shine. Here’s how to get started:
Choosing the Right Barbie Doll and Theme
The first step is selecting the Barbie doll that will be the star of your cake. You can use a classic Barbie doll, a princess-themed one, or even a custom doll that fits your party’s theme. Consider whether you want to use a doll with removable legs to place directly into the cake or if you prefer to create a cake dress around the doll’s torso only. Choosing a theme early on—such as fairy princess, ballerina, or summer beach Barbie—will help guide your color choices and decorations.
Gathering Cake Decorating Tools and Ingredients
Having the right tools makes a big difference in your cake’s final look. Essential items include piping bags and tips for detailed frosting work, fondant rolling mats, smoothers, and cutters for shaping decorations, as well as food-safe brushes for painting edible details. Don’t forget ingredients like quality cake mix or scratch cake ingredients, buttercream or fondant, food coloring, edible glitter, and decorative pearls or sprinkles. Preparing everything in advance ensures a smooth decorating process.
Selecting the Perfect Cake Flavor and Recipe
The cake flavor is just as important as the design. Choose a moist and sturdy cake that can hold up well when carved and layered, such as vanilla, chocolate, or strawberry. Avoid overly crumbly cakes that might break when shaping the dress. If you’re aiming for a healthier option, consider recipes with natural ingredients or gluten-free mixes that still deliver great taste and texture.
Tips for Planning Your Barbie Birthday Cake
Finally, plan your timing carefully. Baking and cooling the cake layers thoroughly before decorating is crucial for a clean finish. Map out when you’ll bake, carve, frost, and add final touches so the cake is fresh but not rushed. Also, think about where you’ll display the cake—choose a stable cake board or stand and a cool environment to keep your cake looking flawless until it’s time to celebrate.
Baking the Cake Layers
Baking the perfect cake layers is the foundation of a stunning Barbie cake. The right texture, shape, and firmness will make decorating easier and ensure your cake looks as good as it tastes. Here’s how to bake your cake layers to perfection:
How to Bake a Moist and Fluffy Cake Base
Start with a reliable cake recipe that produces moist and fluffy layers. Whether you’re using a box mix or baking from scratch, adding ingredients like sour cream or yogurt can enhance moisture and tenderness. Be careful not to overmix the batter, as this can make the cake dense. Also, use room temperature ingredients for better blending and even baking. Properly greased and lined cake pans help your layers come out clean and smooth. For a detailed guide on making a stunning vanilla layer cake, check out this helpful tutorial here.
Using Doll-Shaped Cake Pans vs. Regular Round Pans
You have two main options when baking for a Barbie cake: specialized doll-shaped pans or standard round/square pans. Doll-shaped pans simplify the process by baking the dress shape directly, but they can be expensive or hard to find. Using regular pans gives you more flexibility and allows you to carve the dress shape yourself. If carving, bake multiple layers so you have enough height to sculpt the dress and create a dramatic skirt.
Layering and Cooling the Cake Properly
Once baked, allow your cake layers to cool completely on wire racks to prevent sogginess. Cooling is crucial because warm cake will cause frosting or fondant to melt or slide off. If you’re in a hurry, refrigerate the layers for about 30 minutes. After cooling, level the tops of each layer using a serrated knife or cake leveler to create flat surfaces, which will help your cake stack evenly.
Troubleshooting Common Baking Issues
Sometimes things don’t go as planned. If your cake sinks in the middle, it could be due to underbaking or too much leavening agent. Dry or crumbly cake? Avoid overbaking and ensure your oven temperature is accurate. If the cake sticks to the pan, make sure to grease thoroughly and use parchment paper lining. Baking at the right temperature and following the recipe closely will help you avoid these common pitfalls.
With perfectly baked and cooled layers, you’re ready to move on to shaping and decorating your Barbie cake dress — the exciting part where your creativity truly shines!
Crafting the Barbie Cake Dress
This is where your Barbie cake truly comes to life! The cake dress is the centerpiece of your creation, combining baking skills with artistic decorating to create a beautiful, princess-worthy gown. Follow these steps to shape and decorate a flawless Barbie dress that will impress all your guests.
How to Carve and Shape the Cake for the Doll’s Dress
After your cake layers have cooled and been leveled, it’s time to carve the dress shape. Start by stacking the cake layers with a layer of frosting or buttercream in between to hold them together. Use a serrated knife to gently carve the cake into a bell or A-line skirt shape that mimics a flowing gown. Take your time to smooth out edges and remove any crumbs. If you want extra height or volume, add a few more layers or cake scraps to build up the skirt before shaping.
Decorating Your Barbie Cake
Now comes the most exciting part — turning your cake into a showstopping masterpiece! Decorating your Barbie cake is where creativity takes center stage. From intricate dress details to elegant finishing touches, every element adds magic and personality. Here’s how to make your Barbie cake as glamorous and eye-catching as possible.
Adding Finishing Touches to the Dress Design
Once the basic shape and color of the dress are in place, it’s time to elevate the design with beautiful finishing details. Consider piping buttercream in layered ruffles to resemble fabric folds, or create elegant fondant drapes and pleats to mimic a high-fashion gown. You can use edible glitter, shimmer dust, or gold leaf to add sparkle and luxury. Tiny fondant bows, roses, and even edible lace give the cake a couture feel. Think of the cake as a real dress — every seam, fold, and embellishment matters.
Incorporating Edible Decorations and Embellishments
Take your decoration to the next level by incorporating edible accessories. Use edible pearls, dragees, or sugar crystals for a beaded bodice or belt. You can make fondant jewelry like necklaces, tiaras, or earrings to dress up your Barbie even more. Edible flowers, butterflies, or snowflakes (depending on your theme) can be strategically placed around the dress for a whimsical touch. Want an extra glam factor? Add a satin-finish edible ribbon around the waist or at the base of the skirt.
Decorating the Cake Base and Display Area
Don’t forget the cake base! A beautifully decorated cake board or stand completes the presentation. Wrap the edge of your cake board with ribbon and add fondant or piped accents to the base of the cake to tie it all together. You can create a scene around the Barbie—like a flower garden, a ballroom floor, or a fairyland setting—using additional fondant decorations or edible figurines. This extra step turns your Barbie cake from a simple dessert into a storybook centerpiece.
Matching Barbie’s Look with Hair and Accessories
To complete the illusion, coordinate Barbie’s actual outfit and accessories with the cake design. Style her hair with gentle curls, braids, or even an elegant updo using a small brush and water. Add mini tiaras, hair clips, or sparkle spray to match the theme of the dress. You can even swap out her earrings or add a fondant shawl or cape for a dramatic touch. These small enhancements help blend the doll seamlessly with the cake and give it a polished, professional look.
Final Touches and Presentation
After all the baking, carving, and decorating, it’s time to showcase your stunning Barbie cake! This final step focuses on adding elegant details, presenting the cake for maximum visual impact, and preparing it for serving. These little finishing touches elevate your creation from a simple cake to a true showpiece.
Setting the Stage: Display Ideas for a Barbie Cake
Your Barbie cake deserves a spotlight! Choose a cake stand or board that complements your cake’s theme and color palette. A white or gold pedestal stand adds height and elegance, while a mirrored base reflects the beauty of the skirt. Consider adding decorative elements around the cake—such as silk flowers, edible confetti, or fairy lights—to frame it in a magical setting. If the cake is for a birthday, place it at the center of the dessert table with balloons, banners, and matching treats for a coordinated look.
Storing the Cake Before Serving
To maintain freshness and protect your detailed decorations, store the cake in a cool environment. If it’s covered in buttercream, you can refrigerate it, but make sure to remove it about an hour before serving to bring it to room temperature for optimal flavor and texture. Fondant-covered cakes should be stored in a dry, cool place away from humidity, as fondant can sweat and become sticky. Use a tall cake box or acrylic cover to keep dust and debris away without ruining the design.
Photographing Your Barbie Cake for Memories or Social Media
Before you cut the cake, take the time to photograph it! Use natural light if possible and shoot from multiple angles—especially at Barbie’s eye level—to capture the dress details. Add props or themed decor in the background to create a share-worthy photo. If you’re sharing on social media or your blog, don’t forget to tag relevant hashtags like #BarbieCake, #DollCake, or #PrincessCake to join the baking community and inspire others.
Cutting and Serving Your Barbie Cake Gracefully
When it’s time to serve, remove the Barbie doll gently (you can wrap her in plastic wrap before inserting her into the cake to keep her clean). Start cutting from the back or side of the skirt to preserve the front for a little longer during serving. Use a sharp serrated knife for clean slices, and serve with a scoop of ice cream, a drizzle of sauce, or a side of fresh berries for an extra-special treat. Guests will be wowed not only by the look of the cake but also by its delicious layers and thoughtful presentation.
Choosing Between Buttercream and Fondant for Decoration
When it comes to decorating the dress, you have two main options: buttercream frosting or fondant. Buttercream is creamy, delicious, and easier for beginners to pipe into beautiful ruffles, rosettes, and other textures. Fondant provides a smooth, polished finish and is ideal for creating intricate details like pleats, bows, or lace effects. You can even combine both for a stunning effect — use buttercream as a base layer and add fondant decorations on top.
Coloring and Tinting Fondant for the Perfect Pink Princess Look
Barbie is famous for her signature pink gowns, so achieving the right shade is essential. Use gel-based food coloring to tint your fondant or buttercream, as gels provide vibrant colors without thinning your icing. Start with a small amount of color and gradually add more to reach the perfect pink hue. You can also mix in white fondant or frosting to soften the color or add shimmer with edible glitter or luster dust for a magical sparkle.
Applying Texture and Patterns to the Cake Dress
Bring your Barbie dress to life by adding textures and patterns. For buttercream, use different piping tips to create ruffles, rosettes, or lace-like designs that add dimension and elegance. Fondant can be embossed with patterned mats or textured rolling pins to mimic fabric details like quilted stitching or floral prints. You can also cut out fondant shapes like flowers, bows, or pearls and attach them to the dress for extra flair. Remember to be creative — this is your chance to make a one-of-a-kind Barbie gown!