The Best Fluffy Pancakes recipe you will fall in love with. Full of tips and tricks to help you make the best pancakes.
Halloween is the perfect time to get creative in the kitchen — where spooky meets sweet, and every dessert becomes a little work of edible art. From ghostly cupcakes and chocolate spiderweb brownies to candy corn bark and monster cookies, these spooky and sweet Halloween treats bring fun and flavor to your celebration. Whether you’re hosting a Halloween party, preparing snacks for trick-or-treaters, or just want to surprise your family with some festive sweets, there’s something here for everyone.
What makes Halloween desserts so special is their mix of imagination and indulgence. With a little food coloring, some marshmallows, and a handful of sprinkles, you can turn ordinary recipes into frightfully delicious creations. Best of all, these treats aren’t just eye-catching — they’re simple to make, kid-friendly, and guaranteed to add a magical touch to your spooky season.
So grab your mixing bowls, candy decorations, and a pinch of Halloween spirit — let’s dive into a collection of sweet and spooky dessert ideas that everyone will love!
🕸️ Introduction to Spooky and Sweet Halloween Treats
Halloween isn’t just about costumes and haunted houses — it’s also one of the most exciting times to get creative in the kitchen. As the spooky season rolls around, homes fill with the aroma of chocolate, caramel, and freshly baked cookies. It’s the perfect opportunity to transform your favorite sweets into eerie, eye-catching creations that capture the magic of Halloween night.
From spooky cupcakes decorated with candy eyes to mummy-shaped Rice Krispie treats and pumpkin fudge bites, the possibilities are endless. These spooky and sweet Halloween treats are more than just desserts — they’re little pieces of edible art that bring smiles (and a few playful scares) to every table. Whether you’re baking for a Halloween party, preparing snacks for trick-or-treaters, or creating themed desserts for a family night in, these recipes add a festive flair that everyone will adore.
What makes sweet Halloween desserts so much fun is the mix of creativity and flavor. You can easily use food coloring, marshmallows, candy corn, chocolate chips, and sprinkles to design desserts that look scary yet taste irresistibly good. Kids will love helping with simple tasks like decorating monster cookies or adding colorful toppings, while adults can enjoy the nostalgia of classic Halloween candies reimagined in homemade treats.
Halloween baking is also about making memories — gathering in the kitchen, laughing over frosting mishaps, and watching your spooky creations come to life. So whether you’re aiming for creepy or cute, gory or glamorous, this guide will help you whip up a variety of Halloween sweets recipes that are as delightful as they are delicious.
Grab your mixing bowls, a pinch of creativity, and your favorite spooky playlist — it’s time to make some sweet Halloween magic!
🕸️ Easy and Fun Halloween Dessert Ideas
Halloween is all about creativity — and your desserts should be too! Whether you want something spooky, sweet, or a mix of both, these easy Halloween dessert ideas are fun to make, delicious to eat, and perfect for parties, movie nights, or trick-or-treat gatherings. Best of all, each recipe uses simple ingredients you probably already have at home.
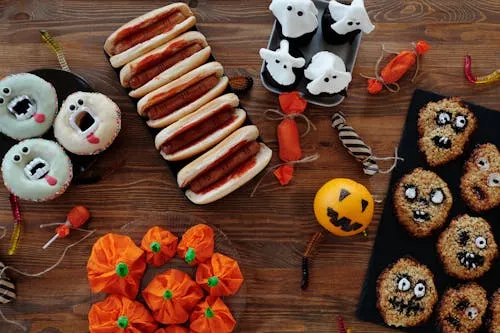
👻 1. Ghostly Cupcakes and Monster Cookies
These spooky cupcakes and cookies are guaranteed to bring smiles and screams to your Halloween table.
For Ghostly Cupcakes:
- 1 box (15.25 oz) chocolate cake mix
- 3 large eggs
- 1/2 cup vegetable oil
- 1 cup water
- 2 cups vanilla frosting
- Mini chocolate chips (for ghost eyes)
Instructions:
- Preheat oven to 350°F (175°C) and line a muffin tin with Halloween-themed cupcake liners.
- Prepare cake mix according to package directions, pour into liners, and bake for 18–20 minutes.
- Once cooled, pipe white frosting on top to form ghost shapes.
- Add two mini chocolate chips for eyes — and your edible ghosts are ready!
For Monster Cookies:
- 1 cup unsalted butter, softened
- 3/4 cup brown sugar
- 3/4 cup granulated sugar
- 2 large eggs
- 1 tsp vanilla extract
- 2 1/4 cups all-purpose flour
- 1 tsp baking soda
- 1/2 tsp salt
- 1 cup chocolate chips
- Candy eyes and colored frosting for decoration
Mix and bake at 350°F (175°C) for 10–12 minutes, then decorate with frosting and candy eyes to create goofy monsters!
🎃 2. Pumpkin and Mummy Rice Krispie Treats
A no-bake Halloween dessert that’s perfect for kids!
You’ll need:
- 3 tbsp unsalted butter
- 1 package (10 oz) marshmallows
- 6 cups Rice Krispies cereal
- Orange food coloring
- Candy eyes and melted white chocolate
Instructions:
- Melt butter and marshmallows in a large saucepan over low heat.
- Stir in orange food coloring until evenly tinted.
- Mix in Rice Krispies cereal and combine well.
- Shape into pumpkins or bars; drizzle with melted white chocolate to form “mummy wraps.”
- Add candy eyes before the chocolate sets.
These treats are sweet, chewy, and perfectly spooky — plus, they make great classroom snacks!
🍫 3. Chocolate Halloween Bark with Candy Corn
A crunchy, colorful dessert that takes just minutes to make.
Ingredients:
- 2 cups semi-sweet chocolate chips
- 1/2 cup white chocolate chips (for drizzle)
- 1/3 cup candy corn
- 1/4 cup pretzel pieces
- Halloween sprinkles
Instructions:
- Line a baking sheet with parchment paper.
- Melt the chocolate chips in the microwave in 30-second intervals, stirring until smooth.
- Spread melted chocolate into a rectangle about 1/4 inch thick.
- Sprinkle candy corn, pretzel pieces, and Halloween sprinkles evenly on top.
- Melt the white chocolate and drizzle for decoration.
- Chill in the fridge for 30 minutes, then break into pieces.
This easy Halloween bark is perfect for gifting or snacking during your spooky movie night.
🕷️ 4. No-Bake Spiderweb Brownies or Fudge
A treat that’s as eerie as it is indulgent!
For Spiderweb Brownies:
- 1 box (18 oz) brownie mix
- 2 large eggs
- 1/2 cup vegetable oil
- 3 tbsp water
- 1/2 cup white chocolate or frosting for web design
Instructions:
- Bake brownies according to package directions and let cool.
- Use melted white chocolate or white frosting to draw spiderwebs on top.
- Add a chocolate candy or peanut butter cup in the center as the “spider.”
For No-Bake Fudge Variation:
- 1 can (14 oz) sweetened condensed milk
- 3 cups chocolate chips
- 1 tsp vanilla extract
Melt together, pour into a pan, chill until firm, and decorate with spiderweb lines — quick, rich, and irresistibly spooky!
🍬 Creative Halloween Candy and Snack Recipes
Halloween wouldn’t be complete without candy — and making your own homemade treats is even more fun! These creative Halloween candy and snack recipes are easy, colorful, and perfect for parties, school events, or movie nights. They’re a mix of sweet and salty, chewy and crunchy, with just the right spooky twist.
🍭 1. Homemade Candy Corn Bark
If you love classic Halloween candy, this candy corn chocolate bark will be your new favorite. It’s easy, festive, and makes a great edible gift!
Ingredients:
- 2 cups (340 g) white chocolate chips
- 1 cup (170 g) semi-sweet chocolate chips
- 1/2 cup (75 g) candy corn
- 1/4 cup (25 g) pretzel pieces (optional)
- 2 tbsp Halloween sprinkles
Instructions:
- Line a baking sheet with parchment paper.
- Melt the white chocolate chips in a microwave-safe bowl, heating in 30-second intervals and stirring until smooth.
- Spread the melted chocolate evenly into a thin layer (about 1/4 inch thick).
- Sprinkle candy corn, pretzel pieces, and Halloween sprinkles over the top.
- Melt semi-sweet chocolate chips and drizzle over the surface to create a marbled effect.
- Refrigerate for 30 minutes, then break into pieces.
💡 Tip: Wrap bark pieces in clear plastic bags with Halloween ribbons for a festive homemade gift!
🍿 2. Monster Popcorn Mix with Marshmallows and Sprinkles
This colorful, crunchy snack mix is a Halloween party favorite — perfect for movie nights, classroom treats, or trick-or-treat goodie bags.
Ingredients:
- 8 cups (about 2.5 L) popped popcorn
- 1 cup (150 g) mini marshmallows
- 1/2 cup (100 g) candy-coated chocolates (like M&Ms)
- 1/2 cup (50 g) pretzels, broken into small pieces
- 1/4 cup (50 g) melted white chocolate
- Halloween sprinkles
Instructions:
- Place popcorn in a large mixing bowl and remove any unpopped kernels.
- Add mini marshmallows, candy-coated chocolates, and pretzel pieces.
- Drizzle melted white chocolate over the mix and toss gently to coat.
- Sprinkle with Halloween sprinkles for a festive touch.
- Let sit for 15–20 minutes to set before serving.
👀 Variation: Add candy eyes or colored chocolate drizzle to make it look like a bowl of “monster mix.”
🕷️ 3. Sweet and Salty Halloween Snack Cups
These snack cups are bite-sized, easy to serve, and loaded with everyone’s favorite Halloween candies. Great for both kids and adults!
Ingredients:
- 2 cups (100 g) caramel popcorn
- 1 cup (150 g) pretzels, roughly broken
- 1 cup (160 g) candy corn
- 1/2 cup (100 g) peanuts or almonds (optional)
- 1/4 cup (50 g) melted chocolate or peanut butter
- Small paper baking cups or mini cauldron cups
Instructions:
- In a large bowl, combine caramel popcorn, pretzels, candy corn, and nuts.
- Drizzle melted chocolate or peanut butter over the mixture and toss gently.
- Spoon the mixture into small serving cups or mini cauldrons.
- Top with a few candy eyes or colorful sprinkles for a spooky finish.
💀 Tip: Serve these on a dessert table alongside cupcakes and brownies for a mix of textures and flavors.
🧡 4. Gooey Halloween Marshmallow Bites
These no-bake treats are soft, chewy, and absolutely adorable — like a mix between a candy and a snack!
Ingredients:
- 3 tbsp (40 g) butter
- 1 bag (10 oz / 283 g) mini marshmallows
- 4 cups (120 g) cornflakes cereal
- Orange and black food coloring
- Candy eyes or sprinkles for decoration
Instructions:
- In a saucepan, melt butter over low heat.
- Add marshmallows and stir until melted and smooth.
- Divide the mixture into two bowls — tint one orange and one black with food coloring.
- Stir 2 cups of cornflakes into each colored marshmallow mixture until coated.
- Use greased hands to shape small balls or clusters and place them on parchment paper.
- Decorate with candy eyes or sprinkles while still warm.
These are cute, chewy, and just the right amount of spooky, perfect for both kids and adults!
🧁 Why You’ll Love These Recipes
All of these Halloween candy and snack recipes are:
- Quick and easy — most ready in under 30 minutes
- Kid-friendly — fun for family baking time
- Perfect for parties — colorful, creative, and crowd-pleasing
- Customizable — mix and match your favorite candies, nuts, or cereals
So, whether you’re hosting a spooky Halloween party, preparing goodie bags for trick-or-treaters, or just craving something sweet and crunchy, these recipes will make your celebration unforgettable.
🎨 Tips for Decorating and Serving Halloween Treats
Halloween is the one time of year when your desserts can be as creepy, colorful, or cute as you want! Whether you’re crafting ghostly cupcakes, monster cookies, or candy corn bark, the right decorations and presentation can transform simple desserts into unforgettable spooky masterpieces. Here are some creative tips for decorating and serving Halloween treats that will take your table from sweet to spectacular.
🕷️ 1. How to Make Desserts Look Spooky Yet Cute
You don’t have to be a professional baker to create picture-perfect Halloween sweets. A few simple decorating tricks can make your desserts stand out!
Tips & Tools:
- Food Coloring: Use orange, black, purple, and green to tint frosting, cake batter, or candy melts. Gel-based colors give a vibrant finish.
- Edible Eyes: Add candy eyes to cookies, cupcakes, and Rice Krispie treats to instantly give them personality.
- Sprinkles & Sugar Crystals: Choose Halloween-themed sprinkles — bats, pumpkins, bones, or spider shapes — for easy decoration.
- Piping Bags: Use a piping bag (or a zip-top bag with a snipped corner) to draw spiderwebs, stitches, and mummy wraps.
- Chocolate Drizzles: Melted chocolate or candy melts are great for drawing ghosts, cobwebs, and drips of “monster slime.”
💡 Pro tip: If you want an extra spooky effect, drizzle red-colored white chocolate over desserts to mimic “bloody” details — perfect for Halloween cupcakes or brownies.
🎃 2. Setting Up a Halloween Dessert Table
A well-decorated dessert table can instantly become the star of your party. The goal is to make it fun, themed, and irresistibly inviting.
How to Style Your Table:
- Theme It: Choose a fun theme like “Haunted Bakery,” “Monster Lab,” or “Witch’s Kitchen.”
- Decor Elements: Add small pumpkins, fake cobwebs, black lace, candles, and LED string lights.
- Height and Display: Use cake stands, cauldrons, and jars to create different heights and textures.
- Serving Dishes: Serve candy or popcorn in small cauldrons, cupcakes on tiered trays, and cookies in clear glass jars.
- Labels & Signs: Create spooky food labels such as “Witch’s Fingers” (cookies), “Bat Wings” (chocolate bark), or “Monster Munch” (popcorn mix).
🕸️ Tip: Cover your table with a black or orange cloth and scatter fake spiders or plastic bones for extra Halloween flair.
👻 3. Safe and Fun Baking Ideas for Kids
Halloween baking is a great opportunity for kids to unleash their creativity — and get a little messy in the process! Keep it fun, easy, and safe.
Kid-Friendly Decorating Ideas:
- Let them dip cookies in chocolate and add sprinkles or candy eyes.
- Provide pre-filled piping bags with colored frosting for easy decorating.
- Offer no-bake projects like Rice Krispie pumpkins or monster popcorn cups.
- Use silicone molds for bite-sized candy or gummies — easy and safe for little hands.
⚠️ Safety Tip: If kids are helping, keep hot tools (like microwaves and ovens) out of reach, and let them handle only cool, pre-prepped ingredients.
🧁 4. Serving Tips for Halloween Parties
Once your desserts are decorated, it’s time to make sure they’re displayed and served in the most festive (and practical) way possible!
Serving Suggestions:
- Serve cupcakes or cookies on tiered stands to create a “haunted tower” effect.
- Place brownies, fudge, or bark in small themed boxes or bags for guests to take home.
- Offer snack cups or mini cauldrons for popcorn mixes, so guests can easily grab and enjoy.
- Keep chilled desserts like pudding cups or mousse on ice if serving outdoors.
💀 Party Tip: Add small “fog effects” with dry ice in a cauldron behind your dessert table — it creates a spooky, mysterious atmosphere everyone will love!
🕯️ Why Decorating and Serving Matter
Beautifully decorated Halloween treats do more than satisfy a sweet tooth — they set the mood, delight your guests, and make your Halloween party unforgettable. Whether your goal is spooky elegance or playful chaos, a few creative touches will transform your table into the ultimate Halloween dessert display.
🕯️ Storing, Sharing, and FAQs
After spending time crafting your spooky cupcakes, monster cookies, and candy corn bark, you’ll want to make sure they stay as fresh and delicious as the day you made them. Proper storage and presentation can make all the difference — especially if you’re preparing ahead for a Halloween party or gifting your sweet creations to friends and neighbors. Here’s everything you need to know about storing, sharing, and frequently asked questions about your Halloween desserts.
🧊 1. How to Store Halloween Desserts Properly
Keeping your Halloween treats fresh ensures their texture and flavor stay perfect for days. Different types of sweets have different storage needs:
Cookies and Cupcakes
- Store in an airtight container at room temperature for up to 3–4 days.
- Add a small slice of bread to the container to keep cookies soft and moist.
- If frosted, keep cupcakes refrigerated for up to 5 days, then let them come to room temperature before serving.
Chocolate Bark and Fudge
- Store layered between sheets of parchment paper in an airtight tin.
- Keep at cool room temperature or in the fridge for up to 2 weeks.
- Avoid direct sunlight to prevent melting.
Rice Krispie Treats and Popcorn Mixes
- Keep in sealed plastic bags or containers at room temperature for 2–3 days.
- Avoid refrigeration, which can make them too hard.
💡 Tip: For longer storage, most baked Halloween treats can be frozen for up to 2 months. Wrap tightly in plastic wrap, then place in a freezer-safe bag or container.
🎁 2. Sharing and Gifting Halloween Treats
One of the best parts of Halloween is sharing your homemade sweets! Whether you’re preparing classroom snacks, office goodies, or neighborly gifts, a little creative packaging makes your treats even more special.
Ideas for Sharing:
- Pack cookies or candy bark in clear cellophane bags tied with orange and black ribbons.
- Place cupcakes in individual cupcake boxes or mini cauldrons for a spooky presentation.
- Fill mason jars with layered popcorn mix, candy corn, or Halloween trail mix, then decorate with stickers and labels.
- Use mini treat boxes or paper bags for party favors — add tags like “Witch’s Bites” or “Monster Munch.”
🎃 Pro tip: Always include a label if your treats contain common allergens (nuts, dairy, gluten, etc.) — especially if you’re sharing them at parties or school events.
⏰ 3. Can You Make Halloween Treats Ahead of Time?
Absolutely! Most Halloween desserts can be made a few days in advance, saving you time before the big event.
Make-Ahead Timeline:
- 3–4 days before: Bake cookies or cupcakes (store unfrosted, then decorate closer to serving).
- 2 days before: Prepare chocolate bark, fudge, or popcorn mix.
- 1 day before: Assemble Rice Krispie treats, frost cupcakes, or finish any candy decorations.
If you’re short on time, choose no-bake recipes like monster popcorn or marshmallow bites — they can be whipped up in less than 30 minutes!
❓ 4. Frequently Asked Questions (FAQs)
Q1: How long do Halloween desserts last?
Most baked or no-bake Halloween treats last 3–5 days at room temperature when stored properly. Chocolate-based desserts can last longer, up to 2 weeks if refrigerated.
Q2: Can I freeze decorated cupcakes or cookies?
Yes — freeze them on a tray until solid, then wrap individually in plastic wrap and store in airtight containers. Let them thaw at room temperature before serving.
Q3: What’s the best way to transport Halloween treats?
Use sturdy plastic containers or bakery boxes lined with parchment paper. For frosted desserts, insert toothpicks to keep the lids from touching the frosting.
Q4: How can I prevent treats from sticking together?
Separate layers with wax paper or parchment paper, especially when packing fudge, cookies, or chocolate bark.


