The Best Fluffy Pancakes recipe you will fall in love with. Full of tips and tricks to help you make the best pancakes.
Sesame Street has been a beloved part of childhood for generations, making a Sesame Street-themed cake the perfect centerpiece for a kid’s birthday party. Whether your little one adores Elmo, Cookie Monster, or Big Bird, a cake inspired by these iconic characters is sure to bring smiles and excitement to the celebration.
Creating a Sesame Street cake might seem challenging, but with the right tools, ingredients, and decorating tips, you can easily make a stunning and delicious cake at home. In this guide, we’ll walk you through choosing the perfect design, essential baking and decorating techniques, and expert tips to make your cake stand out.
Ready to bring the magic of Sesame Street to your dessert table? Let’s get started!
Choosing the Perfect Sesame Street Cake Design
One of the most exciting parts of making a Sesame Street-themed cake is deciding on the design. With so many beloved characters and fun color combinations, you have endless creative possibilities. Whether you’re making a simple character face cake or an elaborate tiered masterpiece, your design should match the theme of the party and the personality of the birthday child. Here are some fun and creative ideas to help you choose the perfect Sesame Street cake design:
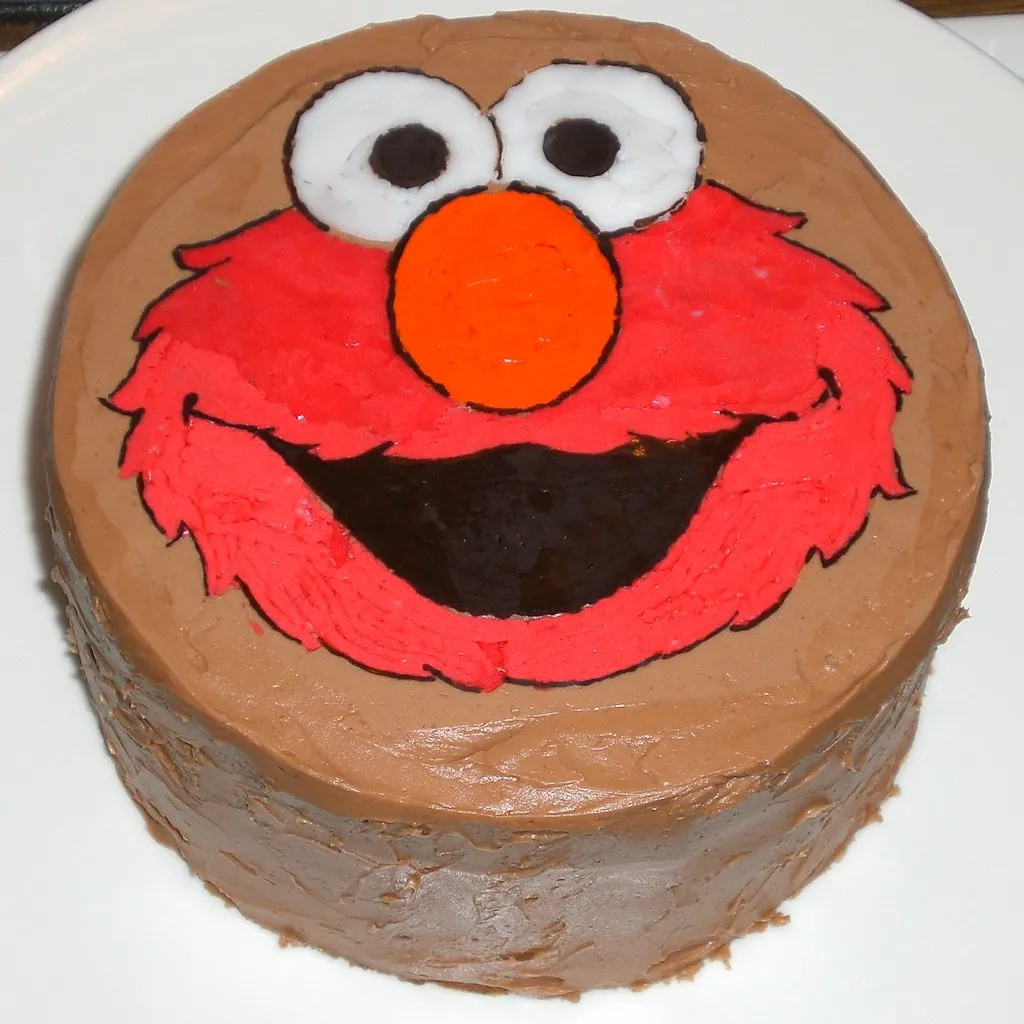
1. Elmo Cake Design: The Red, Furry Favorite
Elmo is one of the most recognizable Sesame Street characters, making him a fantastic choice for a Sesame Street birthday cake. To create an Elmo cake:
- Use red buttercream frosting or red-colored fondant to cover the cake.
- Pipe textured buttercream “fur” using a star piping tip for a realistic look.
- Use white fondant or frosting to create Elmo’s large round eyes and a small black fondant piece for the pupils.
- Shape a bright orange nose from fondant or an orange candy.
- Finish with a black frosting smile to bring Elmo’s cheerful expression to life.
💡 Pro Tip: A smash cake version of Elmo is a fun option for a first birthday!
2. Cookie Monster Cake: A Deliciously Fun Option
If your child loves cookies, why not make a Cookie Monster cake? This design is fun, simple, and can even include real cookies!
- Start with blue buttercream frosting and use a piping bag with a grass tip to create Cookie Monster’s fluffy fur.
- Make large white fondant eyes, placing them slightly off-centered for that goofy Cookie Monster look.
- Use black fondant or chocolate discs for the pupils.
- Add a wide open mouth using black frosting or fondant.
- Stick a real chocolate chip cookie halfway into Cookie Monster’s mouth for an extra fun touch!
💡 Pro Tip: Want an easier version? Decorate blue-frosted cupcakes with mini Cookie Monster faces!
3. Big Bird and Friends: A Colorful Sesame Street Cake
If you want a cake that showcases multiple characters, consider a multi-character Sesame Street cake featuring Big Bird, Oscar the Grouch, Bert, Ernie, and Abby Cadabby! Here are some ways to design it:
- Single-layer cake: Divide the cake into different sections and decorate each with a different character’s face using fondant and frosting.
- Tiered cake: Make a two or three-tier cake, with each tier dedicated to a different character (e.g., Big Bird on the bottom, Cookie Monster in the middle, and Elmo on top).
- Character toppers: Use fondant figures or printed edible toppers to add multiple Sesame Street friends to your cake.
💡 Pro Tip: Adding Sesame Street street sign toppers with the child’s name (e.g., “Emma’s Street”) gives the cake a personalized touch!
4. Tiered Sesame Street Cake: A Grand Celebration Piece
If you want to go all out, a tiered Sesame Street cake is an impressive choice, perfect for a big birthday celebration. Some design ideas include:
- Bottom tier: A blue base with Cookie Monster’s face and cookies scattered around.
- Middle tier: A bright yellow tier featuring Big Bird’s face and feather details.
- Top tier: A red Elmo face with piped fur texture.
- Finishing touches: Add fondant letters, stars, or Sesame Street logo toppers to complete the look.
💡 Pro Tip: Use different cake flavors for each tier, like vanilla for Elmo, chocolate for Cookie Monster, and lemon for Big Bird!
Essential Ingredients and Tools You’ll Need
Before you start decorating your Sesame Street-themed cake, it’s important to gather all the necessary ingredients and tools. Having everything prepared ahead of time will make the process smoother and ensure your cake turns out just as you imagined. From the cake base to the decorating supplies, here’s everything you’ll need to create a stunning Sesame Street cake.
1. Choosing the Right Cake Base
The foundation of any great cake is a delicious and sturdy base. Since Sesame Street cakes are often decorated with buttercream frosting and fondant, you’ll want a cake that can hold up well under the decorations. Here are some great options:
1. Classic Vanilla Cake (Best for Versatility & Light Flavor)
Vanilla cake is a soft, fluffy option that pairs well with any frosting flavor, making it perfect for a Sesame Street-themed cake.
Ingredients:
- 2 ½ cups all-purpose flour
- 2 ½ teaspoons baking powder
- ½ teaspoon salt
- 1 cup unsalted butter, softened
- 2 cups granulated sugar
- 4 large eggs
- 1 tablespoon vanilla extract
- 1 cup whole milk
Instructions:
- Preheat oven to 350°F (175°C). Grease and flour two 8-inch cake pans.
- In a bowl, whisk together flour, baking powder, and salt.
- In a separate bowl, beat butter and sugar until light and fluffy. Add eggs one at a time, mixing well.
- Stir in vanilla extract.
- Alternate adding dry ingredients and milk, mixing until smooth.
- Divide batter evenly into cake pans and bake for 30–35 minutes.
- Let cool completely before frosting.
💡 Pro Tip: For extra flavor, add a teaspoon of almond extract or lemon zest.
2. Rich Chocolate Cake (Best for a Decadent, Moist Cake)
Chocolate cake adds a deep, indulgent flavor, making it a great base for a fun and delicious Sesame Street cake.
Ingredients:
- 2 cups all-purpose flour
- ¾ cup unsweetened cocoa powder
- 2 teaspoons baking soda
- ½ teaspoon salt
- 1 cup unsalted butter, softened
- 2 cups granulated sugar
- 4 large eggs
- 1 ½ teaspoons vanilla extract
- 1 cup buttermilk
- 1 cup hot water
Instructions:
- Preheat oven to 350°F (175°C) and prepare two 8-inch cake pans.
- In a bowl, whisk together flour, cocoa powder, baking soda, and salt.
- In another bowl, cream together butter and sugar until fluffy. Add eggs one at a time, then mix in vanilla extract.
- Alternate adding dry ingredients and buttermilk, mixing well.
- Slowly pour in hot water and stir until fully incorporated.
- Bake for 30–35 minutes, then let cool before decorating.
💡 Pro Tip: Use hot coffee instead of water to enhance the chocolate flavor.
3. Funfetti Cake (Best for a Kid-Friendly, Colorful Surprise!)
Funfetti cake is a bright and festive option that makes every Sesame Street cake extra fun for kids.
Ingredients:
- 2 ½ cups all-purpose flour
- 2 ½ teaspoons baking powder
- ½ teaspoon salt
- 1 cup unsalted butter, softened
- 2 cups granulated sugar
- 4 large eggs
- 1 tablespoon vanilla extract
- 1 cup whole milk
- ½ cup rainbow sprinkles (jimmies, not nonpareils)
Instructions:
- Follow the vanilla cake recipe steps (above), but fold in rainbow sprinkles at the end.
- Be careful not to overmix, as the sprinkles can bleed color into the batter.
- Bake as directed and let cool before frosting.
💡 Pro Tip: Use jimmies-style sprinkles, as nonpareils tend to dissolve into the batter.
4. Rainbow Cake (Best for a Stunning, Multicolored Effect)
Rainbow cake is perfectly on-theme with Sesame Street’s bright colors! It features layers of vibrant cake, making each slice exciting.
Ingredients:
- 2 ½ cups all-purpose flour
- 2 ½ teaspoons baking powder
- ½ teaspoon salt
- 1 cup unsalted butter, softened
- 2 cups granulated sugar
- 4 large eggs
- 1 tablespoon vanilla extract
- 1 cup whole milk
- Gel food coloring (red, orange, yellow, green, blue, purple)
Instructions:
- Follow the vanilla cake recipe steps (above).
- Divide the batter into 6 bowls, adding a different gel food color to each bowl.
- Pour each colored batter into separate 6-inch cake pans (or bake in batches).
- Bake for 18–22 minutes per layer, then let cool completely.
- Stack layers in rainbow order with frosting in between.
💡 Pro Tip: Use parchment paper circles in the pans to prevent sticking.
5. Red Velvet Cake (Best for an Elmo-Themed Surprise!)
Red velvet cake is a delicious, slightly tangy cake that matches Elmo’s bright red fur when sliced!
Ingredients:
- 2 ½ cups all-purpose flour
- 2 tablespoons cocoa powder
- 1 teaspoon baking soda
- ½ teaspoon salt
- 1 cup unsalted butter, softened
- 2 cups granulated sugar
- 4 large eggs
- 1 teaspoon vanilla extract
- 1 teaspoon white vinegar
- 1 ¼ cups buttermilk
- 2 tablespoons red gel food coloring
Instructions:
- Preheat oven to 350°F (175°C) and grease two 8-inch cake pans.
- Whisk together flour, cocoa powder, baking soda, and salt.
- In another bowl, beat butter and sugar until fluffy. Add eggs one at a time, then stir in vanilla and vinegar.
- Alternate adding dry ingredients and buttermilk, mixing well.
- Stir in red gel food coloring until fully combined.
- Bake for 30–35 minutes and let cool completely before frosting.
💡 Pro Tip: Use high-quality cocoa powder for a deeper flavor.
Which Cake Base Should You Choose?
- For a classic taste that works with any frosting: Vanilla Cake
- For a rich, chocolatey treat: Chocolate Cake
- For a fun, festive kid’s cake: Funfetti Cake
- For a stunning, colorful surprise: Rainbow Cake
- For an Elmo-themed delight: Red Velvet Cake
Each cake base offers something unique, making it easy to create a Sesame Street cake that’s both visually stunning and delicious!
2. Frosting Choices for Your Sesame Street Cake
The right frosting will enhance the cake’s flavor and help bring your design to life. Here are some frosting options and when to use them:
1. Buttercream Frosting (Best for Textured Designs)
Buttercream is the most versatile and beginner-friendly frosting, making it ideal for creating Elmo’s fur, Cookie Monster’s fluff, and other textured designs with a piping bag.
Ingredients:
- 1 cup (2 sticks) unsalted butter, softened
- 4 cups powdered sugar
- 2–3 tablespoons heavy cream or milk
- 1 teaspoon vanilla extract
- Food coloring (red for Elmo, blue for Cookie Monster, etc.)
Instructions:
- In a large bowl, beat the softened butter with an electric mixer on medium speed until smooth and creamy (about 2 minutes).
- Gradually add powdered sugar, 1 cup at a time, mixing on low speed to prevent mess.
- Pour in heavy cream and vanilla extract, then increase to high speed and beat until fluffy (about 3 minutes).
- Divide into bowls and mix in gel food coloring to get vibrant Sesame Street colors.
- Use a grass piping tip (Wilton #233) to create Elmo’s fur or Cookie Monster’s texture.
💡 Pro Tip: If the buttercream is too thick, add a teaspoon of heavy cream at a time. If it’s too thin, add more powdered sugar.
2. Fondant (Best for Smooth Finishes & Sculpting)
Fondant is perfect for covering cakes smoothly and creating Sesame Street characters, eyes, and decorations.
Ingredients:
- 1 bag (10 oz) mini marshmallows
- 2 tablespoons water
- 4 cups powdered sugar
- 1 tablespoon vegetable shortening
- Gel food coloring
Instructions:
- Microwave the marshmallows and water in a heatproof bowl for 30 seconds, stirring until melted.
- Add powdered sugar, 1 cup at a time, mixing until a dough forms.
- Knead with vegetable shortening until smooth and pliable.
- Add gel food coloring to small pieces to create red, blue, yellow, and black fondant.
- Roll out and use cutters or molds to create Elmo’s eyes, Cookie Monster’s mouth, and Big Bird’s beak.
💡 Pro Tip: Keep fondant covered with plastic wrap when not in use to prevent drying out.
3. Whipped Cream Frosting (Best for Light & Airy Cakes)
Whipped cream frosting is soft, fluffy, and perfect for simple Sesame Street cake designs. However, it’s less stable than buttercream.
Ingredients:
- 2 cups heavy whipping cream
- ¼ cup powdered sugar
- 1 teaspoon vanilla extract
- Gel food coloring
Instructions:
- In a chilled bowl, beat heavy cream on high speed until soft peaks form.
- Add powdered sugar and vanilla extract, then continue beating until stiff peaks form.
- Mix in gel food coloring as needed.
- Pipe or spread onto your cake.
💡 Pro Tip: Keep whipped cream cakes refrigerated until serving, as this frosting can melt at room temperature.
4. Chocolate Ganache (Best for a Rich, Decadent Flavor)
Ganache is a luxurious chocolate coating, but it’s less common for bright Sesame Street cakes since it’s usually dark brown.
Ingredients:
- 8 oz semi-sweet chocolate, chopped
- 1 cup heavy cream
Instructions:
- Heat heavy cream in a saucepan until steaming (but not boiling).
- Pour over chopped chocolate and let sit for 2 minutes.
- Stir until smooth and glossy.
- Let cool slightly, then pour over the cake for a rich, smooth finish.
💡 Pro Tip: For a firmer ganache, refrigerate for 30 minutes and then whip it for a spreadable consistency.
Which Frosting Should You Choose?
- For textured designs (Elmo’s fur, Cookie Monster’s fluff): Use buttercream with a piping tip.
- For smooth, sculpted decorations (Sesame Street characters, details): Use fondant.
- For a light, creamy finish: Use whipped cream frosting (best for refrigerated cakes).
- For a rich chocolate option: Use ganache, though it’s less common for bright, colorful designs.
Each frosting option adds a unique touch to your Sesame Street cake. Choose the one that fits your cake style, skill level, and taste preferences!
For a smooth and effortless cake-making process, consider using the Ninja CI101 750-Peak-Watt Immersion Electric Mixer. It’s powerful, easy to use, and perfect for mixing cake batters and frostings efficiently.
3. Decorating Tools for a Professional Look
Having the right tools will make decorating your Sesame Street cake easier and more enjoyable. Here’s what you’ll need:
- Piping Bags and Tips: Essential for creating fur textures (use a grass tip for Cookie Monster’s fur and a star tip for Elmo’s texture).
- Offset Spatula: Helps spread buttercream smoothly for a polished look.
- Fondant Tools: Rolling pins, cutters, and shaping tools for making character eyes, noses, and facial details.
- Edible Markers: Great for adding small facial details and writing on the cake.
- Cake Turntable: Makes decorating easier by allowing you to rotate the cake while piping or smoothing frosting.
- Cookie Cutters: Use round cutters for making perfectly shaped eyes, noses, and mouths out of fondant.
💡 Pro Tip: If you’re new to decorating, practice piping on a piece of parchment paper before working on the actual cake!
4. Edible Decorations and Cake Toppers
To bring your Sesame Street cake to life, you’ll need the right edible decorations and toppers. Here are some ideas:
- Fondant Characters: Create Elmo, Cookie Monster, Big Bird, and more using colored fondant.
- Edible Sugar Eyes: Perfect for making realistic character faces without sculpting.
- Sprinkles and Confetti: Add bright and playful colors that match the Sesame Street theme.
- Sesame Street Street Sign Topper: Personalize it with the birthday child’s name (e.g., “Emma’s Street” or “Oliver’s Street”).
- Pre-Made Cake Toppers: If you want a simpler approach, you can buy edible Sesame Street character toppers or plastic figurines to place on the cake.
💡 Pro Tip: If you don’t have time to shape characters from fondant, use Sesame Street toys as cake toppers—just make sure they’re clean and safe for food contact!
Step-by-Step Guide to Decorating Your Sesame Street Cake
Now that you have your cake baked, frosting ready, and tools on hand, it’s time for the most exciting part—decorating your Sesame Street-themed cake! Whether you’re making an Elmo cake, Cookie Monster cake, or a multi-character design, following these step-by-step instructions will help you create a show-stopping cake that looks just as good as it tastes.
1. Preparing Your Cake for Decorating
Before adding decorations, you need a smooth and sturdy base to work with. Follow these steps:
- Level Your Cake Layers: Use a serrated knife or cake leveler to trim the tops of your cakes for an even surface. This ensures stability when stacking layers.
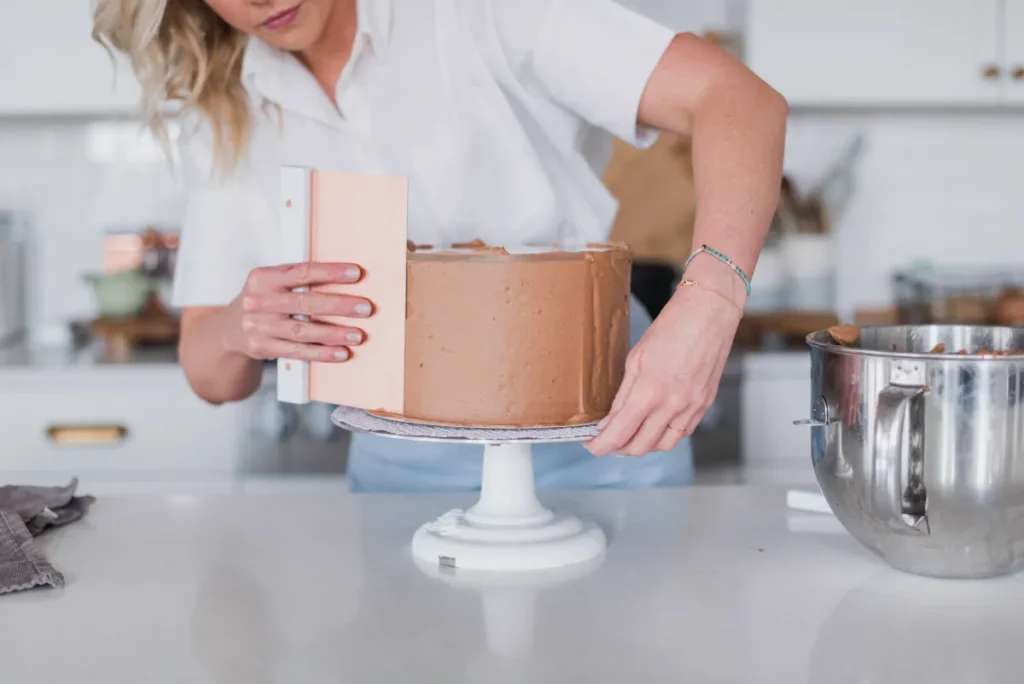
- Apply a Crumb Coat: Spread a thin layer of buttercream frosting over the cake to trap loose crumbs. Chill the cake in the refrigerator for 15–30 minutes until the frosting firms up.
- Add a Final Frosting Layer: Once the crumb coat is set, apply a smooth final layer of frosting using an offset spatula. If using fondant, this layer will help it adhere.
💡 Pro Tip: Chilling the cake before adding fondant prevents bulging and makes smoothing easier!
2. Covering Your Cake with Fondant or Buttercream
Depending on your chosen design, you’ll either frost the cake with buttercream or cover it in fondant.
- For Buttercream Designs (e.g., Elmo or Cookie Monster’s fur):
- Use a piping bag with a star or grass tip to create a fur-like texture.
- Work in small sections, piping in layers to build up a fluffy effect.
- Choose red for Elmo, blue for Cookie Monster, or yellow for Big Bird.
- For Fondant Designs (Smooth Character Faces or Tiers):
- Roll out pre-colored fondant (red, blue, yellow, green, etc.).
- Gently drape the fondant over the cake and smooth it using a fondant smoother.
- Trim off any excess fondant from the bottom using a sharp knife or pizza cutter.
💡 Pro Tip: If making a tiered cake, insert wooden dowels or bubble tea straws into the bottom tier before stacking the next layer for extra support.
3. Creating Sesame Street Character Faces
Adding the Sesame Street character faces is what makes the cake special! Whether you’re making an Elmo cake, Cookie Monster cake, or a cake with multiple characters, follow these steps:
How to Make an Elmo Face Cake:
- Eyes: Roll out white fondant and cut out two circles. Add small black fondant circles for pupils.
- Nose: Shape an orange fondant ball into an oval and place it between the eyes.
- Mouth: Cut a black fondant semicircle for Elmo’s open mouth.
- Fur Texture (if using buttercream): Use a star piping tip to create Elmo’s red fur all over the cake.
Cookie Monster Cake:
- Eyes: Make two large white fondant circles and position them slightly uneven for Cookie Monster’s silly look.
- Mouth: Create a large black fondant semicircle, or pipe black frosting in the shape of an open mouth.
- Cookie Accent: Add a real or fondant cookie sticking out of Cookie Monster’s mouth for an extra fun touch!
- Fur Texture: Use a grass piping tip and blue buttercream to pipe Cookie Monster’s fluffy fur.
Big Bird Cake:
- Eyes & Beak: Cut out fondant shapes to create Big Bird’s eyes and bright orange beak.
- Feather Effect: Use a leaf piping tip or thin fondant strips to add a feathered texture to the cake.
💡 Pro Tip: Use edible markers to outline eyes and add extra details!
4. Adding the Final Details and Decorations
Once your character faces are complete, add extra decorations to enhance the Sesame Street theme:
- Sesame Street Sign Topper: Create a fondant or paper topper shaped like the iconic street sign with the child’s name (e.g., “Emma’s Street”).
- Fondant Letters & Numbers: Cut out the child’s age or name using fondant alphabet cutters.
- Colorful Sprinkles & Confetti: Add extra colorful sprinkles around the base of the cake to match Sesame Street’s fun and playful theme.
- Stars & Balloons: Use fondant or edible decorations to add fun finishing touches around the cake.
- Character Cupcake Accents: If making Sesame Street cupcakes, decorate each one with a different character’s face!
💡 Pro Tip: If you’re short on time, buy pre-made edible Sesame Street cake toppers to simplify decorating.
5. Presenting & Storing Your Sesame Street Cake
After all your hard work, it’s time to show off your Sesame Street cake and keep it fresh until the party!
- For the best presentation: Place the cake on a cake stand or decorative board that matches the theme.
- If storing overnight: Keep the cake in a cake box or airtight container in the fridge to maintain freshness.
- Before serving: If the cake was refrigerated, let it sit at room temperature for 30 minutes before cutting.
💡 Pro Tip: Take plenty of pictures before cutting into your beautiful Sesame Street cake—it’s a memory worth capturing!
Sesame Street Cake Decorating Tips and Tricks
Creating a Sesame Street cake can be a fun and rewarding experience, but having a few expert tips and tricks up your sleeve will make the process smoother. Whether you’re making a simple character face cake or a multi-tiered masterpiece, these decorating hacks will help you achieve a professional-looking and delicious cake with ease.
1. Mastering the Perfect Frosting Texture
A well-decorated cake starts with perfect frosting consistency. Here’s how to get it just right:
- For smooth buttercream frosting: Use an offset spatula and a bench scraper to create an even, polished look. If the frosting feels too thick, add a teaspoon of milk or heavy cream at a time until it reaches a spreadable consistency.
- For textured “fur” effects: If you’re making an Elmo or Cookie Monster cake, use a grass piping tip (Wilton #233) or a star tip (Wilton #18) to pipe small “fur” strands. Work in short bursts to create a fluffy effect.
- Chill between layers: If your buttercream is getting too soft, refrigerate the cake for 15–20 minutes before adding more frosting to keep everything firm.
💡 Pro Tip: If you notice air bubbles in your buttercream, use a paddle attachment on a low mixer setting to smooth it out before applying it to the cake.
2. Using Fondant Like a Pro
Fondant is great for making smooth character faces, Sesame Street signs, and fun 3D decorations. Here’s how to work with it effectively:
- Prevent sticking: Lightly dust your rolling pin and surface with cornstarch or powdered sugar to prevent fondant from sticking.
- Get bright colors: Use gel food coloring instead of liquid to avoid making fondant too sticky. Knead the color into the fondant until evenly mixed.
- Smooth out creases: Use a fondant smoother or your hands (lightly dusted with cornstarch) to press out air bubbles and wrinkles.
- Cut out clean shapes: Use cookie cutters, fondant letter cutters, or an X-Acto knife for crisp edges when cutting out character features like eyes, mouths, and noses.
💡 Pro Tip: If you need black fondant, buy it pre-colored instead of making it from white fondant—it’s easier and prevents over-kneading.
3. Creating Lifelike Sesame Street Characters
The key to an adorable Sesame Street cake is getting the character details just right. Here’s how to perfect some of the most iconic features:
- Eyes:
- Always use white fondant circles for the eyes, then add black fondant pupils.
- For Cookie Monster, make his eyes slightly uneven for his signature goofy look.
- Mouths:
- Use black fondant or black buttercream for open mouths.
- Slightly curve Elmo’s smile for a friendly expression.
- Noses:
- Elmo’s nose is orange and oval-shaped.
- Big Bird’s beak should have a slight curve, with an extra fondant piece for depth.
- Cookie Monster doesn’t usually have a nose, so skip this step for his face.
💡 Pro Tip: If your fondant pieces aren’t sticking, use a tiny amount of water or edible glue to adhere them.
4. Decorating with Extra Fun Sesame Street Elements
Beyond character faces, adding extra details makes the cake more vibrant and fun. Consider these ideas:
- Sesame Street Sign Topper: Create a fondant or edible printout of the famous Sesame Street sign, customized with the birthday child’s name.
- Letter and Number Blocks: Use fondant to cut out alphabet blocks or numbers to match the Sesame Street theme.
- Cookie Decorations: If you’re making a Cookie Monster cake, place real mini cookies on or around the cake.
- Confetti Sprinkles: A rainbow of sprinkles makes the cake feel festive and playful.
- Balloons & Stars: Use fondant cutouts or small lollipops to add a 3D pop of color.
💡 Pro Tip: If making Sesame Street cupcakes, decorate each one as a different character for a fun variety!
5. Keeping Your Cake Fresh and Picture-Perfect
Once your cake is beautifully decorated, it’s important to store it properly before the big celebration.
- If serving within a few hours: Keep the cake in a cool, dry place, away from direct sunlight.
- If storing overnight: Place the cake in a cake box or loosely covered container in the fridge.
- Before serving: Let the cake sit at room temperature for 30 minutes if it was refrigerated—this prevents the cake from being too firm when cutting.
- For transporting the cake: Use a sturdy cake board and place the cake in a box with non-slip padding to prevent movement.
💡 Pro Tip: Always take pictures before moving or cutting the cake—you’ll want to capture your masterpiece!
Serving and Storing Your Sesame Street Cake
After putting in the effort to bake and decorate a stunning Sesame Street-themed cake, it’s important to know the best way to serve and store it to keep it looking and tasting its best. Whether you’re planning a big birthday party or saving leftovers for later, these tips will help you slice, serve, and store your cake properly.
1. The Best Way to Cut and Serve Your Cake
Serving a decorated cake can be a bit tricky, especially when you’ve put so much effort into making it look perfect. Here’s how to cut it neatly:
- Use a sharp, warm knife: Dip a sharp knife in hot water, then wipe it dry before each cut. This helps create clean slices without dragging the frosting or fondant.
- Remove delicate decorations first: If you have fondant toppers, edible figures, or 3D elements, carefully remove them before cutting to avoid breaking them.
- For tiered cakes: Start by cutting the top tier first, then work your way down. Use cake dowels or supports to prevent the layers from collapsing while serving.
- Cutting character cakes: If your cake is shaped like Elmo or Cookie Monster, cut along natural separations (such as between the eyes and mouth) to keep portions even.
💡 Pro Tip: If your cake is covered in fondant, consider peeling it off individual slices if guests prefer buttercream-only bites.
2. How to Keep the Cake Fresh Before Serving
If you’ve made your cake ahead of time, here’s how to store it properly so it stays fresh and delicious:
- For buttercream cakes: Store at room temperature in a cake box or covered stand for up to 24 hours if your kitchen isn’t too warm.
- For fondant-covered cakes: Fondant holds up best in a cool, dry place, so avoid refrigerating it unless absolutely necessary (moisture from the fridge can make fondant sticky).
- For cakes with perishable fillings: If your cake contains cream cheese frosting, custard, or fresh fruit, keep it refrigerated and take it out 30–45 minutes before serving to bring it to room temperature.
💡 Pro Tip: If storing a buttercream cake in the fridge, loosely cover it with plastic wrap or a cake dome to prevent it from drying out.
3. Storing Leftover Cake for Maximum Freshness
If you have leftover cake, follow these storage methods to keep it tasting just as good the next day:
Short-Term Storage (1-2 Days):
- At room temperature: If the cake is frosted with buttercream, cover the cut edges with plastic wrap or press a piece of wax paper against the exposed cake to prevent drying.
- In the fridge: Store slices in an airtight container or wrap them individually in plastic wrap, then place them in a cake box.
Long-Term Storage (Freezing for Up to 3 Months):
If you want to save some cake for later, freezing is the best option:
- Wrap slices individually in plastic wrap, then a layer of aluminum foil to prevent freezer burn.
- For whole cakes: If freezing an entire cake, first flash-freeze it uncovered for about 1 hour (to firm up the frosting), then wrap it in plastic wrap and foil before storing it in the freezer.
- Thawing: When ready to enjoy, transfer frozen cake to the fridge for 4–6 hours or let individual slices sit at room temperature for 30 minutes before serving.
💡 Pro Tip: Label your frozen cake with the date so you remember how long it has been stored.
4. Fun Serving Ideas for a Sesame Street Party
Make serving your Sesame Street cake extra fun with these creative presentation ideas:
- Pair with themed cupcakes: Serve cupcakes decorated as Elmo, Cookie Monster, Big Bird, and Oscar the Grouch alongside your main cake.
- Add a milk station: Sesame Street is all about childhood nostalgia—serve glasses of cold milk to pair with cake slices for a fun, kid-friendly treat.
- Use themed plates and napkins: Decorate the serving table with Sesame Street-themed plates, cups, and napkins to tie in the theme.
- Set up a DIY dessert station: Offer toppings like whipped cream, sprinkles, and crushed cookies so guests can customize their cake slices.
💡 Pro Tip: Cut the first few slices and place them on plates before the party starts to avoid a messy serving situation when guests are eager to dig in!


I was pretty pleased to discover this web site.
I wanted to thank you for your time due to this fantastic read!!
I definitely enjoyed every little bit of it and i also have you saved as a favorite to look at new
stuff on your web site.
Thank you very much, it is my pleasure. Welcome.
Эта статья предлагает захватывающий и полезный контент, который привлечет внимание широкого круга читателей. Мы постараемся представить тебе идеи, которые вдохновят вас на изменения в жизни и предоставят практические решения для повседневных вопросов. Читайте и вдохновляйтесь!
Выяснить больше – https://vivod-iz-zapoya-1.ru/
Clarte Nexive
Clarte Nexive se demarque comme une plateforme d’investissement en crypto-monnaies revolutionnaire, qui met a profit la puissance de l’intelligence artificielle pour proposer a ses membres des avantages concurrentiels decisifs.
Son IA scrute les marches en temps reel, detecte les occasions interessantes et met en ?uvre des strategies complexes avec une exactitude et une rapidite hors de portee des traders humains, optimisant ainsi les potentiels de rendement.
TurkPaydexHub Review
TurkPaydexHub se distingue comme une plateforme de placement crypto innovante, qui utilise la puissance de l’intelligence artificielle pour proposer a ses membres des atouts competitifs majeurs.
Son IA etudie les marches financiers en temps reel, identifie les opportunites et applique des tactiques complexes avec une precision et une vitesse inatteignables pour les traders humains, augmentant de ce fait les potentiels de rendement.
TurkPaydexHub Trading
TurkPaydexHub se distingue comme une plateforme de placement crypto de pointe, qui exploite la puissance de l’intelligence artificielle pour offrir a ses utilisateurs des avantages concurrentiels decisifs.
Son IA etudie les marches financiers en temps reel, detecte les occasions interessantes et applique des tactiques complexes avec une finesse et une celerite inatteignables pour les traders humains, augmentant de ce fait les potentiels de profit.
Вывод из запоя в Рязани является востребованной медицинской услугой, направленной на стабилизацию состояния пациента после длительного употребления алкоголя. Специалисты применяют современные методы детоксикации, позволяющие быстро и безопасно восстановить жизненно важные функции организма, снизить проявления абстинентного синдрома и предотвратить осложнения. Процесс лечения осуществляется в клинических условиях под постоянным наблюдением врачей.
Подробнее можно узнать тут – http://
«Как отмечает врач-нарколог Андрей Николаевич Селиванов, «своевременный визит специалиста на дом позволяет избежать тяжёлых осложнений и ускоряет стабилизацию состояния»».
Углубиться в тему – http://narkolog-na-dom-sankt-peterburg14.ru/narkolog-sankt-peterburg/
Конфиденциальность — не обещание на бумаге, а практический стандарт. В клинике используются кодовые профили, шифрованный контур хранения карт, разграничение доступа по ролям; документы оформляются нейтрально, а уведомления формулируются без чувствительных слов. Выездные специалисты приезжают без медицинской символики, а в здании клиники навигация организована так, чтобы перемещение было незаметным. Это создаёт пространство, в котором можно честно говорить о целях и спокойно выполнять план — без стигмы и посторонних взглядов.
Подробнее можно узнать тут – [url=https://narkologicheskaya-klinika-v-spb14.ru/]наркологическая клиника цены в санкт-петербурге[/url]
Наша философия проста: минимум медикаментов, максимум управляемости процесса. Мы не используем «универсальные капельницы», а собираем схему под клиническую картину: длительность запоя, выраженность тремора и тошноты, качество сна, уровень тревоги, исходное давление и частоту пульса, сопутствующие заболевания, текущие лекарства (антигипертензивные, антиаритмические, сахароснижающие, средства для сна). Скорость инфузии задаётся инфузоматом, витальные показатели контролируются портативным кардиомонитором и пульсоксиметром, глюкоза и электролиты — по экспресс-панелям. Такой подход снижает риск осложнений и делает результат предсказуемым и устойчивым.
Углубиться в тему – http://narcolog-na-dom-krasnodar14.ru/narkolog-i-psikhiatr-v-krasnodare/