The Best Fluffy Pancakes recipe you will fall in love with. Full of tips and tricks to help you make the best pancakes.
Looking for a simple, healthy, and delicious way to start your day? Say goodbye to store-bought cereals packed with sugar and preservatives, and say hello to your new favorite morning meal—quick and easy homemade breakfast cereal! Whether you’re aiming for a nutritious option for your kids, a gluten-free breakfast, or just want full control over what goes into your bowl, making cereal from scratch is easier than you think.
In this post, you’ll learn how to whip up your own customizable cereal blend using wholesome ingredients like oats, nuts, seeds, and natural sweeteners. It’s crunchy, satisfying, and perfect for busy mornings. Plus, you can store it ahead of time for a no-fuss, ready-to-eat breakfast all week long. Let’s dive into the benefits, ingredients, and a foolproof recipe to get you started!
Why Make Homemade Breakfast Cereal?
There’s something incredibly satisfying about pouring yourself a bowl of cereal you made with your own hands. Homemade breakfast cereal isn’t just a fun kitchen project—it comes with a whole list of benefits that go far beyond convenience. Here’s why switching from store-bought to homemade might be one of the best breakfast decisions you’ll ever make:
Healthier Than Store-Bought Brands
Most commercial cereals are loaded with added sugars, artificial flavors, preservatives, and even dyes. When you make your own cereal at home, you get full control over every ingredient that goes in. Want to skip the sugar? Use natural sweeteners like honey, maple syrup, or mashed bananas. Looking for whole-grain goodness? Start with hearty rolled oats, flax seeds, and nuts. The result? A nutrient-packed breakfast that fuels your day without the sugar crash.
Cost-Effective and Customizable
Buying high-quality cereal at the store can get expensive, especially if you’re reaching for organic or gluten-free options. With just a few pantry staples, you can make large batches of cereal at a fraction of the cost. Even better? You can tweak the recipe to fit your dietary needs or personal taste. Prefer it nutty, fruity, or chocolatey? You decide. It’s also a great way to use up leftover ingredients like dried fruits, coconut flakes, or seeds you already have.
Great for Kids and Adults Alike
Homemade cereal is a family-friendly option that both kids and adults will enjoy. You can create kid-friendly versions with mini chocolate chips, cinnamon, or fun shapes (if you’re using a mold or press), and also prepare health-focused variations rich in fiber, protein, and healthy fats for adults. Everyone gets a version they love—and you’ll feel good knowing exactly what’s in every bite.
Ingredients You’ll Need for a Quick Cereal Mix
One of the best things about homemade breakfast cereal is that it’s completely customizable. You don’t need a long list of complicated ingredients—just a few wholesome staples from your pantry and a little creativity. Here’s a breakdown of the essential components that make up a delicious, crunchy, and nutritious cereal mix.
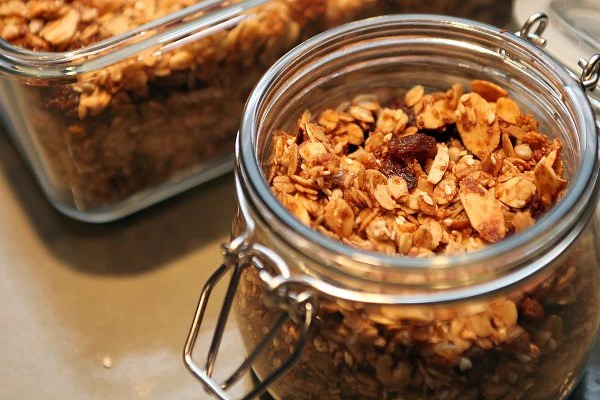
Base Ingredients: Oats, Nuts, and Seeds
Start with the foundation of your cereal—rolled oats are a classic choice. They provide fiber, texture, and that satisfying crunch when baked. You can also try puffed rice, quinoa flakes, or even shredded coconut for variety.
To add more texture and healthy fats, mix in a handful of nuts and seeds. Try:
- Sliced almonds
- Chopped walnuts or pecans
- Sunflower seeds
- Pumpkin seeds (pepitas)
- Chia seeds or flax seeds for a boost of omega-3s and fiber
This base not only adds flavor but keeps you feeling full longer.
Sweeteners and Flavorings
Here’s where the fun (and flavor!) begins. Instead of refined sugar, use natural sweeteners like:
- Maple syrup – for a rich, earthy sweetness
- Honey – for a classic touch that’s perfect with oats
- Date syrup or mashed ripe bananas – for a healthier twist
To enhance the taste, add flavorings like:
- Ground cinnamon
- Nutmeg
- Vanilla extract
- Pinch of sea salt – to balance sweetness
These ingredients elevate the flavor without overpowering the natural goodness of the cereal.
Optional Add-Ins for Flavor and Texture
Once your base is set, toss in some extras to personalize your mix:
- Dried fruits – like raisins, cranberries, chopped dates, or apricots (add after baking to prevent burning)
- Coconut flakes – unsweetened for a tropical touch
- Dark chocolate chips – for a treat-worthy morning bowl
- Freeze-dried fruits – for crunch and a pop of color
These mix-ins make your cereal feel gourmet without the store-bought price tag.
Step-by-Step Homemade Cereal Recipe
Now that you’ve gathered your ingredients, it’s time to bring your homemade cereal to life! Whether you’re aiming for a classic crunchy granola-style mix or a soft, chewy version, this step-by-step guide will walk you through the process. The beauty of this recipe is its simplicity, flexibility, and how quickly it comes together—perfect for busy mornings and make-ahead meal prep.
Mix the Dry Ingredients
In a large mixing bowl, combine all your dry ingredients. This includes your:
- Rolled oats (the foundation of the mix)
- Nuts and seeds (like almonds, walnuts, chia seeds, and flax seeds)
- Coconut flakes or puffed grains (if using)
Toss them together so everything is evenly distributed. This is also a good time to add spices like cinnamon or nutmeg for warm, cozy flavor.
Add Wet Ingredients and Combine
Next, pour in your wet ingredients—your natural sweeteners and oils. Use a mixture of:
- Maple syrup or honey for sweetness
- Coconut oil or olive oil for that golden crunch
- A splash of vanilla extract for depth of flavor
Mix well, making sure the dry ingredients are thoroughly coated. This step is key to ensuring your cereal gets that beautiful golden-brown finish once baked.
Bake or No-Bake Options
Now it’s time to choose your method:
For a Crunchy Baked Cereal:
- Spread the mixture onto a lined baking sheet in an even layer.
- Bake at 325°F (165°C) for about 25–30 minutes, stirring halfway through to ensure even toasting.
- Keep a close eye during the last 5 minutes to avoid burning.
For an efficient and quick bake, you can use a multi-purpose oven like the Ninja Multi-Purpose Oven. This countertop oven makes baking quick and efficient, perfect for evenly crisping your homemade cereal.
For a No-Bake Cereal:
- Press the mixture into a pan lined with parchment paper.
- Chill in the fridge for 1–2 hours until firm.
- Break into clusters or bars for a chewy, grab-and-go option.
Both versions taste amazing—it just depends on your texture preference!
Let It Cool and Store Properly
Once your cereal is done baking (or chilling), let it cool completely. This helps it firm up and become crisp. After it’s cooled:
- Add in any dried fruits or chocolate chips (if using)
- Transfer to an airtight container or glass jar
- Store at room temperature for up to 2 weeks, or refrigerate to extend freshness
Now you’ve got a homemade breakfast staple that’s ready whenever you are!
Serving Tips and Variations
Your homemade breakfast cereal is ready—but the fun doesn’t stop there! One of the best parts of making your own cereal is how versatile and customizable it is. Whether you want to enjoy it with milk, layer it into parfaits, or turn it into snackable clusters, here are some creative ways to serve and switch up your mix so you never get bored.
Serving Suggestions for Everyday Enjoyment
Your cereal can be enjoyed in so many ways beyond the basic bowl-and-milk combo. Try these ideas:
- With Cold or Warm Milk: Pour your favorite milk—dairy, almond, oat, or soy—over your cereal for a refreshing breakfast. For a cozy start, try warming the milk first.
- On Top of Yogurt: Layer your cereal into a Greek yogurt bowl with fresh berries, banana slices, or a drizzle of honey for a protein-packed breakfast or snack.
- With Fresh Fruit: Serve with seasonal fruits like strawberries, apples, or peaches to add natural sweetness and color.
- As a Trail Mix Snack: Toss a portion into a reusable container and enjoy as an on-the-go snack during work, hikes, or school days.
Flavor Variations to Try
Keep things interesting by switching up your ingredients and flavor combinations. Here are a few fun variations:
- Chocolate Almond Crunch: Add cocoa powder to your oat mix before baking and stir in dark chocolate chips once cooled.
- Tropical Delight: Use dried pineapple, mango, and coconut flakes for a tropical flavor boost.
- Pumpkin Spice Cereal: Add pumpkin pie spice and a spoonful of canned pumpkin to your mix for a fall-inspired twist.
- Berry Nut Mix: Combine dried cranberries, blueberries, pecans, and a touch of cinnamon for a fruity, nutty combination.
Kid-Friendly Twists
Want to make breakfast more exciting for the little ones? Try these fun options:
- Add Mini Chocolate Chips or yogurt-covered raisins for a sweet surprise.
- Use Cookie Cutters to mold no-bake cereal into fun shapes.
- Let Kids Help customize their own mix from a “cereal bar” with bowls of toppings and mix-ins.


[…] of relying on store-bought options, why not try making your own cereal at home? Check out this Quick and Easy Homemade Breakfast Cereal Recipe for a simple and delicious alternative the whole family will […]