The Best Fluffy Pancakes recipe you will fall in love with. Full of tips and tricks to help you make the best pancakes.
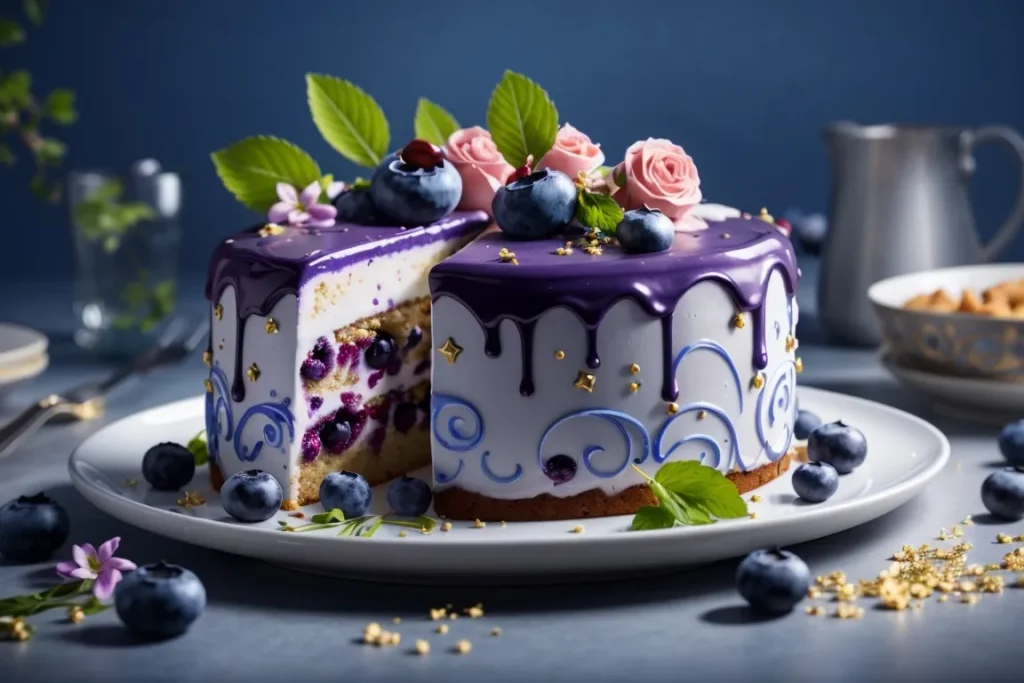
If you love red velvet cake, get ready to fall in love with its vibrant and unique twist—purple velvet cake! This eye-catching dessert combines the soft, moist texture of classic velvet cakes with a stunning purple hue, making it a showstopper for any occasion.
Unlike traditional red velvet, purple velvet cake gets its rich color from ube (purple yam) extract or purple food coloring, giving it a fun and elegant look. It has a light cocoa flavor, a hint of vanilla, and a velvety crumb, thanks to key ingredients like buttermilk and vinegar.
Whether you’re baking for a birthday, wedding, or simply craving something new, this easy-to-make purple velvet cake is guaranteed to impress. Let’s dive into the recipe and discover how to create this delicious and visually stunning dessert!
What Is Purple Velvet Cake?
A Unique Twist on Classic Velvet Cake
Purple velvet cake is a vibrant and flavorful variation of the classic red velvet cake. While red velvet is known for its deep red hue, this version swaps out the red for a rich purple color, creating a visually striking dessert. Despite the color change, purple velvet cake still maintains the signature soft, moist, and velvety texture that makes velvet cakes so popular.
Like traditional velvet cakes, this recipe includes a hint of cocoa powder, which adds subtle depth to the flavor without overpowering the sweetness. The combination of buttermilk and vinegar plays a crucial role in giving the cake its characteristic tender crumb, ensuring each bite is light and fluffy.
The Origins of Velvet Cakes
Velvet cakes have been around since the 19th century, originally created as a softer alternative to traditional sponge cakes. The term “velvet” refers to the fine, delicate crumb that sets these cakes apart. The addition of vinegar and buttermilk to the batter helps break down the proteins in the flour, resulting in a smoother texture.
Red velvet became widely popular in the 20th century, especially with the introduction of food coloring, which intensified the cake’s signature hue. Over time, bakers began experimenting with different colors and flavors, leading to creative versions like blue velvet, green velvet, and purple velvet cakes.
Natural vs. Artificial Coloring: What Gives It That Beautiful Purple Hue?
There are two main ways to achieve the deep purple color in a purple velvet cake:
- Ube Extract or Powder – Ube, or purple yam, is a staple ingredient in Filipino desserts. It has a naturally sweet, slightly nutty flavor and gives the cake a natural purple hue. Ube extract or powder can be used in place of food coloring for a more authentic flavor.
- Purple Gel Food Coloring – If you prefer a bolder, more controlled shade of purple, high-quality gel or liquid food coloring can be used. This option is ideal for bakers who want consistency in color without altering the cake’s taste.
Some bakers also combine ube extract and food coloring to enhance both the color and flavor of the cake.
Why Bake a Purple Velvet Cake?
Purple velvet cake is more than just a pretty dessert—it’s a unique and elegant option for a variety of occasions. Its rich color and smooth texture make it perfect for:
- Birthdays & Celebrations – A fun and festive alternative to traditional cakes.
- Weddings & Special Events – A stunning cake that pairs beautifully with elegant decor.
- Holiday Gatherings – A great way to add a pop of color to your dessert table.
- For Ube Lovers – If you enjoy the flavor of ube, this cake is a must-try!
Whether you’re looking for a fresh take on classic velvet cake or simply want to impress guests with a bold and beautiful dessert, purple velvet cake is a fantastic choice!
Essential Ingredients for the Best Purple Velvet Cake
To achieve the perfect purple velvet cake, you’ll need a combination of carefully selected ingredients that contribute to its signature texture, color, and flavor. Let’s break down the key components that make this cake soft, moist, and visually stunning.
1. Key Ingredients for a Soft & Fluffy Texture
The foundation of a great purple velvet cake lies in using the right ingredients to create its light and velvety crumb. Here’s what makes the texture so special:
- All-Purpose Flour or Cake Flour – Cake flour gives a finer, more delicate crumb, while all-purpose flour offers a slightly firmer texture. If using all-purpose flour, consider sifting it to make the cake softer.
- Cocoa Powder (Unsweetened) – Although purple velvet cake isn’t as chocolatey as a traditional chocolate cake, a small amount of cocoa powder adds depth to the flavor and enhances the cake’s richness.
- Buttermilk – A key ingredient in all velvet cakes! Buttermilk helps break down gluten, resulting in an extra tender and moist crumb. It also interacts with the vinegar and baking soda to create a slight rise.
- White Vinegar – An essential ingredient that works with buttermilk to give velvet cakes their signature soft texture. It also enhances the reaction between baking soda and cocoa powder, improving the cake’s overall tenderness.
- Baking Soda or Baking Powder – These leavening agents ensure the cake rises properly, making it fluffy and airy. Using the right balance with acidic ingredients like buttermilk and vinegar is crucial for the best results.
2. Choosing the Right Purple Coloring
One of the biggest differences between red velvet cake and purple velvet cake is, of course, the color. The perfect shade of purple can be achieved using natural or artificial coloring:
- Ube Extract or Ube Powder – If you want a natural purple hue with added flavor, ube extract is an excellent choice. It’s made from purple yam, a root vegetable commonly used in Filipino desserts. Ube has a subtly sweet, nutty, and vanilla-like taste, which pairs beautifully with the cake’s light cocoa flavor.
- Purple Gel Food Coloring – For a more vibrant and consistent purple, high-quality gel food coloring is ideal. Gel-based colors are more concentrated than liquid food coloring, allowing you to achieve a bold purple shade without affecting the batter’s texture.
- Combination of Ube & Food Coloring – Some bakers like to use both ube extract and food coloring to enhance both the flavor and color intensity of the cake.
Pro Tip: When using ube extract or food coloring, start with a small amount and adjust as needed to get your desired shade of purple.
3. The Perfect Sweetness & Flavor Balance
To enhance the overall taste of your purple velvet cake, the following ingredients are important:
- Granulated Sugar – This provides sweetness and helps create a tender texture by trapping air in the batter.
- Eggs – Eggs act as a binding agent and add moisture to the cake. Using room-temperature eggs helps the batter mix evenly.
- Vanilla Extract – Even though this is a purple velvet cake, vanilla plays a crucial role in adding warmth and depth to the flavor. If you’re using ube extract, vanilla balances out the flavors beautifully.
- Salt – A small pinch of salt enhances the sweetness and brings out the flavors of the cocoa, vanilla, and ube.
4. Frosting & Topping Options
A purple velvet cake wouldn’t be complete without a delicious frosting to complement its rich yet delicate flavor. Here are some popular choices:
- Classic Cream Cheese Frosting – The most traditional pairing! The tangy, creamy texture of cream cheese frosting balances the cake’s sweetness perfectly.
- Ube Buttercream – If you love the flavor of ube, you can make an ube-flavored buttercream using ube extract or ube halaya (sweetened purple yam jam) mixed with butter and powdered sugar.
- Whipped Cream Frosting – A lighter alternative to butter-based frostings, perfect for those who prefer a less sweet topping.
- Chocolate Ganache – For a rich and indulgent twist, a dark chocolate or white chocolate ganache pairs beautifully with the cake’s flavor.
- You can also decorate your cake with:
- Fresh berries (blueberries or blackberries for a color contrast)
- Edible flowers for a touch of elegance
- Shredded coconut for added texture
- Sprinkles or gold flakes for a festive look
Step-by-Step Instructions for a Perfect Bake
Baking a purple velvet cake may seem intimidating at first, but with the right techniques and attention to detail, you’ll achieve a soft, moist, and beautifully vibrant cake every time. Follow these step-by-step instructions to create a perfect purple velvet cake from scratch.

1. Preparing Your Ingredients and Equipment
Before you start mixing, make sure you have everything ready:
- Preheat the oven to 175°C (350°F) to ensure even baking. If your oven tends to run hot or cold, use an oven thermometer for accuracy.
- Prepare your cake pans by greasing two 8-inch (20 cm) round cake pans with butter or non-stick spray, then lining them with parchment paper to prevent sticking.
- Measure all ingredients accurately using a kitchen scale or leveled measuring cups to ensure the correct ratios.
- Bring cold ingredients to room temperature to help them mix evenly. Eggs, buttermilk, and butter should be at room temperature to create a smooth batter.
2. Mixing the Dry Ingredients
The dry ingredients provide the structure of the cake, so they must be properly combined:
- Sift together 2 ½ cups (310 g) of cake flour, 2 tablespoons (15 g) of cocoa powder, 1 teaspoon of baking soda, and ½ teaspoon of salt into a large mixing bowl.
- Whisk to ensure the cocoa powder and leavening agents are evenly distributed.
3. Mixing the Wet Ingredients
The wet ingredients contribute moisture, richness, and the signature purple hue:
- In a large mixing bowl, beat ½ cup (115 g) of unsalted butter, softened, and 1 ¾ cups (350 g) of granulated sugar together using a hand mixer or stand mixer. Mix for about 2–3 minutes, until the mixture is light and fluffy. This step incorporates air into the batter.
- Add 2 large eggs, one at a time, mixing well after each addition.
- Stir in 2 teaspoons of vanilla extract and 2–3 teaspoons of purple food coloring (or 1 tablespoon of ube extract) until fully incorporated. If using ube extract, this will also enhance the flavor with subtle nutty and vanilla notes.
- In a small bowl, mix 1 cup (240 ml) of buttermilk with 1 teaspoon of white vinegar. The vinegar will react with the baking soda, helping to create a light, tender cake texture.
4. Combining the Wet and Dry Ingredients
Now it’s time to bring everything together:
- Gradually mix the dry ingredients and buttermilk mixture into the wet ingredients, alternating between the two (dry-wet-dry method).
- Add ⅓ of the dry mixture, mix on low speed.
- Pour in ½ of the buttermilk mixture, mix again.
- Repeat until all ingredients are fully incorporated.
- Mix just until combined. Overmixing can develop too much gluten, leading to a dense cake.
- Use a spatula to scrape down the sides of the bowl, ensuring everything is well mixed.
5. Baking the Cake
- Divide the batter evenly between the prepared cake pans. If you want precise layers, weigh the batter to ensure equal portions.
- Tap the pans gently on the counter to release any air bubbles.
- Bake for 30–35 minutes, or until a toothpick inserted into the center comes out clean or with a few moist crumbs.
- Allow the cakes to cool in the pans for 10 minutes, then transfer them to a wire rack to cool completely before frosting.
Once fully cooled, your purple velvet cake is ready to be frosted and decorated to your liking.
Tips, Tricks & Variations to Try
Baking the perfect purple velvet cake is not just about following the recipe—it’s about mastering techniques, troubleshooting common mistakes, and exploring creative variations to make it your own. Whether you’re looking for ways to enhance the flavor, achieve the ideal texture, or put a unique twist on this vibrant cake, these tips and tricks will help you level up your baking game.
Baking Tips for a Perfectly Moist & Fluffy Cake
Getting the right texture is key to a great purple velvet cake. Here’s how to ensure your cake comes out soft, moist, and delicious every time.
- Use cake flour for a softer texture – Cake flour has less protein than all-purpose flour, which means less gluten formation and a finer, more tender crumb. If you don’t have cake flour, you can make a substitute by replacing 2 tablespoons of all-purpose flour with cornstarch per cup of flour.
- Don’t overmix the batter – Overmixing develops too much gluten, making the cake dense and tough. Mix until just combined to keep the cake light and fluffy.
- Room temperature ingredients matter – Eggs, buttermilk, and butter should be at room temperature to ensure even mixing and proper aeration. Cold ingredients can cause the batter to separate or curdle, leading to an uneven cake texture.
- Weigh your ingredients for accuracy – Using a kitchen scale is the best way to ensure precision in baking, as measuring by volume (cups) can sometimes lead to inconsistent results.
- Check for doneness the right way – Insert a toothpick into the center of the cake; if it comes out with a few moist crumbs (but not wet batter), your cake is done. Avoid overbaking, as it can dry out the cake.
Tricks for the Best Purple Color & Flavor
One of the most exciting features of purple velvet cake is its stunning color and subtle flavor. Here’s how to perfect both.
- Achieving the best purple shade – Use gel food coloring instead of liquid food coloring, as it is more concentrated and won’t alter the cake’s texture. If you’re unsure about which type of food coloring to use, check out this guide on food coloring types and how to use them from The Kitchn.
- Enhancing the flavor with ube or vanilla – Traditional purple velvet cake can be made with a hint of ube (purple yam), which adds a delicate nutty-vanilla taste. If you prefer a classic velvet cake flavor, use high-quality vanilla extract for depth.
- Boosting moisture with oil or butter – Some bakers prefer using oil instead of butter for extra moisture, as oil keeps cakes softer for longer. You can also do a mix of half butter, half oil for both richness and tenderness.
- Experimenting with natural coloring – Instead of artificial food coloring, try blending purple sweet potato powder, ube halaya (ube jam), or butterfly pea tea extract to achieve a natural purple hue.
Delicious Variations to Try
Looking to customize your purple velvet cake? Here are some fun variations to explore.
- Coconut purple velvet cake – Add coconut milk instead of buttermilk and sprinkle shredded toasted coconut on top for a tropical twist.
- Chocolate swirl purple velvet cake – Create a marbled effect by swirling melted dark chocolate into the batter before baking. This adds a rich chocolatey contrast to the subtle cocoa flavor.
- Berry-infused purple velvet cake –Mix blueberries or blackberries into the batter for a fruity burst of flavor. You can also layer the cake with a berry compote filling for extra juiciness. If you enjoy fruity desserts, you might also love this Strawberry Earthquake Cake recipe for another fun and vibrant treat.
- Cheesecake-filled purple velvet cake – For an indulgent treat, bake a cheesecake layer between two purple velvet cake layers and cover it with cream cheese frosting.
- Cupcake version – Use the same batter to make purple velvet cupcakes. Reduce the baking time to about 18-20 minutes for perfectly portioned treats.
Frosting & Topping Ideas
The right frosting and decorations can take your cake from delicious to absolutely stunning. Here are some ways to elevate your purple velvet cake.
- Classic cream cheese frosting – The tangy taste of cream cheese perfectly complements the sweetness of the cake. Add ube extract or vanilla for a twist.
- Whipped ube buttercream – If you love ube flavor, mix ube extract or ube halaya into a buttercream frosting for a rich and creamy finish.
- Chocolate ganache drizzle – A layer of white or dark chocolate ganache adds extra decadence and pairs beautifully with the cake’s flavor.
- Toppings for extra flair – Try decorating with edible flowers, crushed nuts, shredded coconut, fresh berries, or gold leaf for a fancy touch.
Storing & Making Ahead
To keep your purple velvet cake fresh, follow these storage tips.
- Refrigeration – If not serving immediately, store the cake in an airtight container in the fridge for up to four days. Let it come to room temperature before serving for the best flavor.
- Freezing – You can freeze unfrosted cake layers for up to three months. Wrap each layer tightly in plastic wrap and store in a freezer-safe bag. Thaw overnight in the fridge before frosting.
- Make-ahead tips – You can prepare the batter a day ahead and store it in the fridge, then bake it the next day. Frosting can also be made in advance and kept refrigerated until ready to use.


[…] feeling creative and want to explore beyond the classic vanilla look, check out this eye-catching Purple Velvet Cake Recipe. It’s a fun and vibrant dessert that’s just as moist and delicious—with a bold color […]