The Best Fluffy Pancakes recipe you will fall in love with. Full of tips and tricks to help you make the best pancakes.
Peanut butter is more than just a classic spread—it’s a game-changer when it comes to desserts! Whether you love its creamy richness or the perfect balance of sweet and salty flavors, peanut butter desserts are always a crowd-pleaser. From soft and chewy cookies to decadent cheesecakes and quick no-bake treats, there’s a peanut butter dessert for every occasion.
In this post, we’re diving into five irresistible peanut butter desserts that are easy to make and packed with flavor. Whether you’re a fan of peanut butter and chocolate, creamy fudge, or even healthier options like peanut butter banana ice cream, you’ll find something to satisfy your cravings. Get ready to indulge in some of the best peanut butter treats you’ve ever tasted!
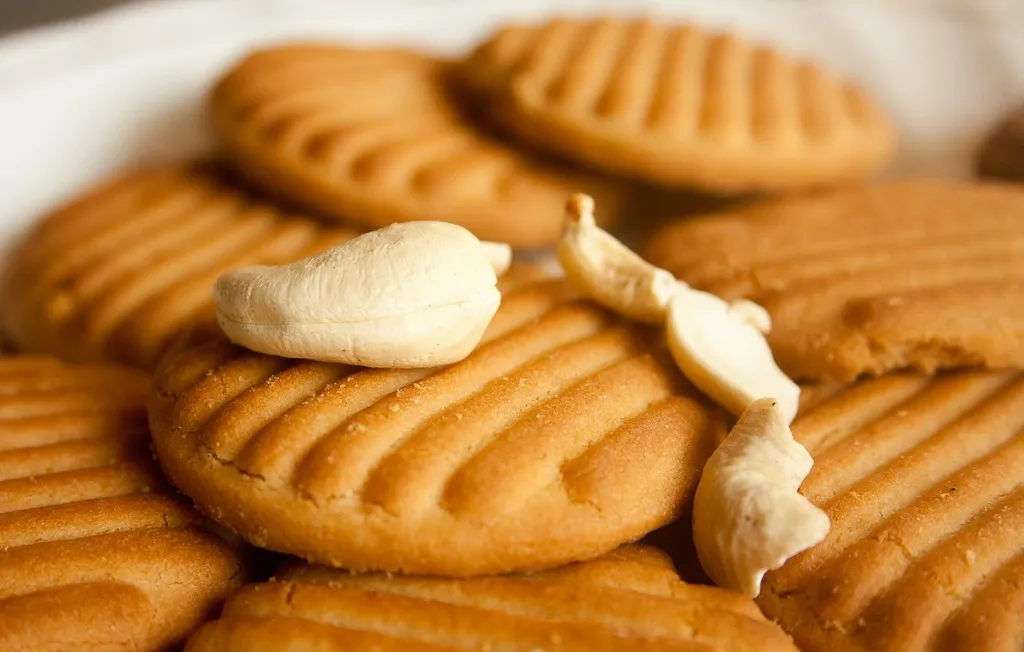
Classic Peanut Butter Cookies – A Timeless Treat
Few desserts are as nostalgic and comforting as classic peanut butter cookies. With their signature crisscross pattern and rich, nutty flavor, these cookies have been a household favorite for generations. They are soft, chewy, and packed with peanut butter goodness, making them perfect for any occasion.
Why Peanut Butter Cookies Are a Favorite
Peanut butter cookies have stood the test of time because they are:
- Easy to make with just a few simple ingredients
- Rich and flavorful thanks to creamy or crunchy peanut butter
- Versatile—pairing well with chocolate chips, caramel drizzle, or a sprinkle of sea salt
- Customizable to be either chewy or crispy, depending on how they are baked
Ingredients You’ll Need
To make about 20 peanut butter cookies, gather the following ingredients:
- ½ cup (120g) peanut butter – Use creamy for a smooth texture or crunchy for extra bite.
- ½ cup (113g) butter – Softened to create a rich, melt-in-your-mouth cookie.
- ½ cup (100g) brown sugar & ¼ cup (50g) granulated sugar – Enhance sweetness and chewiness.
- 1 large egg – Binds the ingredients together for the perfect consistency.
- 1 teaspoon (5ml) vanilla extract – Adds depth of flavor and warmth.
- 1 ¼ cups (160g) all-purpose flour & ½ teaspoon (2g) baking soda – The key to structure and slight crispiness.
- ¼ teaspoon (1g) salt – Balances out the sweetness and enhances the peanut butter flavor.
Step-by-Step Instructions
- Mix the wet ingredients – In a large bowl, cream together butter, peanut butter, and sugars until light and fluffy. Add the egg and vanilla extract, mixing until smooth.
- Incorporate the dry ingredients – In a separate bowl, whisk together flour, baking soda, and salt. Slowly add this to the wet mixture, stirring until fully combined.
- Shape the cookies – Roll the dough into small balls and place them on a lined baking sheet. Using a fork, gently press down in a crisscross pattern to create the signature peanut butter cookie look.
- Bake to perfection – Bake at 350°F (175°C) for 10–12 minutes, or until the edges are golden brown. Let the cookies cool slightly before transferring them to a wire rack.
Pro Tips for the Best Peanut Butter Cookies
- For extra softness, slightly underbake the cookies and let them firm up as they cool.
- To add a chocolate twist, mix in chocolate chips or drizzle melted chocolate over the cookies.
- For a balance of sweet and salty flavors, sprinkle a pinch of flaky sea salt on top before baking.
- To enhance the peanut butter flavor, add crushed peanuts to the dough for more crunch.
These cookies are best enjoyed with a cold glass of milk, a scoop of vanilla ice cream, or even sandwiched with peanut butter frosting.
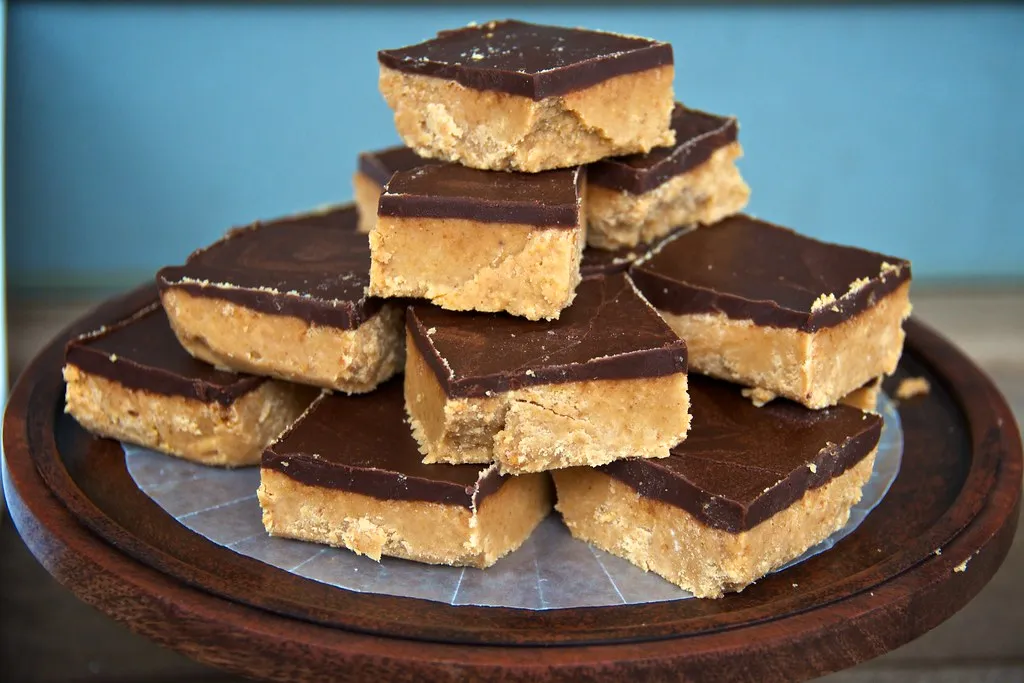
No-Bake Peanut Butter Bars – Quick and Delicious
When you’re craving something sweet but don’t want to turn on the oven, no-bake peanut butter bars are the perfect solution. These bars are rich, creamy, and packed with the irresistible combination of peanut butter and chocolate. With just a few simple ingredients and minimal effort, you can create a decadent dessert that tastes like a homemade version of a peanut butter cup.
Why You’ll Love These Peanut Butter Bars
No-bake peanut butter bars are a favorite because they are:
- Quick and easy – No oven required, just mix, layer, and chill.
- Perfectly balanced – The peanut butter base is sweet and nutty, while the chocolate topping adds a smooth, rich finish.
- Great for any occasion – Whether for a party, a snack, or a dessert, they are always a hit.
- Customizable – You can tweak the recipe by adding mix-ins like crushed graham crackers, caramel drizzle, or chopped nuts.
Ingredients You’ll Need
To make about 20 peanut butter cookies, gather the following ingredients:
- ½ cup (120g) peanut butter – Use creamy for a smooth texture or crunchy for extra bite.
- ½ cup (113g) butter – Softened to create a rich, melt-in-your-mouth cookie.
- ½ cup (100g) brown sugar & ¼ cup (50g) granulated sugar – Enhance sweetness and chewiness.
- 1 large egg – Binds the ingredients together for the perfect consistency.
- 1 teaspoon (5ml) vanilla extract – Adds depth of flavor and warmth.
- 1 ¼ cups (160g) all-purpose flour – Provides structure for the cookies.
- ½ teaspoon (2g) baking soda – Helps the cookies rise slightly while baking.
- ¼ teaspoon (1g) salt – Balances out the sweetness and enhances the peanut butter flavor.
Step-by-Step Instructions
- Prepare the peanut butter base – In a mixing bowl, combine melted butter, peanut butter, powdered sugar, graham cracker crumbs, vanilla extract, and a pinch of salt. Stir until smooth and well combined.
- Press into a pan – Line an 8×8-inch baking dish with parchment paper. Evenly spread the peanut butter mixture into the pan and press it down firmly to create a smooth, compact layer.
- Melt the chocolate topping – In a microwave-safe bowl, melt the semi-sweet chocolate chips with a spoonful of peanut butter, stirring every 30 seconds until smooth. This helps create a glossy, soft-set chocolate layer.
- Layer and chill – Pour the melted chocolate over the peanut butter base and spread it evenly. Refrigerate for at least 1–2 hours until firm.
- Slice and serve – Once set, lift the bars out using the parchment paper, slice into squares, and enjoy.
Tips for the Best No-Bake Peanut Butter Bars
- For a firmer base, refrigerate for longer or add extra graham cracker crumbs.
- For a twist on flavor, mix in crushed pretzels or drizzle caramel over the chocolate layer before chilling.
- To make cutting easier, let the bars sit at room temperature for a few minutes before slicing with a sharp knife.
- Store leftovers in an airtight container in the refrigerator for up to a week or freeze for longer storage.
These no-bake peanut butter bars are rich, chocolatey, and absolutely addictive. Whether you’re making them for a party or as a quick treat, they are guaranteed to be a crowd favorite.
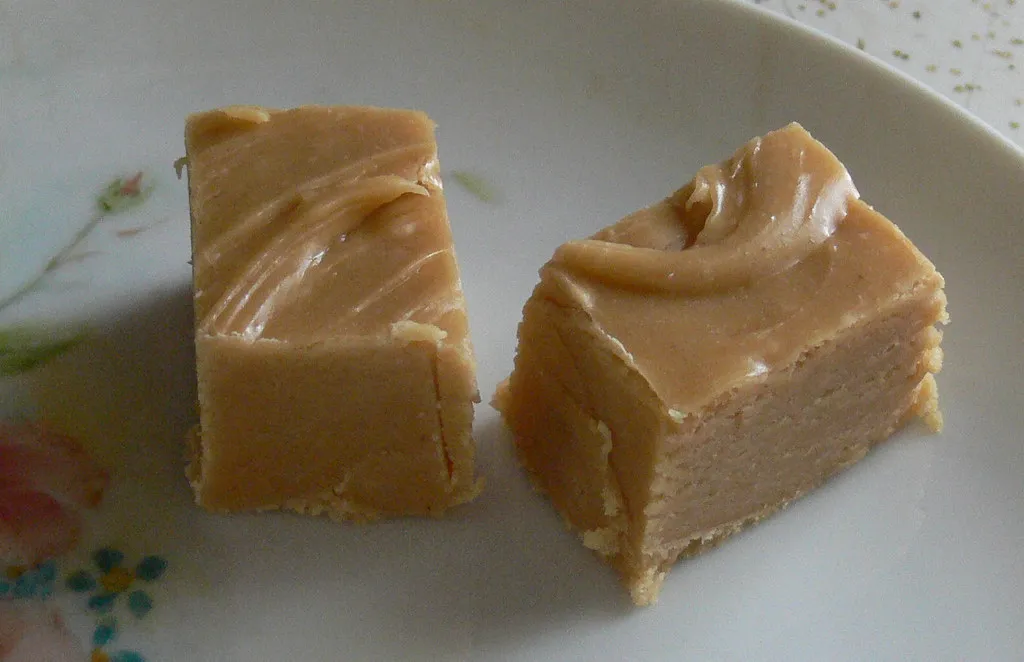
Decadent Peanut Butter Fudge – Creamy and Rich
If you love smooth, melt-in-your-mouth desserts, then peanut butter fudge is a must-try. This rich and creamy treat delivers the perfect balance of sweet and salty flavors, with an ultra-soft texture that makes every bite indulgent. Best of all, it’s incredibly easy to make with just a few simple ingredients. Whether you’re preparing it for a holiday, gifting it to friends, or simply treating yourself, peanut butter fudge is a timeless classic that never disappoints.
Why You’ll Love Peanut Butter Fudge
- Only a few ingredients – No need for complicated steps or hard-to-find ingredients.
- No candy thermometer required – Unlike traditional chocolate fudge, peanut butter fudge is much simpler to prepare.
- Perfectly creamy texture – Soft, smooth, and just the right amount of firmness.
- Great for gifting – Wrap up individual pieces for a delicious homemade present.
Ingredients You’ll Need
To make this creamy and rich peanut butter fudge, gather the following ingredients:
- 1 cup (240g) peanut butter – Smooth peanut butter works best, but crunchy can add a nice texture.
- ½ cup (113g) butter – Adds richness and helps the fudge set properly.
- 3 ½ cups (420g) powdered sugar – Sweetens the fudge while keeping it soft and silky.
- ¼ cup (60ml) milk or heavy cream – Helps achieve the perfect creamy consistency.
- 1 teaspoon (5ml) vanilla extract – Enhances the flavor and brings out the warmth of the peanut butter.
- ¼ teaspoon (1g) salt – Balances the sweetness and deepens the nutty flavor.
Step-by-Step Instructions
- Melt the butter and peanut butter – In a saucepan over low heat, melt the butter and peanut butter together, stirring until smooth and well combined. Remove from heat.
- Mix in the remaining ingredients – Add the powdered sugar, vanilla extract, and salt. Stir vigorously until smooth and thick. If the mixture is too stiff, add a splash of milk or heavy cream to soften it.
- Transfer to a pan – Line an 8×8-inch baking dish with parchment paper and spread the fudge mixture evenly, smoothing the top with a spatula.
- Chill until set – Refrigerate the fudge for at least 2 hours until it is firm enough to slice.
- Cut and serve – Lift the fudge out of the pan using the parchment paper and slice it into small squares. Enjoy!
Pro Tips for the Best Peanut Butter Fudge
- For a firmer texture, let the fudge set overnight in the refrigerator.
- To add a chocolate twist, drizzle melted chocolate on top or mix in chocolate chips.
- For extra crunch, sprinkle chopped peanuts over the fudge before chilling.
- Store properly – Keep the fudge in an airtight container at room temperature for up to a week, or refrigerate for a longer shelf life.
This decadent peanut butter fudge is the perfect combination of creamy, sweet, and nutty flavors, making it an irresistible treat for peanut butter lovers. Whether you enjoy it on its own or as part of a dessert platter, each bite delivers pure indulgence.
Peanut Butter Cup Cheesecake – A Chocolate Lover’s Dream
If you’re a fan of peanut butter and chocolate, this peanut butter cup cheesecake is the ultimate dessert experience. With its creamy, rich peanut butter filling, a chocolate cookie crust, and plenty of chopped peanut butter cups, this cheesecake is pure indulgence. It’s the perfect dessert for special occasions, birthdays, or whenever you’re craving something extra decadent.

Why You’ll Love Peanut Butter Cup Cheesecake
- Rich and creamy texture – The perfect balance of smooth cheesecake and crunchy peanut butter cups.
- No water bath needed – A foolproof cheesecake that’s easy to make.
- Chocolate and peanut butter perfection – The ultimate flavor combination in every bite.
- Crowd-pleasing dessert – Perfect for holidays, birthdays, or just a treat-yourself moment.
Ingredients You’ll Need
For this decadent peanut butter cup cheesecake, gather the following ingredients:
For the Chocolate Crust:
- 24 chocolate sandwich cookies (Oreos or similar), crushed – Creates a rich, chocolatey base.
- 6 tablespoons (85g) butter, melted – Helps bind the crust together.
For the Peanut Butter Cheesecake Filling:
- 16 ounces (450g) cream cheese, softened – Ensures a smooth, creamy consistency.
- ¾ cup (180g) peanut butter – Use creamy peanut butter for the best texture.
- ½ cup (100g) granulated sugar & ¼ cup (50g) brown sugar – Add sweetness and depth.
- 2 large eggs, room temperature – Helps create a smooth, rich filling.
- 1 teaspoon (5ml) vanilla extract – Enhances the peanut butter and chocolate flavors.
- ½ cup (120ml) heavy cream – Adds extra creaminess.
- 1 cup (150g) chopped peanut butter cups – Folded into the batter for bursts of chocolate and peanut butter in every bite.
For the Chocolate Ganache Topping:
- ¾ cup (130g) semi-sweet chocolate chips – Melted for a smooth, glossy topping.
- ½ cup (120ml) heavy cream – Creates a silky ganache that complements the cheesecake.
- Additional peanut butter cups, chopped – Sprinkled on top for extra indulgence.
Step-by-Step Instructions
- Prepare the crust – Crush the chocolate sandwich cookies into fine crumbs and mix them with melted butter. Press the mixture firmly into the bottom of a springform pan, then chill while you prepare the filling.
- Make the cheesecake filling – In a large bowl, beat the cream cheese until smooth. Add the peanut butter, sugar, and vanilla extract, mixing until well combined. Beat in the eggs one at a time, followed by the heavy cream. Fold in the chopped peanut butter cups.
- Bake the cheesecake – Pour the filling over the prepared crust and bake at 325°F (163°C) for 50–55 minutes, or until the center is slightly jiggly but mostly set. Turn off the oven and let the cheesecake cool inside for an hour to prevent cracks.
- Chill before adding ganache – Transfer the cheesecake to the refrigerator and let it chill for at least 4 hours, preferably overnight, to fully set.
- Make the chocolate ganache – Heat the heavy cream until hot but not boiling, then pour it over the chocolate chips. Let sit for a minute, then stir until smooth. Pour the ganache over the chilled cheesecake, spreading it evenly.
- Garnish and serve – Sprinkle additional chopped peanut butter cups over the ganache. Let set for about 30 minutes before slicing and serving.
Pro Tips for the Perfect Peanut Butter Cup Cheesecake
- For a firmer crust, pre-bake it at 350°F (175°C) for 10 minutes before adding the filling.
- To prevent cracks, avoid over-mixing the batter and let the cheesecake cool gradually in the oven.
- For extra peanut butter flavor, drizzle melted peanut butter over the ganache before serving.
- Store leftovers in the refrigerator for up to 5 days, or freeze individual slices for a longer shelf life.
Variations to Try
- No-Bake Version – Skip the baking by using a no-bake cheesecake filling with whipped cream and gelatin.
- Mini Cheesecakes – Make individual-sized cheesecakes using a muffin tin for easy portioning.
- Oreo Peanut Butter Cheesecake – Use peanut butter Oreos for an extra flavor boost in the crust.
This peanut butter cup cheesecake is rich, indulgent, and absolutely unforgettable. Whether you’re making it for a special occasion or just treating yourself, it’s guaranteed to be a crowd favorite.
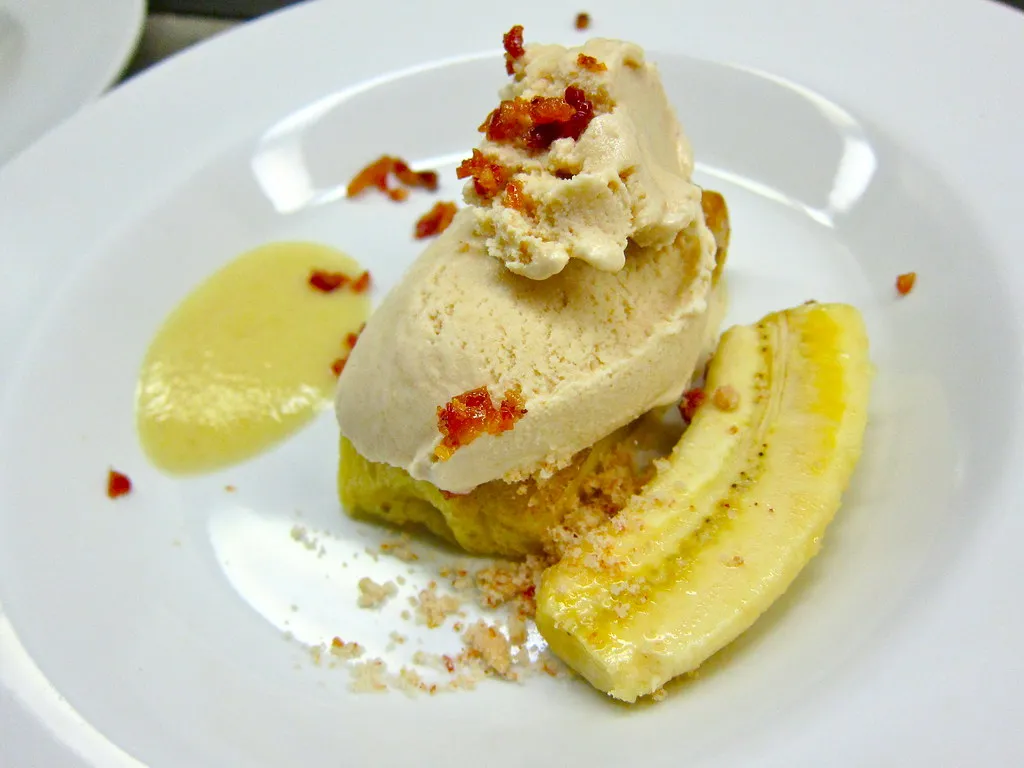
Peanut Butter and Banana Ice Cream – A Healthy Twist
If you’re looking for a deliciously creamy dessert that’s also nutritious, peanut butter and banana ice cream is the perfect choice. This naturally sweet, dairy-free treat is made with just a few wholesome ingredients and is packed with flavor. It offers the richness of peanut butter combined with the natural sweetness of bananas, creating an indulgent yet guilt-free dessert. Best of all, you don’t need an ice cream maker—just a blender or food processor!
Why You’ll Love Peanut Butter and Banana Ice Cream
- No added sugar – The natural sweetness of ripe bananas makes this dessert perfectly sweet without the need for extra sugar.
- Dairy-free and vegan – A great alternative to traditional ice cream.
- High in protein and fiber – Peanut butter provides protein, while bananas add fiber and essential vitamins.
- Quick and easy – With just a few simple ingredients and a blender, you’ll have ice cream in minutes.
Ingredients You’ll Need
To make this creamy and satisfying peanut butter and banana ice cream, gather the following ingredients:
- 3 ripe bananas – The riper, the better! They add natural sweetness and a smooth texture.
- ½ cup (120g) peanut butter – Creamy peanut butter works best, but you can use crunchy for added texture.
- 1 teaspoon (5ml) vanilla extract – Enhances the flavor and adds a warm, dessert-like aroma.
- 2–4 tablespoons (30–60ml) milk (optional) – A splash of almond, oat, or regular milk can help achieve a creamier consistency.
- Pinch of salt – Brings out the flavors and balances the sweetness.
Step-by-Step Instructions
- Freeze the bananas – Peel and slice ripe bananas into coins, then freeze them in a single layer on a baking sheet for at least 2 hours (or overnight for best results).
- Blend the ingredients – In a high-powered blender or food processor, combine the frozen bananas, peanut butter, vanilla extract, and a pinch of salt. Blend until smooth and creamy. If needed, add a splash of milk to help with blending.
- Adjust the texture – If you prefer a soft-serve consistency, serve immediately. For firmer ice cream, transfer the mixture to a container and freeze for another 1–2 hours before scooping.
- Serve and enjoy – Scoop into bowls and top with your favorite add-ins, such as chopped peanuts, chocolate chips, or a drizzle of honey.
Pro Tips for the Best Peanut Butter and Banana Ice Cream
- Use very ripe bananas – The more brown spots, the sweeter and creamier the ice cream will be.
- For extra creaminess, blend in a tablespoon of Greek yogurt or coconut cream.
- To add more texture, mix in crushed nuts, granola, or cacao nibs after blending.
- For a protein boost, add a scoop of vanilla or chocolate protein powder before blending.
Variations to Try
- Chocolate Peanut Butter Banana Ice Cream – Add 1–2 tablespoons of cocoa powder for a chocolatey twist.
- Salted Caramel Peanut Butter Ice Cream – Drizzle homemade salted caramel sauce over the top before serving.
- Nut-Free Option – Swap peanut butter for sunflower seed butter or almond butter.
- Chunky Monkey Style – Fold in dark chocolate chunks and chopped walnuts for extra crunch.
This peanut butter and banana ice cream is a healthy, easy-to-make alternative to traditional ice cream. Whether you enjoy it as a post-workout snack, a refreshing summer treat, or a guilt-free dessert, it’s sure to satisfy your cravings while keeping things light and wholesome.
To achieve the perfect creamy texture for your peanut butter and banana ice cream, using a high-quality immersion blender can make the process effortless. The Ninja CI101 Immersion Blender is a great tool for blending frozen bananas and peanut butter into a smooth and creamy consistency. With 750 peak watts of power, it effortlessly purees frozen ingredients, ensuring a silky ice cream texture without the need for an ice cream maker. Its EasyGlide design allows for smooth blending, and its compact size makes it a convenient addition to any kitchen. Whether you’re making ice cream, smoothies, or sauces, this immersion blender can handle it all.


