The Best Fluffy Pancakes recipe you will fall in love with. Full of tips and tricks to help you make the best pancakes.
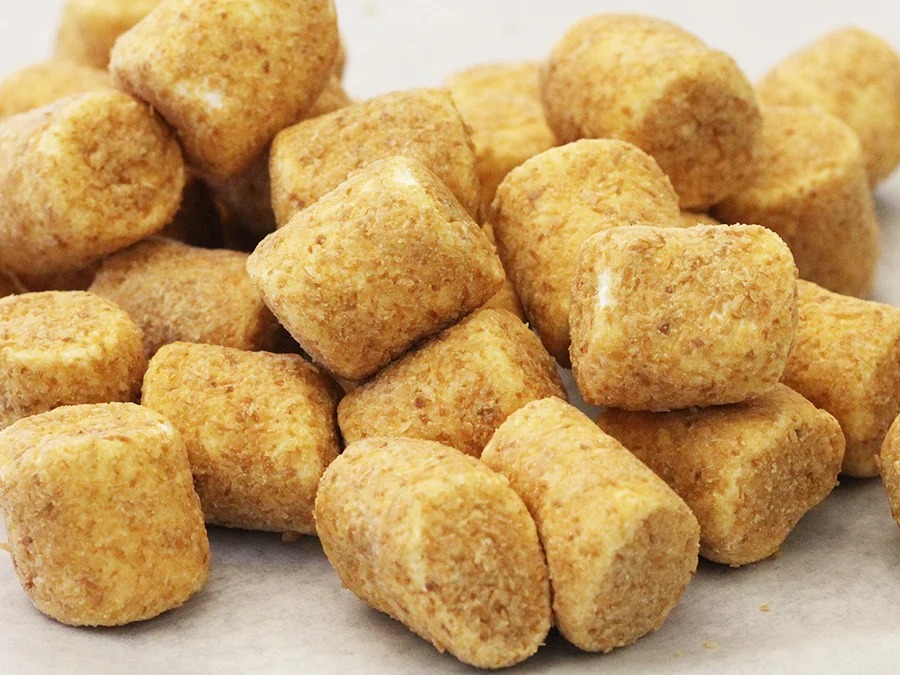
If you’ve never tasted a homemade marshmallow, you’re in for a treat—especially when you add a tropical twist! These toasted coconut marshmallows are soft, fluffy, and coated in perfectly golden coconut flakes that give each bite a sweet crunch and rich, nutty flavor. Whether you’re planning to impress guests with a unique dessert, prepping a cozy batch of s’mores, or looking for a creative homemade gift, this easy coconut marshmallow recipe will quickly become a favorite.
In this post, I’ll walk you through exactly how to make toasted coconut marshmallows at home, from simple ingredients to expert tips that guarantee pillowy perfection. No candy-making experience required—just a few tools, a little patience, and a love for all things coconut!
Why You’ll Love These Toasted Coconut Marshmallows
Homemade marshmallows are already a step above store-bought, but when you coat them in toasted coconut flakes, you get something truly special. These marshmallows are more than just a sweet treat—they’re soft, chewy, and full of tropical flavor. Whether you’re a coconut lover or just looking for a new dessert to try, here’s why this recipe will win you over:
Soft, Fluffy, and Full of Coconut Flavor
These marshmallows have a melt-in-your-mouth texture thanks to the whipped gelatin base. Unlike dense store-bought versions, homemade marshmallows are light, airy, and satisfyingly chewy. The toasted coconut adds a natural sweetness and a bit of texture to every bite, making them both fluffy and flavorful.
A Tropical Twist on a Classic Treat
The combination of vanilla and toasted coconut flakes gives these marshmallows a warm, island-inspired taste. They’re perfect for anyone who loves tropical desserts or wants a fun spin on a childhood favorite. It’s like a beach vacation wrapped in a bite-sized snack!
Perfect for Gifting or S’mores Nights
Not only are these marshmallows easy to make, but they also look beautiful with their golden coconut coating—making them a great addition to homemade candy boxes, dessert platters, or edible gifts. Want to take your s’mores to the next level? Swap out regular marshmallows for these and get ready for a tropical campfire upgrade.
Ingredients You’ll Need
Making toasted coconut marshmallows at home doesn’t require a long list of fancy ingredients—just a few pantry staples and a little coconut magic. Below is everything you’ll need to whip up a soft, chewy batch of homemade marshmallows with a tropical twist:
Marshmallow Base Essentials
To create the perfect fluffy texture, you’ll start with the foundational ingredients used in most marshmallow recipes:
- Unflavored gelatin – This is what gives your marshmallows structure and that signature bouncy texture. You’ll need it to “bloom” in cold water before mixing it in.
- Granulated sugar – Used to create the sweet syrup base.
- Light corn syrup – Helps prevent crystallization and keeps the marshmallows smooth. (You can also use a no-corn-syrup alternative—see below!)
- Water – Needed to dissolve the sugar and activate the gelatin.
- Salt – Just a pinch to balance the sweetness.
Toasted Coconut Flakes
This is what sets your marshmallows apart!
- Unsweetened shredded or flaked coconut – Toasting it brings out a deep, nutty flavor and adds a golden, slightly crisp coating to the marshmallows.
- Optional: Sweetened coconut – If you prefer a sweeter coating, you can use sweetened flakes instead, but keep an eye on them while toasting—they brown quickly!
Optional Flavor Add-ins
Want to customize the flavor? Try adding:
- Vanilla extract – A must-have for classic marshmallow flavor.
- Coconut extract – For an extra boost of tropical goodness.
- Honey or maple syrup – As a substitute for corn syrup if you prefer a more natural option (note: it may change the texture slightly).
- Other extracts – Like almond, lime, or rum for creative twists.
Kitchen Tools to Have Ready
Success in marshmallow-making depends as much on your tools as your ingredients. Make sure you have:
- Stand mixer with a whisk attachment – Whipping the mixture to a fluffy consistency takes about 10 minutes of high-speed mixing, which is easiest with a stand mixer.
- Candy thermometer – To ensure your sugar syrup reaches the perfect temperature (usually around 240°F or 115°C).
- 8×8 or 9×9 inch pan – For setting your marshmallows. Lining it with parchment and dusting it makes removal easier.
- Sifter or fine-mesh strainer – To coat your pan and marshmallows with a dusting of coconut or starch to prevent sticking.
- Baking sheet – For toasting the coconut flakes until they’re golden and aromatic.
Step-by-Step: How to Make Coconut Marshmallows
Making toasted coconut marshmallows at home might sound like a professional candy-maker’s job, but it’s actually a fun and doable process in your own kitchen! With the right tools, accurate measurements, and a little patience, you’ll have a batch of fluffy, chewy, coconut-coated marshmallows in no time.
Step 1: Toast the Coconut Flakes
Ingredients:
- 1½ cups unsweetened shredded coconut (or flaked)
Instructions:
- Preheat your oven to 325°F (160°C).
- Spread the shredded coconut evenly on a baking sheet lined with parchment paper.
- Bake for 5 to 10 minutes, stirring every couple of minutes until the coconut is lightly golden and fragrant.
- Let it cool completely while you make the marshmallows.
🔥 Tip: Keep an eye on the coconut—it can go from golden to burnt very quickly!
Step 2: Bloom the Gelatin
Ingredients:
- 3 packets (about 21g) of unflavored gelatin
- ½ cup cold water
Instructions:
- In the bowl of a stand mixer, pour the cold water and sprinkle the gelatin evenly over it.
- Let it sit for 10 minutes to bloom. It will absorb the water and become thick.
Step 3: Make the Sugar Syrup
Ingredients:
- 1 cup granulated sugar
- 1 cup light corn syrup (or honey/maple syrup as alternative)
- ½ cup water
- ¼ tsp salt
Instructions:
- In a medium saucepan, combine the sugar, corn syrup, water, and salt.
- Stir just to combine, then stop stirring and attach a candy thermometer to the side of the pot.
- Bring the mixture to a boil over medium-high heat and cook until it reaches 240°F (115°C)—the soft-ball stage.
- Remove from heat immediately.
Step 4: Whip It Until Fluffy
Ingredients (add now):
- 1 tbsp vanilla extract (or 1 tsp vanilla + ½ tsp coconut extract for more coconut flavor)
Instructions:
- With the mixer on low speed, slowly pour the hot syrup into the bloomed gelatin (careful—it’s hot!).
- Once fully added, turn the mixer to high speed and whip for 10–12 minutes, or until the mixture becomes thick, glossy, and tripled in volume.
- Add the vanilla (and coconut extract if using) in the last minute of whipping.
Step 5: Pour, Set, and Coat
Other ingredients:
- Toasted coconut flakes (from Step 1)
- Optional: Powdered sugar or cornstarch for dusting
Instructions:
- Line an 8×8-inch pan with parchment paper and lightly grease it. Sprinkle some of the toasted coconut on the bottom.
- Pour the whipped marshmallow mixture into the pan and smooth the top with a spatula.
- Sprinkle more toasted coconut on top, pressing lightly so it sticks.
- Let the marshmallows sit at room temperature for at least 4–6 hours, or preferably overnight.
Step 6: Cut and Roll in Coconut
- Once set, remove the marshmallow block from the pan.
- Use a sharp knife or pizza cutter, greased with oil, to slice into squares.
- Roll each square in the remaining toasted coconut to coat all sides.
- Store in an airtight container at room temperature for up to 1 week.
🌴 Bonus: These marshmallows are perfect in hot chocolate, s’mores, or as a tropical candy gift!
Pro Tips for Perfect Homemade Marshmallows
Making homemade marshmallows—especially with a tropical twist like toasted coconut—is easier than it looks, but a few insider tricks can help you get soft, fluffy, and professional-looking results every single time. Whether it’s your first batch or your fiftieth, these tips will make your marshmallow-making process smoother and your results more delicious.
How to Avoid Sticky Situations
Marshmallows are naturally sticky, but you can keep things mess-free with a few simple steps:
- Dust everything: Lightly dust your work surface, knife, and hands with toasted coconut flakes, powdered sugar, or a 50/50 mix of powdered sugar and cornstarch. This prevents sticking and helps your marshmallows look more polished.
- Use parchment paper: Always line your pan with parchment and dust it before pouring in the mixture.
- Oil your tools: Lightly grease your spatula, knife, or pizza cutter with neutral oil or non-stick spray for easier handling.
Adjusting for Texture and Sweetness
Want your marshmallows a bit softer or less sweet? Here’s how to tweak the recipe:
- Softer marshmallows: Slightly reduce the whipping time by 1–2 minutes to keep the mixture softer (though still set).
- Less sweet: Use unsweetened coconut flakes and consider replacing corn syrup with honey or maple syrup for a more balanced flavor.
- Extra fluffy: Whip the marshmallow mixture just until it forms soft peaks and begins to pull away from the bowl’s sides. Over-whipping can make the mixture dry and harder to spread.
How to Store for Freshness
Proper storage will keep your marshmallows tasting fresh and bouncy:
- Room temperature: Store marshmallows in an airtight container at room temperature. Avoid the fridge—it introduces moisture that can ruin the texture.
- Layer with parchment: If stacking marshmallows, separate layers with parchment paper to prevent sticking.
- Best within 7 days: While they can last up to 2 weeks, they taste best within the first 5–7 days after making.
Flavor and Presentation Boosters
For next-level marshmallows that look as good as they taste:
- Use coconut extract: Just a ½ teaspoon adds a richer tropical depth.
- Dip in chocolate: Half-dip your finished marshmallows in melted dark or white chocolate, then sprinkle with extra toasted coconut.
- Add a swirl: Gently fold in melted chocolate or fruit puree before pouring the marshmallow mixture into the pan for a beautiful marbled effect.
Fun Ways to Use Toasted Coconut Marshmallows
Once you’ve made a batch of these toasted coconut marshmallows, the possibilities go far beyond just popping one into your mouth (though we won’t blame you if that’s the first thing you do!). These pillowy, golden-coated treats are incredibly versatile—you can use them to upgrade your favorite desserts, impress guests, or even create DIY gifts. Here are some fun, creative, and downright delicious ways to enjoy them:
Add Them to S’mores or Hot Chocolate
Why settle for plain marshmallows when you can turn your next campfire or cozy night in into a tropical escape?
- S’mores Upgrade: Swap traditional marshmallows for toasted coconut ones in your s’mores. The coconut adds a nutty crunch and pairs beautifully with dark chocolate and graham crackers.
- Hot Chocolate Topper: Drop a few cubes into a mug of rich hot cocoa for a melty, coconut-kissed topping. They float, melt slowly, and add a lovely sweetness with a hint of toasted goodness.
- Try with Mocha or Coffee: These marshmallows aren’t just for cocoa—try them in a mocha latte or espresso for a café-style treat at home.
Gift Them in Homemade Candy Boxes
If you’re looking for a sweet homemade gift that’s unique and impressive, these marshmallows are perfect:
- Holiday or party favors: Package 4–6 marshmallows in a cellophane bag tied with twine and a tag.
- Hot cocoa kits: Include a few marshmallows, a packet of cocoa mix, and a small chocolate spoon in a mug for a cozy gift set.
- Dessert platters: Add them to a Christmas dessert board, baby shower sweets table, or birthday platter for a soft texture contrast.
🎁 Pro tip: Roll some marshmallows in white chocolate and extra coconut before gifting for a beautiful finish!
Pair with Tropical Desserts
These marshmallows naturally complement island-inspired sweets and fruity desserts:
- Serve with pineapple upside-down cake, coconut cake, or mango sorbet.
- Add to fruit skewers for a fun, tropical-themed treat—alternate pineapple, strawberries, and marshmallows on sticks.
- Layer into coconut parfaits or trifles for added fluff and flavor between fruit and cream layers.
Flavor Variations to Try Next Time
Once you’ve mastered the classic, have fun experimenting with flavor combinations:
- Coconut-lime marshmallows: Add lime zest and a few drops of lime juice to the base.
- Chocolate-coconut swirl: Gently fold in melted dark chocolate before pouring into the pan for a marbled effect.
- Pineapple-coconut: Add a little pineapple extract for a piña colada twist.
- Toasted almond & coconut: Mix crushed toasted almonds into the coconut coating for a nutty crunch.


