The Best Fluffy Pancakes recipe you will fall in love with. Full of tips and tricks to help you make the best pancakes.
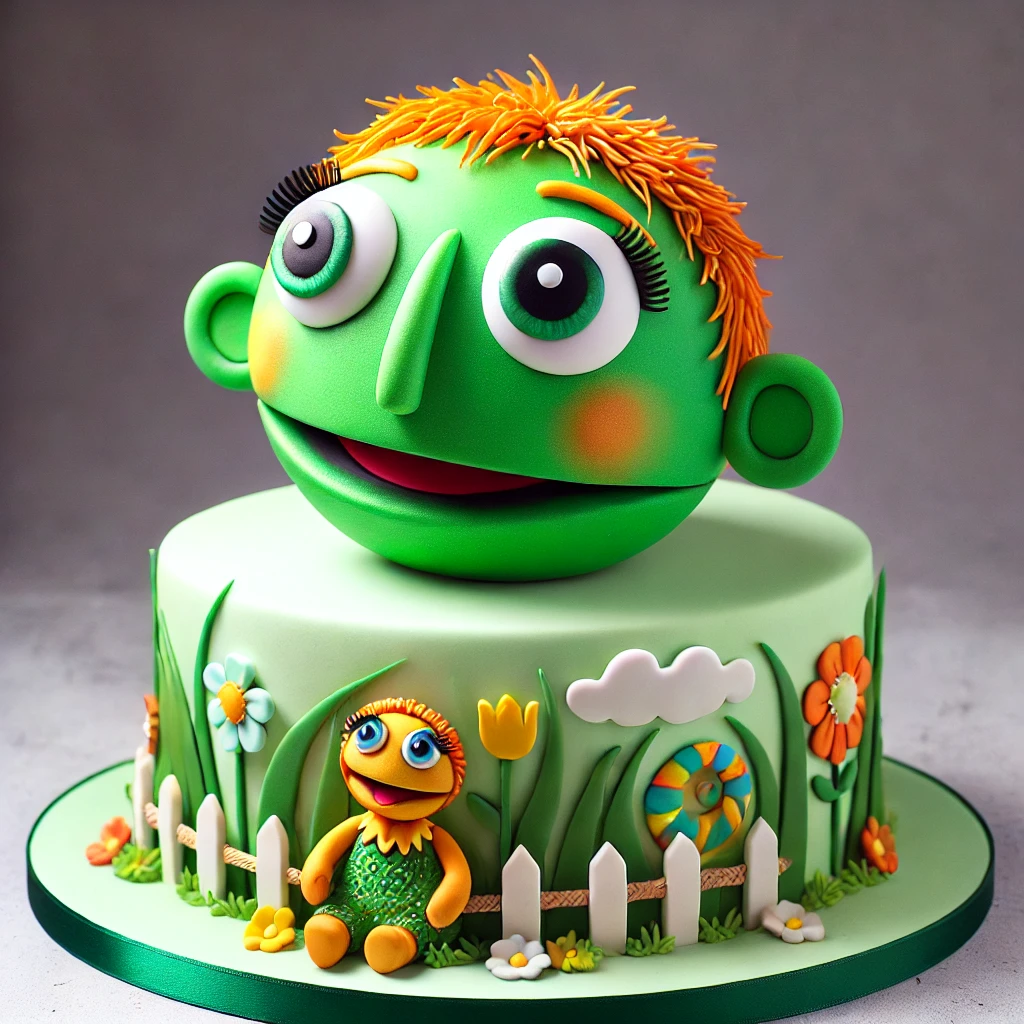
If you’re looking to add a splash of fun and creativity to your next celebration, the Nanalan cake is exactly what you need! Inspired by whimsical themes and bursting with vibrant colors, this cake isn’t just a dessert — it’s a playful masterpiece that delights both kids and adults alike. Whether you’re throwing a birthday party, a family gathering, or simply want to impress with a unique homemade treat, the ultimate Nanalan cake combines easy-to-follow baking techniques with imaginative decoration ideas to create a show-stopping centerpiece. In this guide, we’ll walk you through everything from essential ingredients and tools to step-by-step baking and decorating tips — so you can craft your own delicious, whimsical delight right at home. Ready to bring a little magic to your kitchen? Let’s get started!
What Is a Nanalan Cake? A Fun and Whimsical Treat
When it comes to celebrating special moments, a cake isn’t just a dessert — it’s a centerpiece that captures the spirit of the occasion. The Nanalan cake is a whimsical treat inspired by playful themes, bright colors, and imaginative designs that bring joy and creativity to any party table. But what exactly makes a Nanalan cake so unique and fun? Let’s dive in!
The Inspiration Behind Nanalan Cake
The name “Nanalan” may ring a bell for fans of the quirky children’s TV show that features vibrant characters and imaginative storytelling. Drawing from this playful and colorful inspiration, the Nanalan cake embraces a similar spirit of fun and fantasy. It’s designed to look lively, often incorporating bold colors, creative shapes, and eye-catching decorations that spark delight in both kids and adults. The cake’s whimsical nature invites bakers to think outside the box and use their imagination — making it a perfect project for anyone who loves baking with a twist of fun.
Why Choose a Whimsical Cake for Your Celebration?
Whimsical cakes like the Nanalan cake are more than just tasty treats — they’re conversation starters, mood lifters, and memory makers. Whether you’re planning a child’s birthday party, a baby shower, or a casual gathering, choosing a cake with a playful theme instantly adds excitement and charm to the event. The bright colors and creative decorations appeal especially to kids, but adults often appreciate the artistry and cheerful vibe too. Plus, making a whimsical cake allows you to customize the design and flavors to perfectly match the occasion and the tastes of your guests.
Key Features of a Nanalan Cake
What sets a Nanalan cake apart from other cakes? Here are some signature elements that give it that whimsical edge:
- Vibrant, playful colors: The cake layers and frosting often feature bright shades like pink, green, blue, or yellow, usually achieved with food coloring.
- Creative shapes and layers: Instead of a traditional round cake, Nanalan cakes may include fun shapes, stacked layers, or decorative cut-outs that add dimension.
- Playful decorations: From edible toppers and sprinkles to piped designs and fondant figures, the decoration is all about imagination and joy.
- Kid-friendly and fun: The overall style appeals to children and anyone young at heart, making it ideal for birthdays and themed parties.
In the next sections, we’ll explore everything you need to bake and decorate your own Nanalan cake — from gathering ingredients to assembling your colorful creation. Get ready to bring a bit of magic to your kitchen!
Essential Ingredients and Baking Tools for Nanalan Cake
Creating the ultimate Nanalan cake is all about combining the right ingredients with the proper tools to bring your whimsical vision to life. Whether you’re a beginner baker or have some experience, having everything you need before you start will make the process smooth and enjoyable. Let’s break down the essential ingredients and baking tools that will help you bake, decorate, and assemble your playful masterpiece with ease.
Baking Ingredients You’ll Need
To craft the colorful and flavorful sponge layers that make the Nanalan cake so delightful, you’ll want quality ingredients that produce a moist, tender cake. Here’s a list of the basics:
- All-purpose flour: The foundation of your cake’s structure, ensuring a soft crumb.
- Granulated sugar: For sweetness and moisture.
- Baking powder and baking soda: These leavening agents help your cake rise perfectly.
- Salt: Just a pinch to balance flavors.
- Butter (or oil): Adds richness and tenderness. Butter also enhances flavor, while oil keeps cakes moist.
- Eggs: Bind the ingredients and contribute to the cake’s texture.
- Milk or buttermilk: Provides moisture and tenderness. Buttermilk adds a slight tang and helps with fluffiness.
- Vanilla extract: A classic flavor enhancer for most cake recipes.
- Food coloring: The key to making your cake layers vibrant and fun. Gel or paste food coloring is recommended for bright, bold colors without thinning the batter.
Frosting and Decoration Essentials
No Nanalan cake is complete without whimsical frosting and decorations that bring the cake’s playful theme to life. Consider these must-have ingredients for frosting and toppings:
- Buttercream frosting: Smooth, creamy, and easy to color, buttercream is perfect for frosting layers and decorating. You can flavor it with vanilla, almond, or citrus extracts.
- Fondant: For smooth, sculpted shapes and toppers. Fondant can be rolled, molded, and colored to create fun characters or shapes.
- Edible toppers and sprinkles: Add sparkles, shapes, or themed edible decorations to enhance the whimsical vibe.
- Gel food coloring: For tinting frosting and fondant with intense, vivid colors without affecting texture.
- Piping gel or edible glue: To help attach fondant decorations securely.
Tools to Make Cake Decorating Easier
Having the right tools on hand makes decorating your Nanalan cake fun and precise, turning your vision into reality with ease. Here are some handy tools to consider:
- Mixing bowls and electric mixer: For thoroughly blending your batter and frosting to a perfect consistency. A great choice is the Ninja CI101 750 Peak Watt Immersion Blender for its power and ease of use.
- Measuring cups and spoons: Accuracy is key for baking success.
- Cake pans: Round or shaped pans depending on your design, ideally non-stick or well-greased for easy release.
- Cooling racks: To let your cakes cool evenly before decorating.
- Offset spatula and bench scraper: Essential for spreading frosting smoothly and creating clean edges.
- Piping bags and tips: For detailed frosting work, including borders, flowers, and fun designs.
- Cake turntable: Makes it easier to frost and decorate your cake evenly.
- Fondant rolling pin and cutters: For shaping and cutting fondant decorations.
- Food-safe brushes: For applying edible glue or dusting with edible shimmer.
By gathering these ingredients and tools before you begin, you’ll set yourself up for success in creating a Nanalan cake that’s as delicious as it is delightful. In the next section, we’ll dive into a step-by-step guide to baking and assembling your whimsical cake layers — so get ready to roll up your sleeves and start baking!
Step-by-Step Guide to Baking Your Nanalan Cake
Baking a Nanalan cake is a joyful and creative process that combines colorful sponge layers with smooth frosting and imaginative decorations. Whether you’re a novice or a seasoned baker, this step-by-step guide will walk you through each part of the journey — from mixing your batter to putting on the finishing touches — so your whimsical cake turns out both stunning and delicious.
Preparing the Colorful Sponge Layers
- Gather your ingredients: Before starting, make sure you have all your ingredients measured and ready. This “mise en place” step helps ensure a smooth baking process.
- Mix the batter: In a large bowl, cream together softened butter and sugar until light and fluffy using an electric mixer. Add eggs one at a time, mixing well after each addition.
- Combine dry ingredients: In a separate bowl, sift together flour, baking powder, baking soda, and salt. Gradually add the dry mix to the wet ingredients, alternating with milk or buttermilk, mixing just until combined.
- Divide and color: Divide the batter evenly into separate bowls, depending on how many colors you want to create. Add gel food coloring to each bowl and gently fold it in until you reach your desired vibrant shades.
- Bake the layers: Pour each colored batter into greased cake pans. Bake in a preheated oven at 350°F (175°C) for about 20–25 minutes or until a toothpick inserted into the center comes out clean.
- Cool completely: Remove cakes from pans and transfer to cooling racks. Let them cool completely before assembling — this prevents frosting from melting.
Making the Perfect Whimsical Frosting
- Prepare buttercream: Beat softened butter until creamy, then gradually add powdered sugar and a pinch of salt. Add vanilla extract and a splash of milk or cream, beating until smooth and fluffy.
- Color your frosting: Divide the frosting into portions if you want multiple colors. Add gel food coloring and mix well until vibrant and even in tone.
- Test consistency: If frosting is too thick, add a tiny bit more milk; if too thin, add powdered sugar to thicken.
Assembling and Layering Your Cake
- Level the layers: Use a serrated knife or cake leveler to trim the domed tops off your cake layers, creating flat, even surfaces for stacking.
- Start layering: Place the first layer on your cake board or serving plate. Spread an even layer of frosting over it using an offset spatula.
- Repeat layers: Continue stacking cake layers and frosting until all are assembled. Press gently to ensure layers stick together but avoid squishing the cake.
- Crumb coat: Apply a thin layer of frosting around the entire cake to seal in crumbs. Chill the cake in the refrigerator for 15–30 minutes to set this crumb coat.
Creative Decoration Ideas
- Final frosting layer: Once the crumb coat is set, apply a thicker, smoother layer of frosting over the whole cake. Use a bench scraper and offset spatula for clean edges and a polished finish.
- Piping designs: Use piping bags fitted with different tips to create whimsical borders, flowers, swirls, or playful shapes on your cake.
- Add edible toppers: Decorate with colorful sprinkles, fondant shapes, or themed edible toppers that match your Nanalan-inspired design.
- Personal touches: Consider adding glitter dust, edible pearls, or customized messages for that extra-special flair.
Tips for Customizing Your Nanalan Cake for Any Occasion
One of the best things about the Nanalan cake is its incredible versatility. Whether you’re celebrating a birthday, a baby shower, a holiday, or just want to surprise someone special, you can easily tailor your Nanalan cake to fit any occasion. Here are some creative and practical tips to help you customize your whimsical cake and make it truly one-of-a-kind.
Play with Color Themes
Color is one of the easiest and most impactful ways to personalize your Nanalan cake. You can match the cake colors to the event theme, the birthday person’s favorite hues, or seasonal palettes:
- Birthday parties: Use bright, cheerful colors like red, yellow, blue, or pink for a lively celebration.
- Baby showers: Soft pastels such as mint green, baby blue, blush pink, or lavender add a gentle, sweet vibe.
- Holidays: Customize colors to match holiday themes — red and green for Christmas, orange and black for Halloween, or red, white, and blue for Independence Day.
- Seasonal themes: Draw inspiration from nature — autumnal oranges and browns, springtime pastels, or cool winter blues and whites.
Customize Flavors and Fillings
Don’t limit yourself to classic vanilla! Customizing your cake’s flavors adds an extra layer of delight that guests will love:
- Cake flavors: Consider chocolate, lemon, red velvet, or even funfetti for colorful surprises inside.
- Fillings: Layer your cake with jams (raspberry, strawberry), curds (lemon or passionfruit), or creamy fillings like chocolate ganache or cream cheese frosting.
- Frosting flavors: Add extracts such as almond, coconut, or peppermint to your buttercream to complement your cake’s flavor profile.
Creative Decoration Ideas
Decorations are where you can really let your imagination run wild, adding personality and charm to your Nanalan cake:
- Themed toppers: Create or purchase edible toppers that match the event — animals, cartoon characters, flowers, or geometric shapes.
- Edible art: Use edible markers or paints to draw designs or write personalized messages on fondant or frosting.
- Textures and finishes: Experiment with different frosting techniques — ruffles, rosettes, smooth finishes, or even drip designs with colored ganache.
Size and Shape Adjustments
Depending on your event and guest count, you can modify the size and shape of your Nanalan cake:
- Mini cakes: Make individual mini cakes or cupcakes for party favors or a fun dessert table.
- Tiered cakes: For bigger celebrations, stack multiple tiers of Nanalan cakes for an impressive statement piece.
- Unique shapes: Use shaped cake pans — stars, hearts, or custom shapes — to match the party’s theme or personal interests.
Dietary Considerations
Make your Nanalan cake inclusive by adjusting the recipe to meet specific dietary needs:
- Gluten-free: Substitute all-purpose flour with gluten-free blends designed for baking.
- Dairy-free: Use plant-based butter and milk alternatives like almond, oat, or coconut milk.
- Vegan: Use egg replacers and plant-based dairy alternatives to make a fully vegan cake.
- Sugar-free: Use natural sweeteners like stevia or erythritol, and adjust frosting sweetness accordingly.
Serving, Storing, and Sharing Your Whimsical Delight
After all the effort and creativity you’ve poured into your Nanalan cake, it’s time to enjoy and share your masterpiece! Proper serving, storing, and sharing will ensure that your cake stays fresh, looks beautiful, and brings joy to everyone lucky enough to taste it. Here are some helpful tips to make the most of your whimsical Nanalan cake experience.
Serving Your Nanalan Cake
- Presentation matters: Use a beautiful cake stand or decorative platter to display your Nanalan cake, making it the centerpiece of any celebration. Adding matching themed decorations or fresh flowers around the base can enhance the overall look.
- Perfect slicing: For clean, neat slices, use a sharp serrated knife. Warm the knife slightly by dipping it in hot water and wiping it dry before slicing each piece. This prevents the frosting from sticking and keeps layers intact.
- Portion control: Depending on the size and richness of your cake, smaller slices may be ideal — especially if your cake has rich frosting or multiple layers.
- Accompaniments: Pair slices with complementary treats like fresh berries, whipped cream, or a scoop of vanilla ice cream to enhance the flavor experience.
Storing Your Nanalan Cake
- Room temperature: If your cake is buttercream-frosted and will be consumed within 1-2 days, you can store it at room temperature, loosely covered with a cake dome or plastic wrap to protect it from drying out. Avoid direct sunlight and heat.
- Refrigeration: For longer storage (up to 5 days), place your cake in the refrigerator. Cover it loosely with plastic wrap or place it in an airtight container to prevent it from absorbing odors or drying out. Bring the cake to room temperature before serving for the best texture and flavor.
- Freezing: If you need to store your cake for weeks, you can freeze it. Wrap the whole cake or individual slices tightly in plastic wrap, then in aluminum foil, and place in a freezer-safe container. Thaw in the refrigerator overnight, then bring to room temperature before serving.
Sharing the Joy
- Gift-giving: Nanalan cakes make fantastic gifts! Package a mini cake or slices in a decorative box or cake carrier for birthdays, holidays, or “just because” treats. Personalize with a handwritten note for a thoughtful touch.
- Party favors: Mini versions of your Nanalan cake can be prepared as party favors, delighting guests with a slice of your whimsical creation to take home.
- Social sharing: Share your baking journey and the final masterpiece on social media. Use vibrant photos and behind-the-scenes shots to inspire others to try making their own Nanalan cake. Don’t forget to include your favorite recipe and decorating tips!
With these serving, storing, and sharing tips, your Nanalan cake will stay fresh, look amazing, and bring smiles long after it’s been baked. Whether enjoyed at a family gathering or shared with friends near and far, this whimsical delight is sure to be remembered.


