The Best Fluffy Pancakes recipe you will fall in love with. Full of tips and tricks to help you make the best pancakes.
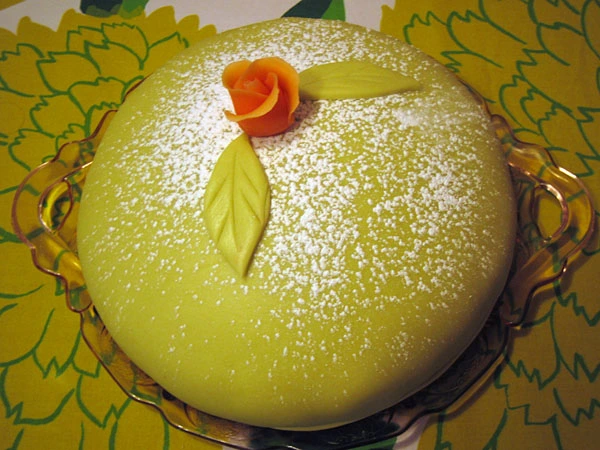
If you’ve ever admired the beauty of a classic Scandinavian dessert, the Princess Cake—or Prinsesstårta—is a true showstopper. With its signature pastel green marzipan dome, layers of light sponge cake, sweet raspberry jam, silky pastry cream, and fluffy whipped cream, this Swedish favorite is as delicious as it is elegant. Originally created for Swedish royalty, it has become a beloved centerpiece at birthdays, baby showers, and afternoon teas.
While it may look like something from a pastry shop window, the good news is—you can absolutely make this royal treat at home. In this guide, you’ll learn everything from the ingredients you need to decorating like a pro, plus tips to ensure authentic flavor and flawless presentation. Let’s bring a bit of Swedish tradition to your kitchen and make your own perfect princess cake!
What Is a Princess Cake?
The Princess Cake, or Prinsesstårta in Swedish, is a traditional Scandinavian dessert known for its whimsical appearance and rich, layered composition. This beautiful cake features a pastel green marzipan shell, hiding a soft, dome-shaped core of sponge cake, raspberry jam, custard, and whipped cream. Its elegant structure and balance of sweetness make it a favorite for special occasions, especially in Sweden.
The Swedish Origin of Princess Tårta
The cake was originally created in the early 20th century by Jenny Åkerström, a Swedish home economics teacher who taught the daughters of Prince Carl of Sweden. The cake was so beloved by the young princesses that it became known as Princess Tårta—“Princess Cake.” It quickly grew in popularity and is now a staple in Swedish bakeries and homes.
Why It’s Popular for Celebrations and Birthdays
Princess Cake is more than just a dessert—it’s a celebration centerpiece. With its beautiful appearance and delicate flavor, it’s often served at birthdays, graduations, weddings, and Swedish holidays like Prinsesstårtans dag (Princess Cake Day) in September. Its towering, dome shape makes it both photogenic and festive.
Key Features of the Cake – Marzipan Dome and Custard Layers
What makes Princess Cake unique is its architecture. It starts with three thin layers of airy sponge cake, separated by homemade pastry cream and raspberry jam. The entire cake is then covered with pillowy whipped cream and topped with a sheet of green-tinted marzipan, shaped into a smooth dome. A pink marzipan rose and a dusting of powdered sugar are often added for the final royal touch.
How It Got Its Royal Name
Though originally titled “Green Cake” in Åkerström’s cookbook, the name changed after the royal sisters—Princesses Märtha, Margaretha, and Astrid—fell in love with it. Their affection for the dessert helped elevate it from a simple confection to a cake fit for royalty—thus the Princess Cake was born.
Ingredients You’ll Need to Make a Princess Cake
Making a classic Princess Cake from scratch may seem elaborate, but each component plays a key role in creating its signature texture and flavor. From the airy sponge layers to the sweet marzipan dome, using fresh, high-quality ingredients will ensure a cake that looks and tastes truly royal.
Traditional Sponge Cake Base
At the heart of the Princess Cake is a light and fluffy sponge cake, typically made without butter to keep it delicate. You’ll need:
- Eggs (at room temperature) – for lift and structure
- Granulated sugar – to sweeten and help whip the eggs to volume
- All-purpose or cake flour – sifted for a fine texture
- Cornstarch – often added for extra softness
- Baking powder (optional) – some recipes use it for added rise
- Salt – just a pinch to enhance flavor
This sponge cake is usually baked in thin layers or sliced horizontally once baked, forming the base for the creamy fillings.
Homemade Custard or Pastry Cream
The second key layer is a rich and velvety pastry cream (vanilla custard). It provides structure and a luxurious mouthfeel. For this, you’ll need:
- Egg yolks – to thicken the cream
- Whole milk – for richness
- Granulated sugar – to sweeten the custard
- Cornstarch or flour – for thickening
- Vanilla bean or extract – for flavor
- Butter – optional, for a smooth finish
Let the custard cool completely before layering to avoid melting the whipped cream.
Whipped Cream and Raspberry Jam
Between the sponge and custard lies a fresh layer of whipped cream and a thin spread of raspberry jam, offering both tang and sweetness. You’ll need:
- Heavy whipping cream – cold, for best volume
- Powdered sugar – to lightly sweeten the cream
- Pure vanilla extract – for flavor (optional)
- Raspberry jam – use seedless for a smooth texture, or homemade for an extra touch
These layers add airiness and brightness, creating that light, cloud-like center.
Green Marzipan and Decorative Toppings
The iconic look of the Princess Cake comes from its pastel green marzipan dome. Marzipan is a pliable almond-based confection, and it’s key to both the flavor and beauty of this dessert. You’ll need:
- Marzipan or almond paste – store-bought or homemade
- Green food coloring – traditionally used to tint the marzipan
- Powdered sugar – for rolling out the marzipan smoothly
- Pink marzipan or fondant – to shape a rose for decoration (optional)
- Powdered sugar – for dusting the top of the cake
If you prefer a more natural look, matcha or spinach powder can be used as natural green colorants.
Step-by-Step Instructions to Make a Princess Cake at Home
Creating a Princess Cake at home may seem like a royal undertaking, but when broken down into manageable steps, it becomes a fun and rewarding process. From baking the sponge layers to crafting the perfect marzipan dome, here’s how to make this elegant dessert from scratch.
1. Bake the Sponge Cake Layers
1. Bake the Sponge Cake Layers
Start by making the light and airy sponge cake, which serves as the foundation of your Princess Cake. This cake is delicate, fluffy, and perfect for layering with custard and whipped cream.
Ingredients for the Sponge Cake:
- 4 large eggs (room temperature)
- 3/4 cup (150 g) granulated sugar
- 1/2 cup (65 g) all-purpose flour
- 1/4 cup (30 g) cornstarch
- 1/2 teaspoon baking powder (optional, for extra lift)
- 1/4 teaspoon salt
Instructions:
- Preheat your oven to 350°F (175°C). For even baking and a professional finish, use a quality countertop convection oven like the Ninja DT201 Foodi 10-in-1 Smart XL Oven.
- Grease and line a 9-inch (23 cm) round cake pan with parchment paper at the bottom to prevent sticking.
- In a large mixing bowl, beat the eggs and sugar on high speed using a hand mixer or stand mixer with a whisk attachment for 5–7 minutes, or until the mixture becomes pale, thick, and triples in volume.
- In a separate bowl, sift together the flour, cornstarch, salt, and baking powder (if using).
- Gently fold the dry ingredients into the egg mixture using a rubber spatula. Work in batches and be careful not to deflate the batter—this helps maintain its airy texture.
- Pour the batter into the prepared cake pan and smooth the surface with a spatula or offset knife.
- Bake for 20–25 minutes, or until the cake is golden, the center springs back when lightly touched, and a toothpick inserted in the center comes out clean.
- Let the cake cool in the pan for 10 minutes, then transfer to a wire rack to cool completely.
- Once cooled, use a serrated knife to slice the sponge into three even layers horizontally.
2. Prepare the Pastry Cream Filling
This smooth vanilla custard adds richness, structure, and creaminess to the Princess Cake’s interior. It pairs perfectly with the airy sponge and light whipped cream.
Ingredients for the Custard:
- 4 large egg yolks
- 1/3 cup (67 g) granulated sugar
- 2 tablespoons (16 g) cornstarch
- 1/8 teaspoon salt
- 1 1/2 cups (360 ml) whole milk
- 1 teaspoon pure vanilla extract
- 1 tablespoon (14 g) unsalted butter
Instructions:
- In a medium saucepan, whisk together the egg yolks, sugar, cornstarch, and salt until smooth and pale.
- In a separate pan or microwave-safe container, gently heat the milk until it’s hot but not boiling.
- Slowly pour the hot milk into the egg mixture while whisking constantly—this tempers the eggs so they don’t scramble.
- Place the saucepan over medium heat and cook the mixture, stirring constantly with a heatproof spatula or whisk, for about 5 to 7 minutes, or until the custard is thick enough to coat the back of a spoon.
- Remove from the heat and stir in the vanilla extract and butter until smooth and glossy.
- Transfer the custard to a clean bowl. Press plastic wrap directly onto the surface to prevent a skin from forming.
- Chill in the refrigerator for at least 1 hour, or until fully cold and set.
3. Whip the Cream and Prepare the Jam
- Whip cold heavy cream with powdered sugar and vanilla extract until stiff peaks form. Keep it chilled until you’re ready to use.
- If using store-bought raspberry jam, give it a quick stir to loosen the texture. For homemade jam, make sure it’s smooth and spreadable.
4. Assemble the Cake
Now it’s time to build your beautiful layered creation.
Assembly Steps:
- Place the bottom sponge layer on a cake board or serving plate.
- Spread a thin layer of raspberry jam, then pipe or spread a layer of pastry cream and a dollop of whipped cream.
- Repeat with the second layer.
- Place the third sponge layer on top, then use the remaining whipped cream to build a dome shape, spreading evenly over the top and sides.
- Smooth it out using an offset spatula. Chill the cake for at least 30–60 minutes to set the shape.
5. Cover with Marzipan and Decorate
The final step is wrapping your cake in a royal green coat and adding elegant finishing touches.
Instructions:
- Knead the marzipan with green food coloring until evenly tinted.
- Roll out the marzipan on a surface dusted with powdered sugar to about 1/8-inch thickness.
- Carefully drape the marzipan over the cake dome, smoothing gently from the top down and trimming the excess at the base.
- Shape a pink marzipan rose or use a ready-made fondant flower for the top.
- Finish with a light dusting of powdered sugar for a soft, elegant look.
You’ve just created a homemade Princess Cake worthy of royalty! While the process involves multiple steps, each one builds upon the next to deliver a truly magical dessert.
Decorating Tips for a Professional Finish
The final look of a Princess Cake is what makes it so enchanting—soft green marzipan, a perfect dome, and a delicate rose on top. With a few clever tricks, you can give your homemade Princess Cake a bakery-quality finish. Here are the best tips to help you decorate like a pro.
1. How to Tint Marzipan the Perfect Pastel Green
Traditional Princess Cakes are known for their beautiful pastel green marzipan covering, which gives them their signature look. Achieving the right shade is easy with the right method:
- Use gel food coloring (not liquid) for a more intense color without altering the marzipan’s texture.
- Start with a small amount of green, kneading it into the marzipan with gloves to avoid staining your hands.
- Aim for a light, soft green, similar to spring leaves or mint—it should be cheerful but not neon.
- If you prefer natural coloring, try using a tiny pinch of matcha powder or spinach powder instead of artificial dye.
2. Shaping the Classic Dome and Smoothing the Surface
Creating the cake’s distinctive dome shape gives it that fairytale charm. To make it look professional:
- After layering the cake with cream and custard, build up the top with whipped cream in a gentle dome shape using a spoon or spatula.
- Chill the cake to set the shape before covering with marzipan—this prevents sagging.
- When draping the marzipan, use a rolling pin to gently lift and transfer it, then center it over the dome.
- Smooth the marzipan from the top down, gently pressing it against the whipped cream layer and working out any air bubbles.
- Trim excess marzipan at the bottom with a pastry cutter or sharp knife, and tuck the edges under for a clean finish.
3. Adding a Pink Marzipan Rose and Powdered Sugar Dusting
No Princess Cake is complete without the iconic pink marzipan rose on top. Here’s how to make it:
- Pinch off a small piece of pink-tinted marzipan and roll it into a small log.
- Flatten the log into thin petals and roll them together into a spiral, fanning them out as you go to mimic a rose.
- Place the rose in the center of the dome, or slightly off-center for a charming look.
- Dust the entire cake lightly with powdered sugar using a fine sieve to give it a soft, elegant finish.
4. Creative Variations: Color, Fruit, or Themed Decorations
While the classic look is iconic, you can personalize your Princess Cake for different occasions:
- Use different colors of marzipan (like soft pink, lavender, or white) for baby showers or weddings.
- Decorate the base with piped whipped cream rosettes or sliced almonds for added texture.
- For a fruity touch, add a layer of fresh raspberries or strawberries under the marzipan.
- Celebrate a themed birthday by adding edible pearls, gold dust, or fondant characters around the cake.
With these decorating tips, your Princess Cake will not only taste delicious—it will look as if it came straight from a Scandinavian patisserie.
Serving, Storing, and Celebrating with Princess Cake
After all your effort crafting the perfect Princess Cake, it’s time to enjoy it! This section will guide you on how to serve the cake elegantly, store leftovers properly, and suggest occasions where Princess Cake shines as the centerpiece of your celebration. Whether you’re hosting a party or enjoying a quiet tea at home, this cake brings a royal touch to any moment.
1. Ideal Occasions: Birthdays, Baby Showers, and Tea Parties
The Princess Cake is more than just a dessert—it’s a symbol of celebration. Its charming look and delicate flavors make it perfect for:
- Birthday parties, especially for kids or anyone who loves fairytale themes
- Baby showers or gender reveals, where the pastel green and pink rose fit beautifully
- Bridal showers, adding elegance and sweetness to the dessert table
- Mother’s Day or Easter brunch, offering a light, fresh dessert
- Afternoon tea or fika (the Swedish tradition of coffee and cake)
It also makes a wonderful centerpiece cake for any event that calls for something both beautiful and unique.
2. How to Slice and Serve a Layered Cake Neatly
Slicing a dome-shaped layered cake like a Princess Cake can be tricky without the right technique. Here are a few tips to make clean, beautiful slices:
- Use a sharp, serrated knife, and dip it in hot water before each cut for clean edges.
- Score the marzipan lightly before slicing to avoid tearing or dragging it.
- Slice in wedges like a pie, gently supporting the base of each piece with a cake lifter or wide spatula.
- Serve each slice on a pretty dessert plate with a dusting of powdered sugar or a small dollop of whipped cream for presentation.
3. Tips for Refrigerating or Freezing Leftovers
If you have leftovers (lucky you!), storing Princess Cake properly will preserve its flavor and texture.
- Refrigerate the cake in an airtight container or loosely covered with plastic wrap. It’s best consumed within 2–3 days.
- Avoid letting the marzipan come into direct contact with plastic wrap, as it can become sticky—use parchment paper as a buffer.
- To freeze, slice the cake and wrap each piece tightly in plastic wrap, then foil. Freeze for up to 1 month.
- When ready to enjoy, thaw overnight in the fridge. The texture may be slightly softer, but the flavor will still shine.
4. Pairing Suggestions: Swedish Coffee or Fruit Tea
Pairing your Princess Cake with the right beverage enhances the entire dessert experience. Traditional Swedish fika includes:
- Brewed Swedish coffee, rich and slightly strong, to balance the cake’s sweetness
- Fruit-infused teas like raspberry, hibiscus, or rosehip
- Light sparkling drinks or non-alcoholic elderflower punch for special events
- For an adult occasion, a chilled glass of prosecco or dessert wine pairs beautifully
Whether you’re indulging solo or serving guests, pairing your Princess Cake thoughtfully adds a cozy, celebratory touch.


