The Best Fluffy Pancakes recipe you will fall in love with. Full of tips and tricks to help you make the best pancakes.
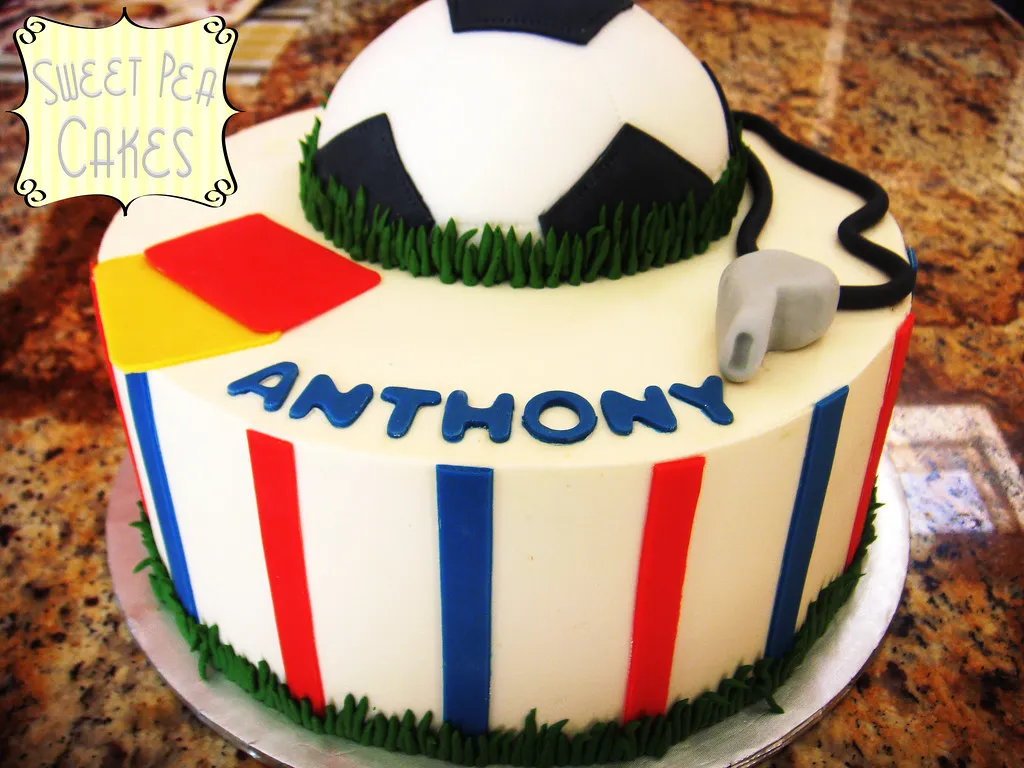
If you’re looking to add a fun and unique touch to your next celebration, a soccer-themed cake might be just what you need! Whether it’s a birthday party, a game day treat, or a special occasion for soccer fans, a soccer cake is sure to impress. Not only is it a delightful dessert, but it also brings the excitement of the game to the table. With a little creativity, you can transform an ordinary cake into a soccer field or a 3D soccer ball, making it the centerpiece of your event. In this guide, we’ll walk you through the simple steps to create a soccer cake that everyone will love, from baking the perfect cake to decorating it with sporty details. So, grab your ingredients and let’s kick off the fun!
The Essentials for Your Soccer Cake Recipe
Before you dive into the fun of decorating, it’s important to gather all the essential ingredients, tools, and materials you’ll need to create a soccer cake that stands out. Here’s a breakdown of everything you’ll need for this exciting project:
Ingredients
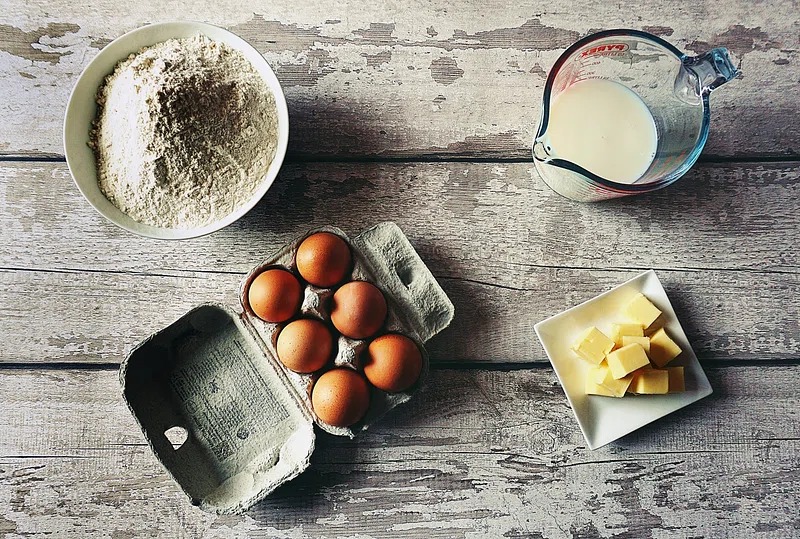
The key to a delicious soccer cake is starting with a solid cake recipe. Here’s what you’ll need for a basic cake and frosting:
- Cake Ingredients:
- Flour: All-purpose flour is typically used for a light and fluffy cake base.
- Sugar: Granulated sugar will give the cake the right sweetness and texture.
- Butter: Unsalted butter is ideal, as it adds richness and a smooth texture.
- Eggs: Eggs provide structure and moisture to the cake.
- Baking Powder: This will help the cake rise and stay light and airy.
- Milk or Buttermilk: Adds moisture and helps the batter come together.
- Vanilla Extract: For flavor; feel free to add any other flavorings like almond or citrus zest if you prefer.
- Frosting Ingredients:
- Butter: Used as a base for buttercream frosting, it gives the icing a creamy consistency.
- Powdered Sugar: For sweetness and to achieve a smooth, spreadable consistency.
- Vanilla Extract: Enhances the flavor of the frosting.
- Heavy Cream or Milk: Helps thin the frosting to the perfect consistency for spreading or piping.
- Food Coloring: For adding vibrant green, white, and black colors to the frosting, essential for the soccer field and ball designs.
Tools
Having the right tools will make your cake-making process smooth and enjoyable. Here are the essentials you’ll need:
- Cake Pans: For a soccer cake, you’ll likely need a round cake pan for a soccer ball shape, or square/rectangular pans if you’re making a field design. Make sure to grease and line the pans with parchment paper for easy removal. Ninja B30309 Nonstick Cake Pans a
- Offset Spatula: This tool is perfect for spreading frosting evenly and creating smooth layers on your cake.
- Piping Bags and Tips: Use these for detailed icing work. A round piping tip (such as #1 or #2) is ideal for creating fine lines and designs, while a star tip can help you pipe textured grass or ball seams.
- Rolling Pin: If you plan on using fondant for decoration, a rolling pin will help you roll out the fondant evenly.
- Cake Turntable: This is optional but makes decorating much easier as it allows you to rotate the cake for a smoother and more consistent finish.
- Fondant Tools: If you choose to make fondant decorations (such as a 3D soccer ball), you’ll need basic fondant tools like a rolling pin, smoothers, and cutters to shape your designs.
Decorating Materials
When it comes to decorating a soccer cake, the right materials can really make a difference. Here’s what you’ll need to bring your soccer cake to life:
- Fondant: Fondant is a great way to create smooth, clean surfaces and intricate designs like soccer balls, goalposts, or even players. You’ll need white, black, and green fondant for a classic soccer design.
- Food Coloring: Make sure you have food-safe dyes in green (for the soccer field), white (for the lines), and black (for the soccer ball and other accents). Gel food colors are a good choice for vibrant, concentrated colors that won’t water down your frosting.
- Edible Glitter: For a special touch, edible glitter can add a fun shine to the soccer ball or field, especially if you’re making the cake for a celebratory occasion.
- Cake Toppers: If you’re short on time or looking for an easier solution, you can buy soccer-themed cake toppers, such as a mini soccer ball or tiny figurines of players, to place on top of the cake for added flair.
Optional Extras
If you want to make your soccer cake even more personalized or unique, consider these optional extras:
- Team Colors: If you’re making the cake for a fan of a specific soccer team, you can incorporate the team’s colors or logo into the design. Use colored frosting or fondant to create a team logo on the cake’s top or sides.
- Player Figurines: For a more interactive cake, you can use small edible figurines or plastic players to create a little soccer game scene on your cake.
- Toppings and Garnishes: If your cake is more of a field design, add a few edible “soccer” elements like chocolate chips for the ball or green shredded coconut for extra texture in the grass.
By gathering all of these ingredients, tools, and decorating materials, you’ll be fully prepared to tackle your soccer cake creation. Once you’ve got everything ready, you’ll be able to focus on what matters most—having fun and crafting a cake everyone will love!
Step-by-Step Guide to Baking the Perfect Soccer Cake
Baking the perfect soccer cake is all about precision, patience, and, of course, a little creativity! Whether you’re making a simple cake for a soccer-loving child’s birthday or crafting a more detailed soccer-themed masterpiece, following the right steps is key to achieving that show-stopping finish. Here’s your ultimate guide to baking a soccer cake that’ll impress everyone at the table.
Step 1: Preheat Your Oven and Prepare Your Cake Pans
Before you even begin mixing your ingredients, preheat your oven to 350°F (175°C). This ensures that the cakes bake evenly and rise to perfection. If you’re using a round cake pan to shape the soccer ball, lightly grease and flour your pan to prevent sticking.
For non-stick performance, consider using high-quality pans like Ninja B30309 Nonstick Cake Pans. These pans are designed for even baking and durability, ensuring your cake comes out of the pan perfectly.
Step 2: Prepare the Cake Batter
Now that your oven is ready, it’s time to mix the batter. Here’s what you’ll need for the batter:
- 2 ½ cups (310g) all-purpose flour
- 1 ½ teaspoons baking powder
- 1 teaspoon salt
- 1 cup (230g) unsalted butter, softened
- 2 cups (400g) granulated sugar
- 4 large eggs
- 1 teaspoon vanilla extract
- 1 cup (240ml) whole milk
Now, follow these steps for preparing the batter:
- Cream Butter and Sugar: Start by creaming the softened butter and sugar together until light and fluffy. This helps create a light texture in the cake.
- Add Eggs One at a Time: Beat in your eggs one at a time, making sure each is fully incorporated before adding the next. This step ensures the batter doesn’t break.
- Alternate Dry and Wet Ingredients: Gradually add your dry ingredients (flour, baking powder, salt) and wet ingredients (milk, vanilla) in alternating batches. This will keep the batter smooth and prevent overmixing.
- Mix until Just Combined: Stir the batter until it’s just combined to avoid overworking the flour, which can make the cake dense.
If you’re using food coloring to tint the batter (for example, to make a soccer field green), now is the time to do so. Divide the batter into bowls if needed, and add a few drops of gel food coloring until you achieve the desired shades.
Step 3: Bake the Cake Layers
Once your batter is ready, pour it into the prepared cake pans. For a soccer cake, you’ll likely need multiple layers to achieve the right shape and size. Here’s a simple breakdown:
- Bake in Layers: If you’re making a soccer ball-shaped cake, bake each layer separately in a round cake pan. If you’re using square or rectangular pans for a field design, bake each separately and trim the edges to fit.
- Check for Doneness: Bake the cake for 25-30 minutes, or until a toothpick inserted into the center comes out clean.
- Let the Cake Cool: After baking, let the cake cool in the pans for about 10-15 minutes. Then, carefully remove the cakes and place them on a wire rack to cool completely. This prevents the cake from becoming soggy and makes it easier to decorate later.
Step 4: Level and Stack the Cake Layers
Once your cake has cooled, it’s time to level the layers so they stack perfectly:
- Trim the Tops: Use a serrated knife to level the tops of the cake layers, ensuring they are flat. This helps the cake stay stable when stacked.
- Stack and Fill: Spread a thin layer of frosting on the top of the first cake layer and then place the next layer on top. Repeat this process, frosting in between each layer until your cake reaches the desired height.
If you’re shaping your cake into a soccer ball, you might want to stack the layers into a dome shape to mimic the curvature of a ball. You can do this by trimming the edges of the cake layers slightly, so they fit together like a “ball.”
Step 5: Apply a Crumb Coat
Before you begin frosting your cake with the final design, apply a thin layer of frosting all over the cake. This is called a crumb coat and helps seal in any loose crumbs, creating a smooth base for the final layer of frosting. Once the crumb coat is applied, refrigerate the cake for about 30 minutes to allow it to firm up.
Step 6: Frost and Decorate Your Soccer Cake
Now comes the fun part—decorating! Depending on the design you’re going for, here’s how to proceed:
- Base Frosting: Apply a thicker layer of frosting over the crumb coat. If you’re making a soccer field design, spread green frosting all over the sides and top of the cake to represent the grass. For a soccer ball design, you’ll need to cover the cake with a smooth layer of white frosting.
- Add Details: Once your base frosting is set, start adding details. Use piping bags and tips to create the lines of the soccer field, goalposts, and any other elements you want to include. You can also add fondant decorations for more intricate shapes, such as the soccer ball’s pentagons and hexagons.
- Finish with Fun Toppings: You can use additional cake toppers like mini soccer figures, edible glitter, or chocolate chips to create a fun and interactive scene on top of the cake.
Step 7: Serve and Enjoy
Once your cake is decorated to your liking, it’s time to serve! Place the soccer cake on a cake board or platter for easy cutting and display. As you slice into it, you’ll reveal all the hard work and creativity you put into making this cake—perfect for any soccer-themed party or celebration.
How to Decorate Your Soccer Cake Like a Pro
Decorating a soccer cake doesn’t have to be intimidating. With a little creativity and the right tools, you can transform your simple cake into a masterpiece that looks like it came straight from a professional bakery. Whether you’re going for a soccer field theme or a realistic soccer ball design, these expert tips will guide you in decorating your soccer cake like a pro.
1. Choose the Right Frosting
The foundation of any great cake decoration is the frosting. For a smooth and professional finish, you’ll need the right consistency of frosting.
- Buttercream is a popular choice because it’s easy to work with and can be tinted any color. A classic American buttercream recipe will work wonders for covering the cake and piping intricate details. It’s firm enough to hold its shape but soft enough to spread easily.
- Fondant is perfect for creating a sleek, smooth finish, especially when you’re making detailed designs like a soccer ball. It’s rolled out thinly and applied directly to the cake for a flawless, professional appearance.
- If you’re aiming for a soccer field effect, you can tint your buttercream frosting green to resemble grass. For a more vibrant and smooth look, fondant is a good option. Both can help achieve a clean finish, but fondant gives a more refined and polished appearance.
2. Prepare Your Tools for Precision
Professional decorators use certain tools to get clean lines and perfectly piped details, and you can easily achieve the same results with a few simple tools. Here’s what you’ll need to elevate your decorating game:
- Piping Bags and Tips: Use different piping tips to create various textures, such as grass, stars, or borders. For the soccer field, you’ll want a grass tip (like Wilton #233) to create the grass effect. For other details like borders and lines, a round tip like Wilton #1 or #2 will work wonders.
- Fondant Tools: If you’re using fondant for your design, consider purchasing a set of fondant tools that includes rolling pins, cutters, and texture tools. These tools will help you shape and smooth the fondant into perfect shapes like soccer ball panels or goalposts.
- Offset Spatula: This tool is essential for smoothing the surface of your cake when applying a crumb coat or frosting. It ensures that your layers are evenly spread and helps you avoid uneven surfaces.
- Cake Turntable: A cake turntable is incredibly useful for decorating cakes because it allows you to rotate the cake smoothly and evenly as you work. This gives you better control and precision, especially when smoothing frosting or piping intricate designs.
3. Create the Base Design
Once your cake is covered in frosting (whether buttercream or fondant), you can begin shaping the soccer field or soccer ball design. Here’s a guide for both:
- Soccer Ball Design:
- If you’re aiming for a realistic soccer ball design, you’ll want to cover the entire cake with white fondant. Then, use black fondant to cut out the familiar pentagon and hexagon shapes that make up the pattern of a soccer ball. Use a sharp knife or a fondant cutter to ensure that the shapes are clean and uniform.
- Tip: If you prefer a slightly easier approach, you can simply use black food coloring to pipe the soccer ball panels on the cake using a round piping tip to draw the outlines.
- Soccer Field Design:
- If you’re creating a soccer field, start by covering the cake with green buttercream or fondant. This will represent the grass on the field.
- Field Lines: Use a white piping gel or buttercream to draw the lines of the soccer field, including the goal areas, center circle, and penalty box. For a more realistic look, make sure the lines are sharp and straight. You can use a ruler to get the precise measurements of a soccer field, but freehanding the design adds a playful touch.
- Goalposts: To make the goalposts, you can use fondant or even pretzel sticks for an edible, fun alternative. Shape the fondant into rectangular bars and assemble them into the shape of a goalpost.
- Additional Details: Add extra elements like mini edible soccer players, soccer balls, or even a net effect made from piping gel or string. These little touches can add more life to the cake.
4. Add Realistic Details
Professional cake decorators know that it’s all about the details. Adding realistic touches can take your soccer cake from good to extraordinary. Here are a few ideas:
- Shiny Details: For a polished look, brush your fondant soccer ball or field with edible luster dust or golden or silver spray to give it a professional, shiny finish. This can be especially effective if you’re creating a trophy or celebratory theme around the cake.
- Mini Soccer Players or Accessories: Small figurines of soccer players can be placed on top of the cake or around the field to create an action-packed scene. You can find edible soccer player toppers online or create your own using fondant. If you’re using fondant, be sure to let the player figures dry properly before placing them on the cake.
- Texture Effects: Add dimension to your cake by incorporating textures. You can use a toothbrush to create a “grass-like” texture in your frosting or a fondant roller to press patterns into the fondant, mimicking textures like the texture of a soccer ball.
5. Finishing Touches
Now that the main elements are complete, it’s time for the finishing touches:
- Edible Glitter or Sprinkles: Use green edible glitter for extra sparkle on the field to give the illusion of sunlight reflecting off the grass.
- Personalization: Don’t forget to add a personalized touch to the cake. You can write the birthday child’s name, the team’s name, or even their favorite player’s number on the cake using piping gel or edible markers.
6. Presentation and Serving
Finally, once your soccer cake is decorated, the presentation can make a huge difference. Here are a couple of pro tips:
- Place the cake on a cake board or a decorative platter that complements the theme of your event (such as a green grass-like base or a soccer ball pattern). This will not only make the cake easier to transport but will enhance its appearance.
- Keep the cake chilled until serving, especially if it has fondant, as fondant tends to soften at room temperature.
Common Mistakes to Avoid When Making a Soccer Cake
Making a soccer cake can be an enjoyable and creative experience, but it’s easy to fall into some common traps that can affect the outcome of your cake. Whether you’re a beginner baker or an experienced cake decorator, understanding and avoiding these mistakes will help ensure your soccer cake turns out just as you envision it. Here are some common mistakes and tips on how to avoid them:
1. Using the Wrong Cake Recipe or Pan
One of the most important steps in cake baking is choosing the right recipe and baking pan. It’s easy to get carried away with a cool soccer design but forgetting to ensure the base of your cake is solid can lead to disasters.
- Mistake: Using a cake recipe that doesn’t hold up well for decorating, such as very crumbly cakes or cakes that are too soft to support heavy decorations.
- How to Avoid It: Choose a recipe that produces a firm yet moist cake, such as pound cake, chocolate cake, or vanilla butter cake. These cakes are sturdy enough to hold up the weight of the decorations without falling apart. If you are using a cake mix, make sure to adjust it as needed by adding an extra egg or some sour cream to make it denser.
Also, make sure you’re using the right cake pans. For a realistic soccer ball shape, you may want to use a sphere pan or a specially designed football-shaped pan. When using standard round cake pans, be sure to cut your cakes to shape or stack them properly so they resemble the spherical shape.
2. Skipping the Crumb Coat
A crumb coat is a thin layer of frosting that seals in any loose crumbs on the surface of your cake before you apply the final layer of frosting. While it may seem like an unnecessary step, it’s actually critical for a clean, smooth finish.
- Mistake: Not applying a crumb coat before decorating, which results in a messy and uneven cake surface.
- How to Avoid It: After your cake has been baked and cooled, apply a thin layer of frosting around the entire cake, smoothing it out with an offset spatula. This creates a smooth base and prevents crumbs from mixing into your final layer of frosting or fondant. Allow the crumb coat to set in the fridge for about 15-30 minutes before applying the final coat of frosting or fondant.
3. Overworking or Undercooking the Fondant
Fondant is a great medium for achieving smooth and professional-looking designs, but it can be tricky to work with. Overworking or underworking it can result in cracks, uneven surfaces, or a cake that’s too heavy to handle.
- Mistake: Rolling out fondant too thin or thick, which makes it difficult to work with and leads to imperfections.
- How to Avoid It: Roll your fondant to an even thickness—ideally about 1/8-inch thick. If it’s too thin, it will tear easily; if it’s too thick, it will be too heavy and affect the overall look of your cake. Use a fondant smoother to remove air bubbles and smooth the surface for a flawless finish.
If you’re applying fondant to a cake covered in buttercream, make sure the buttercream is firm enough to hold the fondant in place without sliding off. A slight chilling of the cake can help, but don’t refrigerate the cake for too long, as it may cause the fondant to sweat when brought back to room temperature.
4. Not Allowing the Cake Layers to Cool Properly
It’s tempting to start decorating your cake right after it’s out of the oven, but decorating on a warm cake can cause the frosting to melt and ruin the structure.
- Mistake: Frosting or decorating a warm cake, which causes the frosting to slide off and disrupt the cake’s shape.
- How to Avoid It: Always allow your cake to cool completely before decorating. For a quicker cooling process, you can place the cake in the fridge for a short period after it has cooled slightly at room temperature. This will help set the cake and prevent frosting from melting or slipping off.
5. Skipping the Proper Cake Support
When stacking layers or using heavier decorations, it’s crucial to ensure your cake has adequate support. Without it, your cake can collapse under the weight, ruining your hard work.
- Mistake: Not adding enough cake dowels or supports when stacking multiple layers or using heavy fondant designs.
- How to Avoid It: For multi-layered cakes, use cake dowels or cake straws to support the weight of each layer. Insert the dowels evenly in the bottom layer to prevent the layers from sliding or collapsing. For larger designs, consider using bubble tea straws or other supports meant for cake structures.
6. Overcomplicating the Design
While it’s fun to go all out with your cake design, overcomplicating the design can lead to frustration, mistakes, and an overall crowded look.
- Mistake: Overloading the cake with too many intricate designs, too much fondant, or excessive piping.
- How to Avoid It: Keep the design simple and cohesive. Focus on one or two elements that stand out, such as a soccer ball pattern on the top or a few details like a goalpost. Let your design breathe by leaving some open space on the cake. A few well-executed touches can make the cake look more professional than a crowded, busy design.
7. Forgetting About the Texture and Details
Details make the difference between an average soccer cake and a professional-looking one. Neglecting these small touches can leave the cake looking flat or incomplete.
- Mistake: Skipping the small, important details that can bring the cake to life, like texture on the field or a goalpost.
- How to Avoid It: Pay attention to texture and layering in your design. For example, use a piping tip to create the effect of grass on the soccer field, or brush edible glitter on your cake to create highlights and shine. Add small edible accessories like mini soccer players, flags, or a mini soccer ball to add personality to your cake.
8. Not Giving Enough Time for Drying or Setting
Certain components of your cake, such as fondant figures or decorations, require time to dry and set before they can be placed on the cake.
- Mistake: Rushing the drying process for fondant decorations, which may result in soft or misshapen items when placed on the cake.
- How to Avoid It: Allow your fondant decorations to dry completely before adding them to the cake. For example, if you’re making soccer player figurines, they should dry for several hours or overnight before placement. Use a cake box to keep the cake safe and intact while it sets.
9. Not Planning the Cake’s Structure and Layers
A successful soccer cake doesn’t just look good on the outside; it also needs to be stable inside. Without proper planning, your layers can end up uneven, leading to a lopsided cake.
- Mistake: Not planning the structural elements of your cake and frosting layers properly, which can cause the cake to be uneven or unstable.
- How to Avoid It: Take time to level your cake layers with a cake leveler or serrated knife. Make sure the frosting between layers is even and free of air bubbles. Ensure that your top layer is perfectly centered to avoid a crooked design.


I have been examinating out some of your stories and i can state clever stuff. I will definitely bookmark your blog.