The Best Fluffy Pancakes recipe you will fall in love with. Full of tips and tricks to help you make the best pancakes.
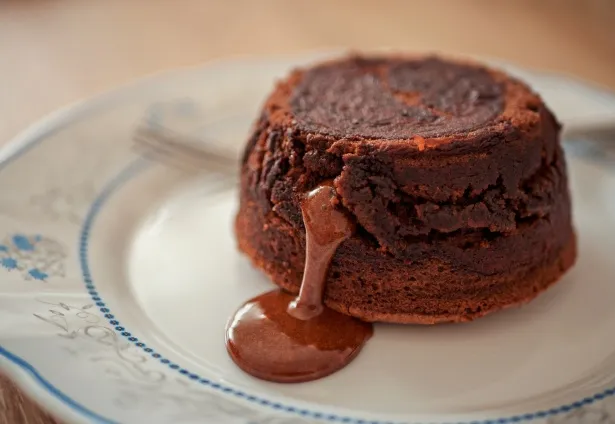
Chocolate lava cake, also known as molten chocolate cake, is the ultimate dessert for any chocolate lover. With its rich, decadent exterior and a warm, gooey center that flows like lava when you cut into it, this dessert feels luxurious yet surprisingly simple to make at home. Whether you’re planning a romantic date night, a special celebration, or just craving an indulgent treat, learning how to make the perfect chocolate lava cake will impress anyone at your table.
Unlike traditional chocolate cakes, lava cake offers a melt-in-your-mouth experience that combines a soft, tender cake with a molten, chocolatey core. With the right ingredients, proper techniques, and a few expert tips, you can easily achieve a dessert that looks and tastes like it came from a gourmet bakery—but made in your own kitchen. In this guide, we’ll walk you through everything you need, step by step, to create the perfect homemade chocolate lava cake.
Discover the Magic of Chocolate Lava Cake
Chocolate lava cake, also known as molten chocolate cake, is one of the most indulgent desserts you can make at home. Its signature feature is the warm, gooey chocolate center that “flows” like lava when you cut into it—a combination of a soft cake exterior and a molten interior that instantly delights the senses. This dessert has captured the hearts of chocolate lovers worldwide because it’s both luxurious and comforting, perfect for special occasions or a simple treat to satisfy a chocolate craving.
Unlike a regular chocolate cake, the molten center of a lava cake requires precise timing and technique. Overbaking can turn the center into a solid cake, while underbaking may leave the exterior too soft. When done right, however, the result is pure perfection: a slightly crisp outer layer encasing a warm, rich, chocolatey core.
Chocolate lava cake is incredibly versatile. You can serve it as an individual dessert in ramekins for a romantic dinner, or create a larger version for gatherings and celebrations. Toppings such as fresh berries, a scoop of ice cream, a drizzle of caramel, or a dusting of powdered sugar can elevate the presentation and taste even further.
In this guide, you’ll learn not just the recipe but also the tips and techniques that ensure a perfectly gooey, restaurant-quality chocolate lava cake every time. By understanding the dessert’s unique characteristics and how to balance ingredients, you can confidently make this decadent treat in your own kitchen.
Ingredients You’ll Need for Homemade Lava Cake
Making the perfect chocolate lava cake starts with simple ingredients, but choosing the right ones—and measuring them accurately—makes all the difference. Each element plays a key role in creating the iconic molten center and soft cake exterior.
Ingredient List (Exact Measurements)
- 170 g (6 oz) dark chocolate (between 60–70% cocoa for best results)
- 115 g (½ cup) unsalted butter, cut into cubes
- 150 g (¾ cup) powdered sugar (confectioners’ sugar)
- 2 large whole eggs
- 2 large egg yolks
- 40 g (⅓ cup) all-purpose flour, sifted
- 1 tsp vanilla extract (optional, but recommended)
- Pinch of salt
- Butter and cocoa powder (for greasing and coating ramekins)
Why These Ingredients Matter
- Dark chocolate provides deep flavor and helps create the molten center. Using chocolate that’s too sweet may affect texture and consistency.
- Butter adds richness and helps create that silky, melt-in-your-mouth bite.
- Eggs and yolks are essential for structure and the soft, custard-like core.
- A small amount of flour prevents the cake from collapsing while keeping the center gooey.
- Powdered sugar dissolves faster, giving the batter a smooth, glossy texture.
Essential Kitchen Tools & Utensils (in English)
To make lava cake easily and efficiently, you’ll need:
- Ramekins (4 small or 2 large depending on portions)
- Mixing bowls (medium and large)
- Whisk or electric hand mixer
- Silicone spatula
- Sifter (for flour)
- Heat-proof bowl (for melting chocolate)
- Saucepan (for double-boiler method) or microwave
- Measuring cups and measuring spoons
- Kitchen scale (optional but recommended for precision)
- Baking tray (to stabilize ramekins in the oven)
- Oven mitts
Step-by-Step Guide to Making Perfect Lava Cake
Mastering chocolate lava cake is all about technique and timing. Follow each step closely to achieve a smooth batter, a tender cake exterior, and that iconic molten chocolate core.
1. Preheat the Oven & Prepare the Ramekins
- Preheat your oven to 220 °C (425 °F).
- Generously butter the inside of each ramekin, then dust with cocoa powder (not flour—cocoa prevents white residue on the cake).
- Tap out the excess and place the ramekins on a baking tray for easy handling.
Pro tip: Proper greasing ensures the cakes release smoothly and keeps the outer layer slightly crisp.
2. Melt the Chocolate & Butter
- Add 170 g dark chocolate + 115 g butter to a heat-proof bowl.
- Melt using a double-boiler method (bowl over simmering water) or microwave in 20-second intervals, stirring each time.
- Mix until the texture is smooth and glossy, then set aside to cool slightly.
Why it matters: If the mixture is too hot when you add the eggs, it could cook them and ruin the texture.
3. Whisk Eggs, Sugar & Vanilla
- In a mixing bowl, whisk:
- 2 whole eggs + 2 egg yolks
- 150 g powdered sugar
- 1 tsp vanilla extract
- Pinch of salt
- Beat for 1–2 minutes until pale and slightly frothy.
Tip: You’re not trying to add too much air—just enough to dissolve the sugar and blend the eggs.
4. Combine the Chocolate & Egg Mixture
- Slowly pour the slightly cooled chocolate mixture into the eggs while stirring continuously.
- Use a spatula or whisk to combine gently until the batter looks shiny, smooth, and uniform.
5. Fold in the Flour
- Sift 40 g all-purpose flour into the batter.
- Fold it in gently using a spatula—do not overmix.
Goal: A silky batter with no lumps, but not overworked (overmixing can make the cake dense).
6. Fill the Ramekins & Bake
- Pour the batter evenly into prepared ramekins, filling about ¾ full.
- Bake at 220 °C (425 °F) for:
- 8–10 minutes for small ramekins
- 10–12 minutes for larger ramekins
You’ll know they’re ready when:
- The edges look set
- The center is still slightly jiggly
- The top appears soft and slightly cracked
⚠️ Do not overbake—this is the most common lava cake mistake. Too long in the oven = no molten center.
7. Rest, Release & Serve
- Remove from the oven and let them sit for 1 minute (not longer).
- Carefully run a knife around the edge, place a plate over the ramekin, and invert gently.
- Lift the ramekin slowly and reveal the lava cake.
8. Optional Finishing Touches
Enhance your presentation with:
- A sprinkle of powdered sugar
- Fresh berries or mint leaves
- Vanilla ice cream
- A drizzle of caramel or chocolate sauce
Serving Suggestions and Presentation Ideas
A chocolate lava cake doesn’t need much to shine, but the right accompaniments can turn it into a full sensory moment. Think contrast—temperature, texture, color, and flavor are your best friends here.
1. Add a Temperature Contrast
The warm, flowing chocolate center pairs beautifully with something cold and creamy:
- Vanilla ice cream (classic and reliable)
- Salted caramel ice cream for a sweet–savory twist
- Coconut or hazelnut gelato to introduce subtle nutty notes
Place the scoop slightly beside the cake so the chocolate can spill dramatically without melting everything right away.
2. Use Color and Freshness for Visual Appeal
Bright elements make the dessert look intentional, fresh, and elegant:
- Raspberries, strawberries, or blackberries
- Pomegranate seeds for a jewel-like pop
- Fresh mint leaves for a clean green contrast
Aim for 2 or 3 small elements max—clean plating almost always beats decorated chaos.
3. Add a Final Decorative Touch
A light garnish makes the dish feel complete without overpowering it:
- Dust with powdered sugar
- Cocoa powder stencil design for a restaurant-style finish
- Drizzle of chocolate or caramel sauce (use a spoon or squeeze bottle for clean lines)
- Chopped nuts (pistachio, hazelnut, almonds) for texture
Less is more. One confident finish > five busy ones.
4. Serve With Purpose
You can tailor the presentation to the mood or occasion:
| Occasion | Serving Style |
|---|---|
| Romantic dinner | On dark plates with berries + ice cream |
| Family treat | Straight from the ramekins with a spoon and a smile |
| Dinner party | Unmolded, dusted with sugar, symmetrical plate design |
| Festive holidays | With seasonal fruit and a spice-dusted garnish |
5. Timing Is Everything
Lava cake waits for no one. For the perfect experience:
- Plate it immediately after the 1-minute rest
- Serve within 2–3 minutes
- Let guests cut into it right away for the full molten effect
The magic is in that first break—where the chocolate slowly spills like warm silk.
Tips, Tricks, and FAQs for Chocolate Lava Cake Success
A molten lava cake looks simple, but the magic lies in the details. These tips and troubleshooting notes help you achieve a gooey center every time—no guesswork.
✅ Expert Tips for Consistent Results
1. Don’t Overbake
- The cake is ready when the edges are set but the center still looks soft and slightly jiggly.
- Every oven is different—check at the 8-minute mark.
2. Use Quality Chocolate
- At least 60–70% cocoa dark chocolate gives the best texture and balanced sweetness.
- Chocolate chips are convenient but don’t melt as smoothly as baking chocolate.
3. Chill the Batter for Make-Ahead
- You can refrigerate filled ramekins for up to 24 hours.
- Add +1 minute to baking time if baking straight from the fridge.
4. Grease and Coat the Ramekins Well
- Butter + cocoa powder ensures easy release.
- Flour coating can leave white marks—cocoa looks cleaner.
5. Weigh Ingredients When Possible
- Precision is key. Small measurement errors affect the molten center.
⚠️ Common Mistakes and How to Fix Them
| Problem | Cause | Solution |
|---|---|---|
| Cake is fully cooked, no molten center | Overbaked | Reduce bake time by 1–2 minutes |
| Batter looks too thick | Overmixed flour | Fold gently, do not whisk after adding flour |
| Cake sticks to ramekin | Not greased/dusted properly | Use butter + cocoa powder generously |
| Eggs curdle in mix | Chocolate too hot | Let melted chocolate cool slightly before mixing |
❓ Frequently Asked Questions (FAQ)
Q: Can I bake chocolate lava cake in a microwave?
Yes. Microwave on high for 45–60 seconds, checking after 40 seconds. Texture will be slightly less crisp on the outside.
Q: Can I make lava cake without ramekins?
Yes—use a muffin tin. Reduce baking time to 6–7 minutes.
Q: Can I freeze chocolate lava cakes?
Freeze unbaked batter directly in ramekins. When ready to bake, put in the oven frozen and add +2 minutes to baking time.
Q: What chocolate works best?
Dark chocolate between 60–70% cocoa. Milk chocolate makes the cake sweeter and less molten.
Q: Can I make this recipe gluten-free or dairy-free?
- Replace flour with almond flour or gluten-free flour blend (1:1 substitution).
- Substitute butter with vegan butter and use dairy-free chocolate.
🔁 Storage & Reheating
- Store cooked lava cakes in the refrigerator for up to 3 days.
- Reheat in microwave for 10–15 seconds to reactivate the molten center.
Note: Freshly baked always tastes best.