The Best Fluffy Pancakes recipe you will fall in love with. Full of tips and tricks to help you make the best pancakes.
There’s something truly enchanting about moon cookies. With their soft texture, delicate flavor, and charming crescent shape, these cookies are more than just a treat—they’re a whimsical experience. Whether you’re baking for a holiday like Eid or Lunar New Year, planning a space-themed party, or just looking for a fun kitchen project, moon cookies are the perfect pick. In this post, you’ll learn how to make moon cookies from scratch with simple ingredients, how to give them a magical decorative touch, and tips to ensure they turn out melt-in-your-mouth delicious every time. Get ready to bake a batch of sweet, celestial goodness that everyone will love!
Ingredients You’ll Need to Make Moon Cookies
To create these soft, magical moon cookies, you’ll need a mix of pantry staples and optional add-ins that allow for creativity and flavor customization. Here’s a breakdown of everything you’ll want to gather before you start baking:
1. Basic Dry Ingredients
- All-Purpose Flour: This is the foundation of your cookie dough, giving the cookies structure while keeping them soft and tender.
- Powdered Sugar: Also known as confectioner’s sugar, it adds sweetness and a melt-in-your-mouth texture without making the cookies overly crisp.
- Salt: A small pinch helps balance the sweetness and enhances the overall flavor.
2. Flavorful Wet Ingredients
- Unsalted Butter: Softened butter adds richness and creates that delicate, crumbly texture moon cookies are known for.
- Vanilla Extract: A classic ingredient that brings warmth and depth to the cookies.
- Almond Extract (Optional): For a subtle nutty undertone that pairs beautifully with the vanilla—highly recommended if you love bakery-style cookies.
3. Optional Add-Ins and Decorations
- Lemon Zest: Adds a bright, citrusy twist if you want a refreshing flavor profile.
- Food Coloring: Use pastel tones or galaxy-inspired shades like lavender, silver, or midnight blue for decorating your cookies after baking.
- Sprinkles and Edible Glitter: Perfect for giving your moon cookies that extra “magical” touch.
4. Tools and Supplies
- Moon-Shaped Cookie Cutter: Essential for achieving that iconic crescent shape.
- Rolling Pin and Parchment Paper: To roll out the dough evenly and prevent sticking.
- Baking Sheet: Line it with parchment paper to ensure even baking and easy cleanup.
These ingredients and tools come together to create cookies that are visually stunning, flavorful, and perfect for sharing during special occasions—or just when you’re in the mood for a little kitchen magic.
Step-by-Step Instructions for Perfect Moon Cookies
Creating moon cookies is as easy as it is fun. With just a few steps, you’ll transform simple ingredients into beautiful, buttery treats with a dreamy crescent shape. Follow this step-by-step guide to ensure your moon cookies turn out soft, flavorful, and picture-perfect every time.
1. Cream the Butter and Sugar
Start by placing softened unsalted butter and powdered sugar in a large mixing bowl. Using a stand mixer or hand mixer, beat the mixture on medium speed for about 2–3 minutes, until it becomes light, pale, and fluffy. This step is essential for creating that delicate, melt-in-your-mouth texture.
Tip: Make sure the butter is at room temperature—it should be soft enough to press a finger into but not melted.
2. Add the Flavorings
Next, mix in your vanilla extract and, if desired, almond extract for a bakery-style flavor. You can also add a bit of lemon zest at this stage for a fresh citrus note. Beat until everything is well combined.
3. Incorporate the Dry Ingredients
In a separate bowl, whisk together the all-purpose flour and a pinch of salt. Slowly add the dry ingredients to the butter mixture, mixing on low speed. The dough will be soft but should hold together. Avoid overmixing—stop once the flour is just incorporated.
If the dough feels too sticky to work with, cover it and refrigerate for 15–30 minutes.
4. Roll and Cut the Dough
Lightly flour your work surface and rolling pin. Roll out the dough to about 1/4-inch thickness. Use a moon-shaped cookie cutter to cut out crescent shapes, then place them onto a parchment-lined baking sheet, leaving about an inch between each cookie.
If the dough starts to get too soft while rolling, place it back in the fridge for a few minutes.
5. Bake and Cool
Preheat your oven to 350°F (175°C). Bake the cookies for 9–11 minutes, or until the edges are just starting to turn golden. Do not overbake—they should be soft and pale in color, not browned.
Let the cookies cool on the baking sheet for a few minutes before transferring them to a wire rack to cool completely.
With these steps, you’ll have a batch of soft, buttery moon cookies ready to decorate and enjoy. Whether you’re baking for a party or enjoying a quiet night in, this process is easy, rewarding, and perfect for all skill levels.
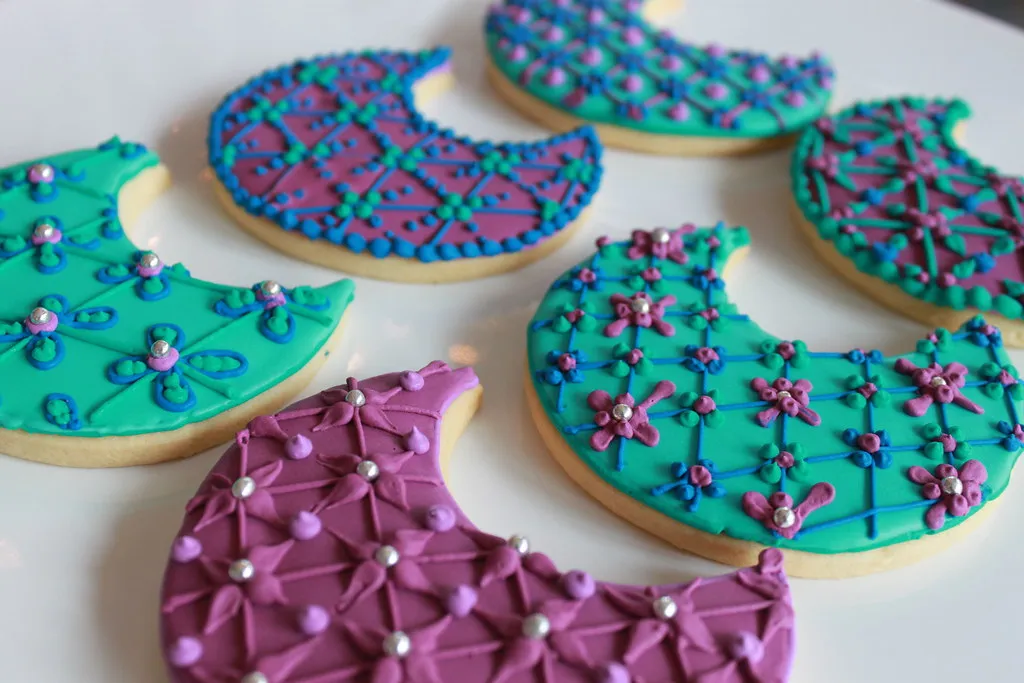
Decorating Your Moon Cookies with a Magical Touch
Once your moon cookies have cooled, it’s time to bring them to life with whimsical decorations. Whether you’re going for a celestial galaxy look, a pastel crescent moon, or a sparkling starry vibe, this is your chance to get creative and add personality to your cookies. Here are several ways to make your moon cookies truly magical:
1. Glazing with Icing or White Chocolate
For a smooth, elegant finish:
- Mix a simple glaze using powdered sugar, milk, and vanilla extract. Add a few drops of food coloring for a pastel or galaxy look (lavender, sky blue, pink, or silver).
- Alternatively, melt some white chocolate chips and drizzle or dip the cookies halfway for a clean, glossy finish.
- Let the glaze set for 15–20 minutes before handling.
Pro Tip: Use a spoon or small piping bag to create smooth, crescent outlines or moon phase designs.
2. Add Sparkle with Edible Glitter and Sprinkles
To make your moon cookies shimmer:
- While the glaze is still wet, dust cookies with edible glitter or luster dust in silver, gold, or iridescent hues.
- Use star-shaped or pearl sprinkles to mimic constellations or shooting stars.
- For a more subtle sparkle, lightly brush dried cookies with edible shimmer dust using a clean paintbrush.
3. Create Galaxy Effects with Marbling
For a dreamy, night-sky appearance:
- Divide icing into 2–3 small bowls and tint each with different complementary colors (e.g., dark blue, purple, silver).
- Add a drop of each onto the cookie surface and gently swirl with a toothpick to create a marbled galaxy effect.
- Finish with a sprinkle of white nonpareils to resemble stars.
4. Personalize with Icing Pens or Edible Markers
Add fun, creative touches:
- Use edible food markers to draw moon faces, write names, or add tiny stars and dots.
- Outline the edges of the moon shape for definition, or draw moon phase symbols like crescents and full moons.
- Great for kids’ parties or themed events—let each guest decorate their own cookie!
Bonus Idea:
Place decorated cookies in a small gift box or clear bag tied with a ribbon and a moon-shaped tag. They make perfect party favors or holiday gifts for occasions like Ramadan, Eid, baby showers, or birthday parties.
Tips for the Best Texture and Flavor
Moon cookies are loved for their soft, buttery texture and delicate flavor—but getting that perfect bite depends on more than just the right ingredients. These tips will help you take your moon cookies from good to melt-in-your-mouth magical.
1. Use High-Quality Butter and Flavoring
- Butter is key in this recipe, so opt for high-quality, unsalted butter for a rich, clean taste. The better the butter, the more flavorful your cookies will be.
- Don’t skip the pure vanilla extract or optional almond extract. Even a small splash adds a depth of flavor that takes the cookies from plain to bakery-style.
- Want to add a bright twist? A touch of lemon zest enhances the dough with a light citrus aroma—perfect for spring or summer occasions.
2. Chill the Dough (If Needed)
- While not always necessary, chilling the dough for 15–30 minutes can make shaping and cutting easier—especially if your kitchen is warm or the dough is sticky.
- Chilling also helps the cookies hold their moon shape while baking and results in a more tender, less spread-out cookie.
3. Don’t Overbake
- These cookies are meant to be soft and light, not crispy. Remove them from the oven just as the edges begin to turn golden.
- If they’re browning on top, they’ve likely been in too long. Keep an eye on them after the 8-minute mark—most cookies are done in 9–11 minutes depending on thickness.
Tip: Every oven is different, so consider baking a test batch of one or two cookies before doing the full tray.
4. Let Them Cool Completely Before Decorating
- Warm cookies will cause icing or glaze to melt and run. Always let them cool fully on a wire rack before decorating.
- Once cool, they’ll also have a slightly firmer surface, which helps decorations like sprinkles and glitter stick properly.
5. Store Properly to Maintain Freshness
- After decorating and drying, store cookies in an airtight container at room temperature for up to 5–7 days.
- To keep decorations intact, place a piece of wax paper between layers if stacking them.
- Want to prep ahead? Freeze plain moon cookies (undecorated) in a sealed bag for up to 2 months. Thaw at room temperature and decorate when ready.
These small tips make a big difference—helping your moon cookies stay soft, flavorful, and picture-perfect whether you’re serving them at a party, gifting them, or simply enjoying one with a cup of tea under the stars.
Fun Variations and When to Serve Moon Cookies
Moon cookies are not only delicious—they’re also incredibly versatile. With a few tweaks in color, flavor, or decoration, you can adapt this simple recipe to suit holidays, birthdays, or even themed parties. Whether you’re hosting a celebration or looking for a cozy baking activity, these variations and ideas will help you make the most of your moon cookies.
1. Galaxy Cookies
Turn your moon cookies into mini galaxies with bold colors and shimmer:
- Use a marbled icing technique with deep blue, purple, and black food coloring to mimic the look of a swirling night sky.
- Sprinkle with edible stars, gold dust, or silver glitter to give them a sparkling, space-like finish.
- Perfect for outer space parties, kids’ birthdays, or sci-fi themed events.
2. Holiday and Cultural Celebrations
Moon cookies are ideal for festive occasions:
- For Ramadan or Eid, decorate with silver, gold, or crescent moon and star motifs using royal icing or edible decorations.
- During the Lunar New Year, use red and gold colors for good luck. You can even flavor the cookies with matcha or sesame for a cultural twist.
- Add pastel colors and floral sprinkles for spring holidays like Easter.
3. Kid-Friendly Cookie Decorating Activity
Moon cookies are a fun and safe project for kids:
- Set up a cookie decorating station with bowls of colored glaze, sprinkles, and edible markers.
- Let kids customize their own cookie moons, planets, or even aliens for a space-themed afternoon.
- It’s an entertaining activity for birthday parties, classroom events, or rainy-day fun.
4. Gifting and Party Favor Ideas
These cookies are easy to package and gift:
- Stack a few decorated cookies in a clear treat bag and tie it with a ribbon and a moon-shaped gift tag.
- Use them as wedding or baby shower favors, especially if the theme is celestial or “love you to the moon and back.”
- Add them to a dessert box with stars, planets, or other themed treats for a stunning edible gift.
Bonus Serving Ideas:
- Serve them with herbal tea, chai, or milk for a cozy nighttime snack.
- Pair with other celestial-themed desserts (like star sugar cookies or galaxy cupcakes) for a stunning dessert table.
- Use them to decorate a moon-themed cake—just gently place a few finished cookies around the edge.
From everyday enjoyment to once-a-year events, moon cookies are the kind of sweet treat that fits right in. Their gentle flavor and playful appearance make them a joy to bake, decorate, share—and, of course, eat.


I will immediately snatch your rss feed as I can’t in finding your e-mail subscription hyperlink or e-newsletter service. Do you have any? Please let me recognize so that I may just subscribe. Thanks.