The Best Fluffy Pancakes recipe you will fall in love with. Full of tips and tricks to help you make the best pancakes.
There’s something truly magical about a beautifully stacked layer cake. Whether it’s for a birthday, celebration, or simply a weekend baking project, a well-made layer cake always steals the show. But let’s be honest — while many cakes look amazing, not all of them deliver on flavor. That’s where this guide comes in.
In this post, I’ll walk you through how to make a stunning layer cake that tastes just as incredible as it looks. From selecting the right ingredients to baking moist, even layers and mastering frosting techniques, you’ll get everything you need to create a show-stopping dessert. Whether you’re a beginner or looking to level up your cake game, this guide has you covered.
Ready to bake a cake that’s both beautiful and delicious? Let’s get started.
Choosing the Right Ingredients for a Perfect Layer Cake
Making a stunning layer cake starts with choosing the best ingredients. Each component plays a crucial role in the final result, from the texture of the cake to the flavor and stability of the frosting. In this section, we’ll dive into the essential ingredients you’ll need to make your layer cake both moist and flavorful, while also providing the foundation for a beautiful, sturdy structure.
Essential Dry Ingredients: Cake Flour, Baking Soda & Baking Powder
The right dry ingredients are key to achieving that light, airy texture we all love in a layer cake. Cake flour is often preferred over all-purpose flour because it has a lower protein content, resulting in a finer crumb and softer cake. If you don’t have cake flour, you can substitute by using all-purpose flour and cornstarch, but cake flour really makes a difference in terms of tenderness.
Next up, baking powder and baking soda work together to help the cake rise. Baking powder is a leavening agent that releases carbon dioxide, helping the cake expand during baking. It’s important to measure these ingredients accurately to avoid any imbalance, which could lead to a cake that’s too dense or too airy. For the best results, sift these dry ingredients together to ensure they’re evenly distributed throughout the batter.
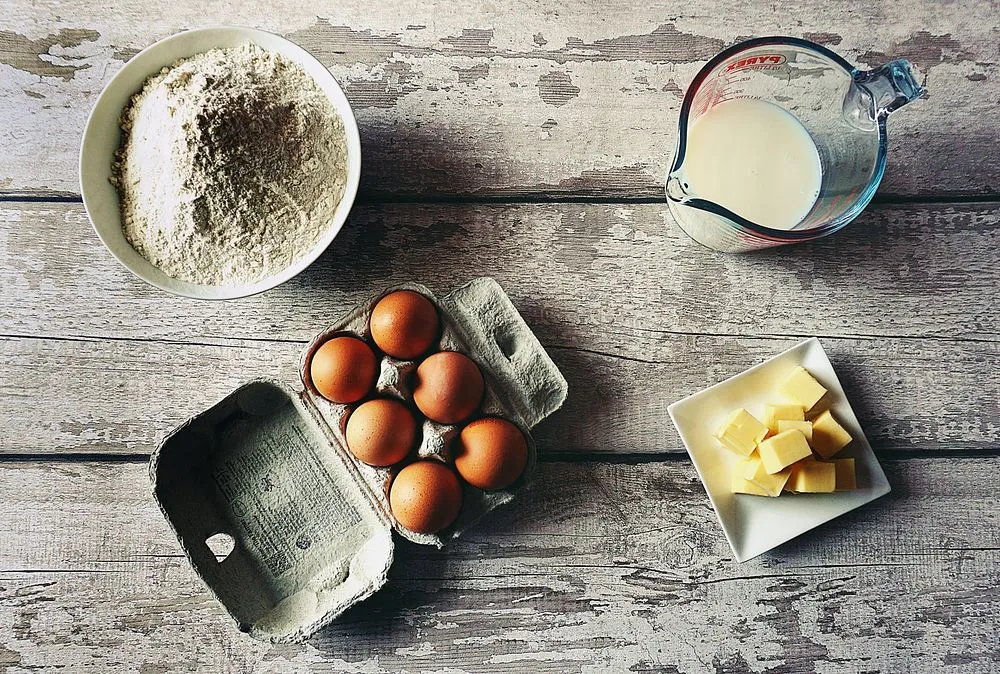
Moisture Matters: Using Eggs, Butter, and Whole Milk
Now, let’s talk about moisture, which is essential for achieving a cake that’s not only delicious but also stays fresh for days. Unsalted butter is your go-to fat for a moist and tender crumb. Butter adds richness and flavor, and it helps create a smooth batter that bakes evenly. Be sure to bring your butter to room temperature before mixing; this ensures it will cream properly with the sugar, leading to a lighter texture.
Eggs are another crucial element. They act as a binding agent and provide structure to the cake. For a rich flavor and golden color, you’ll want to use large whole eggs, ideally at room temperature as well. If you’re looking to make your cake extra fluffy, separating the eggs and beating the egg whites separately before folding them into the batter can give you a lighter, airier texture.
As for the liquid, whole milk is ideal for adding the right amount of moisture without making the cake too dense. If you want a richer taste, you can substitute some of the milk for sour cream or buttermilk. These options help add a slight tanginess and extra tenderness, which makes the cake even more delectable.
Flavor Boosters: Vanilla Extract, Cocoa Powder, and More
The flavor of your cake is just as important as its texture. While a classic vanilla layer cake is always a winner, you can easily customize the flavor to suit your preferences. A good-quality vanilla extract is essential for that warm, sweet base flavor. Vanilla is one of those ingredients that subtly elevates the taste of the entire cake without overpowering the other ingredients.
For a chocolate layer cake, swap in cocoa powder for a rich, deep flavor. Make sure to use high-quality unsweetened cocoa powder, as it will give your cake that signature chocolatey taste without being overly sweet. If you’re making something more exotic, consider adding a touch of almond extract, lemon zest, or even cinnamon to create a unique and delicious flavor profile. Remember that flavor extracts should be used sparingly — a little goes a long way.
Best Layer Cake Fillings: Buttercream, Jam, Ganache Options
A stunning layer cake isn’t just about the outer appearance; the filling plays a key role in the overall taste experience. Buttercream is the go-to choice for most cakes, and for good reason. Its creamy texture and sweet, buttery flavor pair perfectly with a variety of cakes. You can choose from a classic vanilla buttercream, cream cheese frosting, or a Swiss meringue buttercream if you want something lighter and less sweet. For a more decadent treat, chocolate ganache or whipped ganache is always a crowd-pleaser.
For a fruity touch, try adding a layer of jam or preserves. Raspberry, strawberry, or apricot jams are popular choices that add a fresh, tangy contrast to the sweetness of the cake and frosting. If you’re feeling adventurous, lemon curd or pastry cream can also make a fantastic filling, giving your cake a creamy, citrusy zing.
Lastly, don’t forget to think about texture. If you’re adding jam or ganache, consider adding some chopped nuts or toasted coconut for an extra crunch. This not only adds flavor but also makes for a more visually appealing cake.
Basic Vanilla Layer Cake Recipe
A classic vanilla layer cake is the cornerstone of many celebrations, from birthdays to weddings, and for good reason. Its simple, delicate flavor pairs wonderfully with almost any frosting or filling. Whether you’re new to baking or an experienced cake maker, this basic vanilla layer cake recipe is a must-have in your repertoire. It’s easy to follow, versatile, and guaranteed to be a crowd-pleaser.

Ingredients for the Vanilla Layer Cake
To make a basic vanilla layer cake, you’ll need these essential ingredients:
- 2 ½ cups (312g) all-purpose flour
- 2 ½ tsp baking powder
- ½ tsp salt
- 1 cup (226g) unsalted butter, softened
- 2 cups (400g) granulated sugar
- 4 large eggs, at room temperature
- 1 tbsp vanilla extract
- 1 cup (240ml) whole milk, at room temperature
These ingredients are easy to find, and together they create the perfect balance of sweetness, fluffiness, and richness for the cake.
Step-by-Step Instructions for Making the Cake
- Preheat the Oven: Begin by preheating your oven to 350°F (175°C). This ensures the oven is at the right temperature for baking.
- Prepare the Cake Pans: Grease and flour two 9-inch round cake pans. You can also line the bottom of the pans with parchment paper to prevent the cake from sticking.
- Mix Dry Ingredients: In a medium-sized bowl, whisk together 2 ½ cups flour, 2 ½ tsp baking powder, and ½ tsp salt. Set this aside to add later.
- Cream Butter and Sugar: In a large mixing bowl, beat 1 cup butter and 2 cups sugar together on medium speed for about 4-5 minutes, until the mixture is light and fluffy. This step helps create air pockets in the cake, giving it a light texture.
- Add Eggs: Beat in the 4 large eggs, one at a time. Make sure each egg is fully incorporated before adding the next to ensure a smooth batter.
- Add Vanilla: Stir in 1 tbsp vanilla extract for that wonderful, aromatic flavor that will shine through in every bite.
- Combine Wet and Dry Ingredients: Gradually add the dry ingredients to the wet mixture, alternating with 1 cup whole milk. Start and end with the dry ingredients. Mix until just combined—avoid overmixing to ensure your cake is light and tender.
- Pour the Batter: Evenly divide the batter between the two prepared cake pans, smoothing the tops with a spatula for a uniform surface.
- Bake: Place the pans in the preheated oven and bake for 25-30 minutes or until a toothpick inserted into the center comes out clean. Be sure to check for doneness, as oven times can vary.
- Cool: Allow the cakes to cool in the pans for about 10 minutes. After that, transfer the cakes to a wire rack to cool completely before frosting.
How to Bake Even, Moist Cake Layers
Achieving perfect, even layers is essential for any great layer cake. Uneven cake layers not only affect the aesthetics but also impact the texture and structure. Moist, evenly baked layers ensure a light, tender cake that holds up beautifully when stacked. In this section, we’ll explore the techniques and tips to bake flawless cake layers every time.
Preheat Your Oven Properly for Consistent Heat
The first step in baking even layers is ensuring your oven is preheated properly.
- Give your oven enough time to reach the desired temperature before placing your cake inside.
- An oven thermometer can be extremely helpful to ensure your oven is heating accurately.
- Bake at 350°F (175°C) for most layer cakes, as this is a standard temperature for even baking.
If the oven is too hot or too cold, it can lead to uneven baking, resulting in domed or dry cake layers.
For consistent and even baking results, using a reliable oven can make a big difference. The Ninja DT251 Smart Countertop Convection Oven is a great option for home bakers. With smart technology, a built-in thermometer, and consistent heat circulation, it helps cakes bake evenly every time.
If your current oven has hot spots or temperature inconsistencies, this smart oven can be a game-changer for your baking.
Use the Right Cake Pans and Prepare Them Well
Choosing the correct pans is vital for even baking.
- Light-colored metal pans work best for even heat distribution. Dark pans can cause uneven baking, with edges cooking faster than the center.
- Grease and flour your pans or line them with parchment paper for easy release.
- Use baking strips around the outside of your pans to ensure consistent temperature and even baking. If you don’t have baking strips, you can DIY with cloth soaked in water.
Preparing your pans properly ensures that your cake layers bake evenly and don’t stick.
Distribute the Batter Evenly
Once your pans are ready, the next important step is distributing the batter evenly.
- Use an ice cream scoop or measuring cup to add batter to the center of each pan.
- Gently spread the batter to the edges with a spatula.
- Tap the pans gently on the counter to settle the batter and remove air bubbles.
For multiple layers, make sure you divide the batter equally between pans. Using a kitchen scale can help you achieve perfect portioning.
Level the Batter Before Baking
Before baking, ensure the batter is level in the pan.
- Tap the pans on the counter gently to level the batter.
- Use an offset spatula to smooth the top of the batter for an even surface.
- For precise leveling, use a cake leveler to check the height of the batter in each pan.
Leveling the batter ensures that the layers bake evenly, without any domes or uneven rises.
Bake and Rotate the Pans for Even Heat
Oven heat can be uneven, even in well-preheated ovens. To ensure even baking:
- Rotate your cake pans halfway through baking to ensure they bake evenly on all sides.
- If baking two layers, swap their positions—top to bottom and vice versa—to distribute heat more evenly.
This step ensures both layers bake uniformly without overcooking in any one spot.
Use a Cake Tester to Ensure Proper Baking
A cake tester or toothpick is essential for checking the doneness of your cakes.
- Insert the tester into the center of the cake.
- If it comes out clean or with a few crumbs, your cake is done.
- If there’s wet batter, allow it to bake for a little longer.
Checking for doneness helps you avoid overbaking, which could dry out your layers.
Let the Cake Cool Properly
Proper cooling helps maintain the moisture in your cake and prevents it from breaking when removed from the pan.
- Let your cakes cool in the pans for 10–15 minutes before flipping them out.
- Once removed from the pans, let the cakes cool completely on a wire rack.
This cooling period is essential for retaining moisture and making the cake easier to frost.
Tort Your Cakes for Even Layers
If your cakes have a slight dome, you can easily level them.
- Use a serrated knife to carefully cut off the domed top.
- Leveling your cakes ensures they stack evenly, creating a smooth surface for frosting.
This step, known as torting, guarantees even layers that are easier to decorate and frost.
Assembling and Frosting Like a Pro
Assembling and frosting a layer cake is the final step in bringing all your hard work together. With the right techniques and tools, you can achieve a smooth, professional-looking finish that will make your cake both beautiful and delicious. This section covers everything you need to know about assembling your cake layers and applying frosting like a pro.

Preparing Your Cake Layers for Assembly
Before you begin assembling your cake, it’s essential to make sure your layers are ready.
- Ensure your cake layers are completely cooled before starting the assembly. This prevents the frosting from melting and ensures the cake layers are firm enough to stack.
- Trim your cakes if needed. If your cakes have domed tops, use a serrated knife to level them. This gives you even layers that will stack better and stay stable.
- Place a layer of cake on a sturdy base, such as a cake board or a flat plate. This makes it easier to handle the cake while you assemble and frost it.
Applying the First Layer of Frosting: The Crumb Coat
A crumb coat is a thin layer of frosting that locks in the crumbs and provides a smooth surface for the final layer of frosting.
- Spread a thin layer of frosting over the top and sides of the cake. Don’t worry if it’s not perfect at this stage.
- Seal in the crumbs by spreading frosting over the entire surface of the cake, creating a smooth, even coat.
- Once the cake is crumb-coated, refrigerate the cake for 20–30 minutes to allow the crumb coat to set. This step prevents crumbs from mixing into the final coat of frosting.
Adding the Final Layer of Frosting
After the crumb coat has set, it’s time to apply the final, thicker layer of frosting. This is where you can start perfecting the appearance of your cake.
- Apply a generous amount of frosting to the top of the cake using an offset spatula. Spread it evenly to the edges of the top layer, letting it slightly overhang.
- Smooth the frosting over the top of the cake, using the spatula or a bench scraper to make sure the top is even and flat.
- Frost the sides of the cake by starting at the bottom and working your way up. Spread the frosting in a downward motion, ensuring it’s smooth and evenly distributed.
Smoothing the Frosting for a Professional Finish
Achieving a flawless, smooth surface takes a little practice but is totally doable with the right technique.
- Use a bench scraper for a sleek, smooth finish on the sides. Hold the scraper at a 45-degree angle to the cake and rotate the cake slowly to smooth the frosting evenly.
- If you don’t have a bench scraper, you can use a spatula or the back of a spoon to gently smooth the frosting.
- For a sharp edge, clean the bench scraper often to avoid transferring crumbs or excess frosting.
- You can also heat your spatula by dipping it in hot water and wiping it dry before smoothing the frosting. This makes it easier to achieve a smoother finish.
Adding Decorative Details
Now comes the fun part: decorating your cake! Whether you prefer a minimalist look or a more intricate design, there are many ways to add decorative elements to your cake.
- Piping designs: Use a piping bag fitted with different tips to create decorative designs on the top and sides of your cake. You can pipe rosettes, stars, or even simple borders around the base of the cake.
- Edible flowers: Fresh edible flowers can be a beautiful addition to any layer cake. Place them on top or around the edges for an elegant touch.
- Sprinkles or edible glitter: For a playful and festive look, add sprinkles or edible glitter to the cake for some sparkle and color.
- Drip effect: If you’re feeling creative, you can add a chocolate or caramel drip effect by melting your choice of topping and drizzling it over the edge of the cake for a stunning visual.
Chill the Cake Before Serving
Once your cake is frosted and decorated, it’s important to let it set before serving.
- Chill the cake for at least an hour to allow the frosting to firm up and the flavors to meld together.
- If you’re not serving the cake immediately, cover it lightly with plastic wrap or a cake dome and refrigerate. This helps preserve the freshness of the cake and prevents the frosting from softening.
Serving and Enjoying Your Layer Cake
Now that your cake is beautifully assembled and frosted, it’s time to cut into it and enjoy! To get clean slices, use a serrated knife and wipe it clean between each cut. This ensures each slice has a clean, professional appearance.
Remember, a beautifully frosted layer cake is not just a treat for the taste buds but also a feast for the eyes. By mastering these assembly and frosting techniques, you can create cakes that look as good as they taste.
Decorating Tips to Make It Truly Stunning
Decorating a layer cake is where your creativity can truly shine! Whether you’re aiming for a simple, elegant design or a bold, intricate masterpiece, decorating can elevate your cake from delicious to absolutely stunning. In this section, we’ll explore a range of tips and techniques to help you achieve the perfect look for your cake.
Choosing a Decorating Theme
The theme of your cake should align with the occasion, the season, or even the flavor profile of the cake. Choosing a theme before you start decorating can help you stay focused and ensure all your elements work together.
- Seasonal Themes: Think of the seasons when decorating your cake. Light pastel colors and floral designs are perfect for spring, while deep reds and golds work wonderfully for winter.
- Occasion-Specific: For birthdays, weddings, or holidays, tailor the design to reflect the occasion. Consider using the recipient’s favorite colors or creating designs that symbolize the event (e.g., hearts for Valentine’s Day, flowers for Mother’s Day).
- Flavor-Inspired: The cake flavor can also inspire the decoration. For example, a lemon cake might be beautifully complemented with fresh lemon zest, candied citrus slices, or a lemon curd drip.
Choosing a clear theme helps you narrow down your decorating options, making the process smoother.
Piping Designs for Detailed Decoration
Piping is one of the most popular techniques for adding intricate and professional-looking details to your cake. There are many different piping tips and designs you can use to create stunning patterns and textures.
- Piping Flowers: Use a variety of piping tips to create beautiful flowers like roses, daisies, or even more elaborate blossoms such as peonies and tulips. Start with a large tip for the petals and a smaller one for the details.
- Buttercream Ruffles: A delicate, textured look can be achieved by piping ruffles around the sides of the cake. This technique adds a sophisticated touch to any layer cake.
- Swirls and Rosettes: Simple but elegant, rosettes or swirls can be piped along the top of the cake or around the base. These give the cake a polished, uniform appearance.
- Piping Borders: Use piping to create neat borders around the top and bottom edges of the cake. A small round tip or star tip works great for this.
Make sure your buttercream is at the right consistency—too soft and it will sag, too stiff and it won’t pipe smoothly. Practice on parchment paper before working on your cake for the best results.
Adding Fresh Flowers and Edible Decorations
Fresh flowers can transform a cake into an elegant and eye-catching masterpiece. When using fresh flowers, always ensure they are food-safe and free of pesticides.
- Edible Flowers: Flowers like pansies, violets, and marigolds are great options for cake decoration. Arrange them around the base or scatter them across the top for a natural, organic feel.
- Succulents: For a trendy, rustic look, consider using edible succulents. They are perfect for a modern, minimalist cake.
- Fruits: Fresh fruits like berries, sliced citrus, or even tropical fruits like kiwi or passionfruit add vibrant color and a fresh touch to the design.
- Gold Leaf: Edible gold leaf can elevate any cake. A few delicate pieces placed on top or along the edges can add a touch of luxury and refinement.
When arranging flowers or fruits, be sure to place them so they won’t fall off or get crushed when serving the cake.
Creative Drips for a Modern Look
Drip cakes are all the rage in the world of cake decorating, and for good reason—they’re fun, eye-catching, and can be done with a variety of sauces.
- Chocolate Drip: Melted chocolate is a classic drip option. It adds a rich, glossy finish and can be made in any color or flavor—dark, milk, or white chocolate.
- Caramel Drip: For a more decadent twist, use a caramel sauce to create a golden drip effect. This pairs wonderfully with chocolate or vanilla cakes.
- Fruit Syrup Drip: For a refreshing, light touch, fruit syrups or fruit curds (like raspberry or lemon) can create vibrant, colorful drips on your cake.
- How to Drip: To achieve the perfect drip effect, warm your chosen drip material (chocolate, caramel, or fruit syrup) to a pourable consistency. Let it drip over the edges of the cake, starting from the top and allowing it to cascade down naturally.
The drip effect adds a modern, eye-catching element to your cake and can easily be customized to suit any flavor.
Adding Texture with Fondant
Fondant is a versatile decorating tool that can give your cake a smooth, flawless finish. It can also be used to create beautiful textured elements.
- Smooth Fondant Finish: Roll fondant out to a thin, even layer and carefully drape it over the cake. Smooth it down with your hands or a fondant smoother to remove any air bubbles and create a seamless finish.
- Fondant Flowers and Decorations: Use fondant to make flowers, bows, or other custom decorations. You can color fondant, mold it into shapes, and even add details like veining on flowers or intricate lace patterns.
- Textured Designs: If you want to create texture on your cake, you can use textured rolling pins or fondant mats to imprint patterns like ruffles, lace, or geometric shapes onto the fondant.
Fondant can be tricky to work with, but with practice, it’s a great way to create a smooth, elegant surface that’s perfect for detailed designs.
Using Sprinkles and Other Fun Edible Toppings
Sometimes, the simplest touches can make the biggest impact. Edible sprinkles or other toppings can add color, texture, and fun to your cake.
- Sprinkles: Whether you choose classic rainbow sprinkles or fancy metallic or confetti sprinkles, they add a playful and festive element to your cake. Consider scattering them around the base or on top for a lighthearted touch.
- Shredded Coconut: Toasted coconut can add a tropical flair to your cake, and its texture gives a fun contrast to smooth frosting.
- Crushed Nuts: Walnuts, almonds, or pistachios can add a crunchy element and a burst of flavor, perfect for pairing with chocolate or fruit cakes.
- Candy Decorations: From chocolate pieces to gummies or meringue kisses, candy can bring a fun and whimsical touch to any cake.
These decorative toppings are easy to add and can be tailored to suit any theme or flavor.
Final Touches: Adding a Personal Flair
The final steps in decorating your cake are all about adding your personal touch.
- Monogram or Custom Message: Piping a name, message, or initials onto the cake adds a personalized element that makes it feel special.
- Painted Details: For a sophisticated look, you can use edible food colors to paint delicate designs, like brush strokes or small floral motifs, onto the cake’s surface.
- Textured Edges: Use a fork or spatula to create a textured effect on the sides of the cake, adding a rustic yet elegant touch.
With these final details, you can turn a simple cake into a custom masterpiece that reflects your style and the occasion.
Want to Try a More Colorful Twist?
If you’re feeling creative and want to explore beyond the classic vanilla look, check out this eye-catching Purple Velvet Cake Recipe. It’s a fun and vibrant dessert that’s just as moist and delicious—with a bold color that makes a statement on any table.


[…] pre-made chocolate or vanilla cake layer (or homemade cake, […]
[…] Start with a reliable cake recipe that produces moist and fluffy layers. Whether you’re using a box mix or baking from scratch, adding ingredients like sour cream or yogurt can enhance moisture and tenderness. Be careful not to overmix the batter, as this can make the cake dense. Also, use room temperature ingredients for better blending and even baking. Properly greased and lined cake pans help your layers come out clean and smooth. For a detailed guide on making a stunning vanilla layer cake, check out this helpful tutorial here. […]