The Best Fluffy Pancakes recipe you will fall in love with. Full of tips and tricks to help you make the best pancakes.
When the weather heats up, there’s nothing more satisfying than a cool, colorful, and delicious dessert platter packed with fresh seasonal fruits and sweet treats. Whether you’re hosting a backyard BBQ, planning a summer picnic, or just craving something light and refreshing, a fruity summer dessert board is the perfect choice. It’s easy to assemble, visually stunning, and endlessly customizable—plus, you don’t even need to turn on the oven!
In this post, you’ll discover simple recipe ideas like fruit skewers with yogurt dip, no-bake cheesecake cups, and chocolate-dipped bites—all designed to bring a burst of flavor and fun to your summer gatherings. With just a few ingredients and creative presentation tips, you can build a platter that looks impressive and tastes even better.
Let’s dive into how to make a fresh and fruity summer dessert platter that will wow your guests and keep things cool and sweet all season long.
Fresh Fruit Skewers with Honey-Yogurt Dip
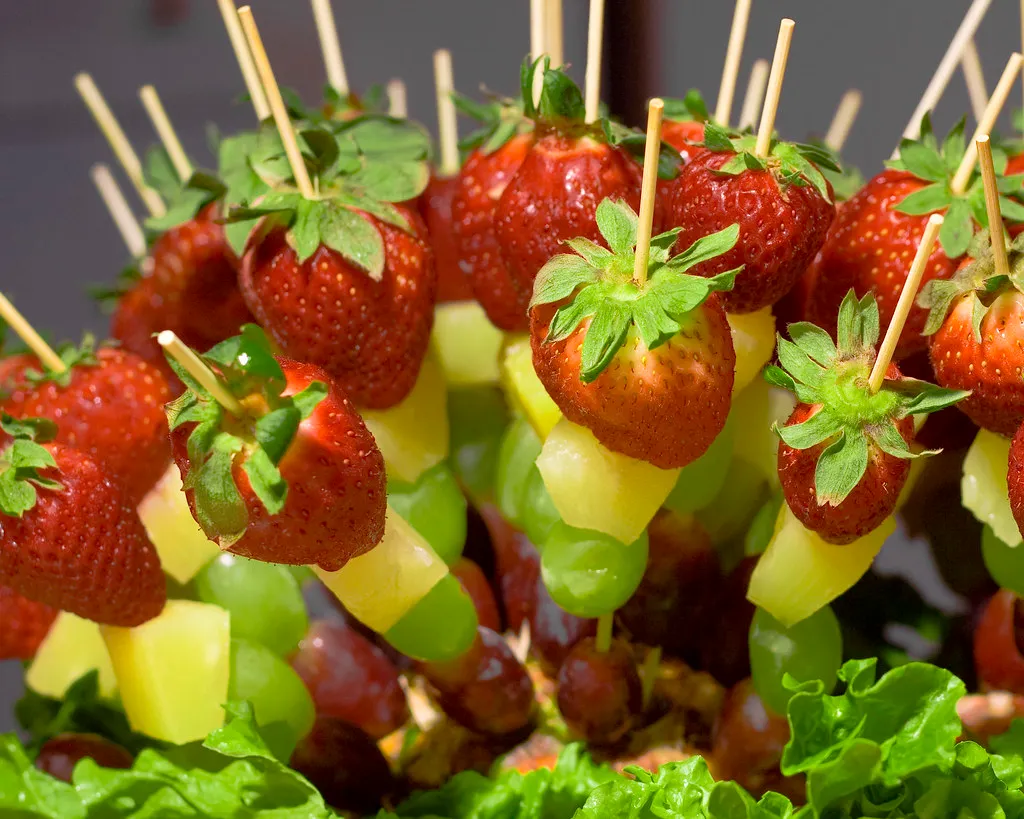
Fresh fruit skewers are the perfect way to showcase the vibrant colors and natural sweetness of summer produce. They’re easy to make, fun to eat, and look beautiful on any dessert platter. Paired with a creamy honey-yogurt dip, these skewers are light, refreshing, and ideal for warm-weather entertaining.
🥭 What You’ll Need:
- Fruits to use: Strawberries, watermelon, pineapple, cantaloupe, kiwi, blueberries, grapes, mango
- For the dip:
- 1 cup plain Greek yogurt
- 1–2 tablespoons honey (adjust to taste)
- ½ teaspoon vanilla extract (optional)
- Zest of ½ lemon for brightness
🍓 How to Assemble the Skewers:
- Wash and prep your fruits. Cut larger fruits like watermelon, mango, and cantaloupe into bite-sized cubes or fun shapes using cookie cutters.
- Thread fruits onto wooden or reusable skewers, alternating colors and textures for visual appeal.
- Chill the skewers in the fridge for at least 20 minutes before serving. This keeps them extra refreshing.
🍯 Make the Honey-Yogurt Dip:
- In a small bowl, mix the Greek yogurt, honey, and vanilla (if using).
- Stir in lemon zest for a fresh, zesty kick.
- Serve chilled in a small bowl or ramekin placed in the center of your dessert platter.
💡 Tips for Success:
- Use firm, ripe fruit to prevent the skewers from getting mushy.
- For extra flair, sprinkle some toasted coconut or chopped mint on top of the dip.
- Want it dairy-free? Use coconut yogurt and agave syrup as an alternative.
This recipe is a healthy, no-bake option that adds color, freshness, and a touch of elegance to any summer dessert spread. Plus, it’s fun for kids and adults alike!
No-Bake Mini Cheesecake Cups with Berries
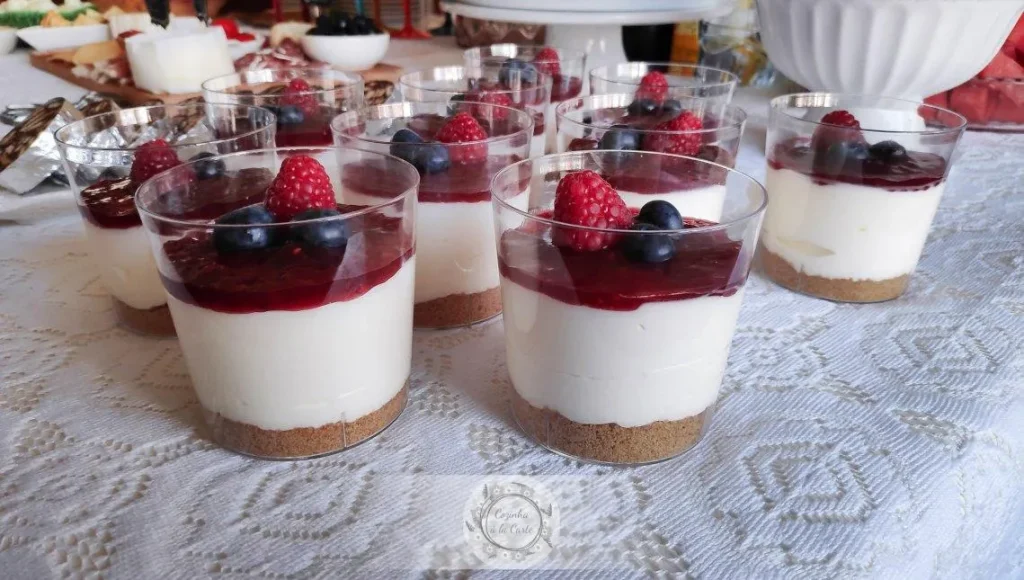
These no-bake mini cheesecake cups are a rich yet refreshing treat—perfect for hot summer days when you don’t want to turn on the oven. They’re creamy, fruity, and individually portioned, making them ideal for entertaining. With a simple graham cracker base and a tangy cheesecake filling, these little cups pair beautifully with fresh summer berries like strawberries, raspberries, or blueberries.
🍰 Ingredients You’ll Need:
crust:
- 1 cup graham cracker crumbs
- 2 tablespoons melted butter
- 1 tablespoon sugar (optional)
filling:
- 8 oz (225 g) cream cheese, softened
- ½ cup Greek yogurt or whipped cream
- ⅓ cup powdered sugar (or to taste)
- 1 teaspoon vanilla extract
- Zest of 1 lemon (for brightness)
topping:
- Fresh berries (strawberries, raspberries, blueberries, blackberries)
- Mint leaves or lemon zest (optional, for garnish)
🧁 How to Make Them:
- Make the crust:
In a bowl, combine graham cracker crumbs, melted butter, and sugar. Stir until the texture is like wet sand. Press about a tablespoon of the mixture into the bottom of each small glass, ramekin, or dessert cup. - Prepare the filling:
In another bowl, beat the cream cheese until smooth. Add in the Greek yogurt (or whipped cream), powdered sugar, vanilla, and lemon zest. Mix until light and fluffy. - Assemble the cups:
Spoon or pipe the cheesecake mixture over the crust. Smooth the tops with a spoon or spatula. - Add the berries:
Top each cup with a variety of fresh summer berries. Feel free to mix and match for a vibrant look. - Chill:
Refrigerate for at least 1 hour before serving. These can be made several hours ahead and stored until ready to serve.
📝 Tips and Variations:
- For a gluten-free option, use gluten-free cookies or granola for the base.
- Want it lighter? Swap cream cheese with full-fat Greek yogurt and reduce the sugar.
- For a fun twist, drizzle honey or berry compote on top before serving.
These mini cheesecake cups bring a creamy, tangy element to your summer dessert platter and look gorgeous next to fruit skewers and chocolate-dipped treats.
Chocolate-Dipped Fruit Bites
Chocolate-dipped fruit bites are a simple yet elegant addition to any summer dessert platter. They combine the natural sweetness and juiciness of fresh fruit with the rich, silky flavor of melted chocolate—creating a treat that feels indulgent without being too heavy. These bites are easy to prepare, customizable, and look beautiful arranged alongside fresh fruit and other mini desserts.

🍫 Best Fruits for Dipping:
- Strawberries: A classic pairing with chocolate.
- Banana slices: Creamy and sweet—dip halfway for a perfect bite.
- Orange or clementine segments: Tangy and refreshing with dark chocolate.
- Pineapple chunks: Their tropical sweetness balances beautifully with semi-sweet chocolate.
- Apple slices or grapes: Crisp textures for variety.
🔪 How to Make Chocolate-Dipped Fruit Bites:
- Prep your fruit:
Wash, peel (if needed), and pat the fruit dry thoroughly. Moisture prevents chocolate from sticking properly. - Melt the chocolate:
- Use semi-sweet, dark, or white chocolate chips.
- Microwave in 20-second intervals, stirring until smooth.
- Optionally, add ½ teaspoon of coconut oil for a glossier finish.
- Dip the fruit:
Hold each piece with a toothpick or fork, dip halfway into the melted chocolate, and let the excess drip off. - Add toppings (optional):
- Sprinkle with chopped nuts, shredded coconut, crushed freeze-dried berries, or a pinch of sea salt while the chocolate is still wet.
- Set and chill:
Place dipped fruit on a parchment-lined tray. Refrigerate for 15–30 minutes or until chocolate is fully set.
🎉 Presentation Tips:
- Group dipped fruits by color or fruit type on your platter for a clean, eye-catching look.
- Place them near fresh berries or mini cheesecake cups for contrast.
- Garnish with mint leaves or edible flowers to elevate the summer vibe.
🍽️ Flavor Ideas & Variations:
- Drizzle white chocolate over dark-dipped fruits for a decorative finish.
- Use flavored chocolate (like orange or mint) for a unique twist.
- For an adult version, sprinkle a touch of chili powder or sea salt on dark chocolate for a gourmet edge.
These chocolate-dipped bites are quick to make, naturally gluten-free, and incredibly versatile. They bring a touch of luxury to your summer dessert platter while staying easy and fun.
Watermelon Feta Mint Bites (Savory-Sweet Option)
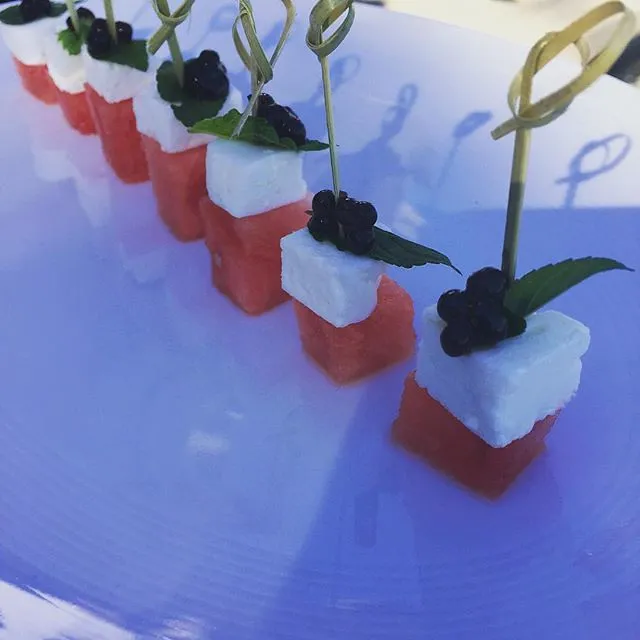
For a unique addition to your summer dessert platter, watermelon feta mint bites offer a perfect blend of sweet, salty, and fresh flavors. This savory-sweet option adds a gourmet touch and balances out the richer elements like cheesecake or chocolate. The crisp watermelon, creamy feta, and cool mint combine for a bite-sized treat that’s as beautiful as it is delicious.
🍉 Why This Combo Works:
- Sweetness from the watermelon
- Salty creaminess from the feta
- Fresh herbal brightness from the mint
- A hint of acid or glaze (like balsamic reduction) ties it all together and elevates the flavor.
🧀 Ingredients:
- Fresh seedless watermelon, cut into 1-inch cubes
- Feta cheese, cubed or crumbled (block-style feta holds better)
- Fresh mint leaves, whole or chiffonade
- Toothpicks or small skewers
- (Optional) Balsamic glaze or honey drizzle
🔪 How to Assemble:
- Cube the watermelon:
Cut into bite-sized, uniform cubes and pat dry with paper towel to avoid sogginess. - Cut the feta:
Slice into small squares similar in size to your watermelon cubes. You can also use a melon baller and crumble feta on top for a more rustic look. - Stack & skewer:
Layer one cube of watermelon, one cube of feta, and a mint leaf. Secure with a toothpick or mini skewer for a polished presentation. - Finish with a drizzle (optional):
Just before serving, lightly drizzle with balsamic glaze for a sweet-acidic finish or honey for a floral twist.
🍽️ Serving Tips:
- Place them in neat rows or clusters on your dessert board.
- Alternate them with fruit skewers and sweets to create contrast.
- For extra color, garnish the platter with edible flowers or cucumber ribbons.
💡 Variations:
- Add a blueberry or black olive on top for extra color and complexity.
- Swap feta with goat cheese or mozzarella pearls if preferred.
- Replace watermelon with cantaloupe or honeydew for a different fruity base.
This recipe is a fantastic way to incorporate something savory into your dessert platter while still keeping it light and refreshing. It’s ideal for adult palates and makes your summer spread feel extra sophisticated.
Summer Dessert Platter Assembly & Presentation
Now that you’ve prepared all your delicious elements—fruit skewers, no-bake cheesecakes, chocolate-dipped bites, and savory-sweet watermelon stacks—it’s time to bring it all together with beautiful presentation. The way you arrange your summer dessert platter can transform it from a collection of treats into a show-stopping centerpiece. Here’s how to do it with style and ease.
🍽️ Choose the Right Base
- Large wooden board: A rustic and classic choice that’s perfect for outdoor gatherings or BBQs.
- Marble slab or ceramic tray: Ideal for a more elegant or modern look. Also helps keep food cool.
- Tiered stands or flat serving trays: Great for small spaces or when you want to create height and visual interest.
🎨 Arrange by Color and Texture
- Group by color: Place reds (strawberries, raspberries), oranges (mango, cantaloupe), greens (kiwi, mint), and purples (grapes, blueberries) in separate areas to create bold sections.
- Balance soft and crunchy: Alternate creamy textures (cheesecake, dip) with crisp bites (fruit, nuts, cookies).
- Vary shapes: Use cubes, rounds, skewers, and whole fruits to create depth and flow.
🥄 Add Dips, Drizzles, and Decorative Touches
- Place small bowls or ramekins of yogurt dip, honey, or chocolate sauce in the center or corners of the board.
- Drizzle chocolate or honey over part of the board for a gourmet look.
- Garnish with fresh mint leaves, lemon zest, or edible flowers to add color and freshness.
🧊 Keep It Cool and Fresh
- If serving outdoors, consider using an ice pack layer under the board (especially with yogurt and cheese).
- Assemble the platter no more than 1 hour before serving for optimal texture and color.
- Cover with plastic wrap and refrigerate until it’s time to serve.
📝 Quick Tips for Platter Success
- Always use odd numbers of items in each group (visually more pleasing).
- Avoid overcrowding—leave some negative space for balance.
- Think about flow—use long items like skewers to lead the eye across the board.
- Include small tongs, forks, or toothpicks for easy self-service.
👉 For more individually portioned treats, check out these single-serve dessert recipes for one—perfect for quick cravings or personal-sized platters.
🔪 Pro Tip: Use Sharp, Quality Knives for Clean Fruit Cuts
Clean cuts make a big difference in presentation—especially for watermelon cubes, citrus slices, or delicate berries. A good knife set can make prep quicker, safer, and much more precise.
👉 We recommend this premium Japan-style Ninja kitchen knife set — it’s sharp, well-balanced, and perfect for fruit prep and everyday kitchen use.


Whats Happening i am new to this, I stumbled upon this I’ve discovered It absolutely helpful and it has aided me out loads. I hope to give a contribution & help different customers like its helped me. Good job.