The Best Fluffy Pancakes recipe you will fall in love with. Full of tips and tricks to help you make the best pancakes.
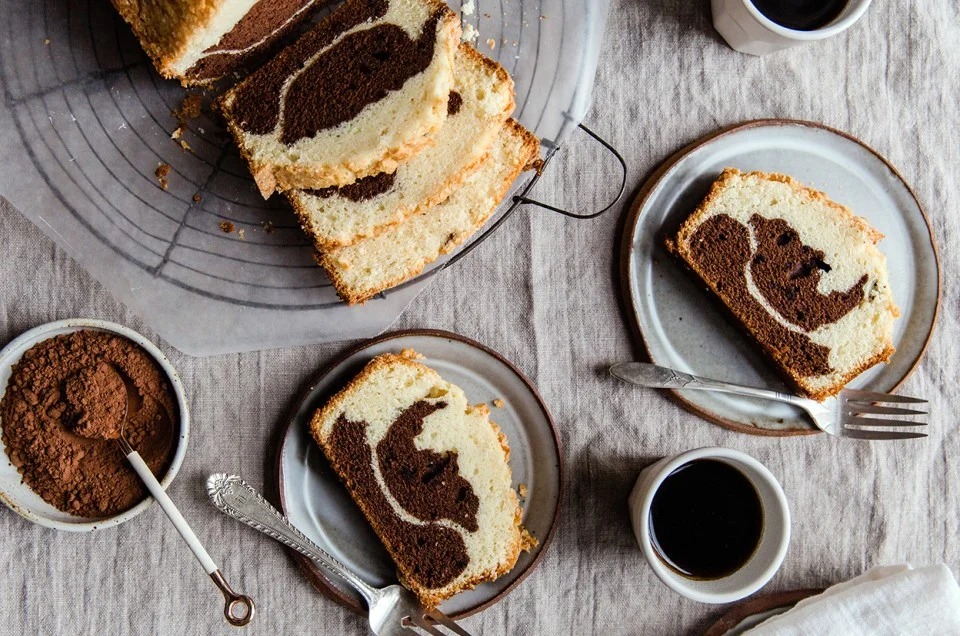
Who says desserts can’t be healthy and satisfying at the same time? 🍰 This fluffy and moist protein powder cake proves that you can enjoy a sweet treat without straying from your fitness goals. Whether you’re looking for a post-workout snack, a guilt-free dessert, or a creative way to use your favorite protein powder, this recipe delivers the perfect balance of flavor, texture, and nutrition.
Unlike most protein-based bakes that turn dry or dense, this cake stays incredibly soft and light — thanks to a simple combination of whey or plant-based protein, almond flour, Greek yogurt, and eggs. Each slice is packed with high-quality protein and natural sweetness, making it ideal for anyone who loves to bake and stay fit.
In this post, you’ll learn exactly how to make a delicious protein powder cake at home, discover the best ingredients for baking, explore fun flavor variations, and find out how to store and serve your cake for lasting freshness. Let’s turn that tub of protein powder into your new favorite dessert!
Why Make a Cake with Protein Powder?
If you’ve ever wished your desserts could be both delicious and nutritious, baking with protein powder is the perfect solution. Adding protein to your cake doesn’t just boost its nutritional value — it transforms your treat into a muscle-friendly, energizing snack that fits effortlessly into a healthy lifestyle. Here’s why this baking trend has become so popular among food lovers and fitness enthusiasts alike.
The Benefits of High-Protein Desserts
Protein-rich desserts like this cake help satisfy your sweet tooth while supporting muscle recovery and satiety. Unlike traditional cakes loaded with refined flour and sugar, a protein powder cake provides long-lasting energy and keeps you full longer. It’s a great option for anyone following a fitness plan, weight-loss journey, or balanced diet — especially when you crave something sweet after a workout.
How Protein Cakes Support Your Fitness Goals
When you eat a slice of protein cake after exercising, your body gets a convenient dose of amino acids essential for muscle repair and growth. Instead of reaching for a processed protein bar, you can enjoy a homemade dessert that’s made from clean ingredients and fits your macros. It’s a perfect blend of comfort and functionality — a reward that fuels your progress.
Choosing the Right Type of Protein Powder
Not all protein powders behave the same way when baked.
- Whey protein creates a soft and moist texture, making it ideal for cakes.
- Casein protein gives structure and richness, helping your cake stay tender.
- Plant-based proteins like pea or rice protein are great for vegan or dairy-free options, though they may require extra moisture from ingredients like Greek yogurt, bananas, or nut butter.
Experimenting with different types lets you find the perfect texture and flavor balance for your recipe.
Myths About Baking with Protein Powder
Many people think baking with protein powder automatically leads to dry, rubbery desserts — but that’s far from true! The key lies in balancing wet and dry ingredients. Adding elements like Greek yogurt, almond flour, or eggs ensures moisture and tenderness. With the right ratio, you’ll get a fluffy, bakery-style cake that tastes as good as it looks — without compromising on nutrition.
Ingredients and Tools You’ll Need
Before you start baking your fluffy and moist protein powder cake, make sure you have all your ingredients and tools ready. This recipe is simple, but the right measurements and utensils will help you achieve the perfect light, tender texture every time.
Below you’ll find everything you need — from the exact ingredient quantities to the essential kitchen tools for the best baking results.
Essential Ingredients for a Fluffy and Moist Protein Cake
For 1 medium loaf or 8–10 slices, you’ll need:
- 1 cup (120 g) oat flour (or almond flour for a gluten-free version)
- 1/2 cup (50 g) protein powder (whey, casein, or plant-based — vanilla or unflavored works best)
- 1 ½ tsp baking powder
- ¼ tsp baking soda
- Pinch of salt
- 2 large eggs
- ¾ cup (180 g) Greek yogurt (plain or vanilla, adds moisture and protein)
- ¼ cup (60 ml) unsweetened almond milk (or regular milk)
- 2 tbsp melted coconut oil (or olive oil/butter)
- 2–3 tbsp honey or maple syrup (adjust for sweetness)
- 1 tsp vanilla extract
- Optional mix-ins: chocolate chips, cocoa powder, chopped nuts, or fresh berries
💡 Tip: If you’re using chocolate protein powder, reduce the flour slightly (by about 2 tbsp) and add 1 tbsp cocoa powder for balance.
Choosing the Best Protein Powder for Baking
Not every protein powder reacts the same in heat.
- Whey protein – Gives a soft, fluffy texture and mild flavor.
- Casein protein – Adds density and creaminess, keeping cakes moist longer.
- Plant-based protein – Works for vegan diets; add extra moisture (yogurt, banana, or applesauce).
When in doubt, start with whey protein isolate for a smooth, bakery-style result.
Optional Flavor Boosters
Customize your protein cake for variety and fun:
- Spices: Cinnamon, nutmeg, or pumpkin spice
- Extracts: Almond, lemon, or coconut extract
- Add-ins: Dried fruit, dark chocolate chunks, shredded coconut, or protein frosting
These small touches can make your healthy dessert feel indulgent while staying macro-friendly.
Tools and Equipment Checklist
To prepare and bake your protein powder cake, gather:
- 2 mixing bowls (one for wet, one for dry ingredients)
- Whisk or electric hand mixer (for smooth batter)
- Measuring cups and spoons
- Rubber spatula or wooden spoon
- Loaf pan or 8-inch round cake pan (lightly greased or lined with parchment paper)
- Oven thermometer (optional, for accuracy)
- Cooling rack
💡 Pro Tip: Avoid overmixing the batter — it helps keep your cake light and fluffy.
Step-by-Step Recipe: How to Make Protein Powder Cake
Now that you’ve gathered your ingredients and tools, it’s time to start baking! This protein powder cake recipe is simple enough for beginners yet satisfying enough for anyone craving a moist, high-protein treat. Follow each step carefully to get a light, fluffy texture that tastes like a classic homemade cake — but with a nutritious twist.
Step 1: Preheat and Prepare
Before mixing your ingredients, preheat your oven to 350°F (175°C).
Lightly grease your loaf pan or 8-inch cake pan with a bit of oil or line it with parchment paper for easy removal.
💡 Tip: Make sure your oven rack is placed in the center position to allow even baking.
Step 2: Combine Dry Ingredients
In a large mixing bowl, whisk together:
- 1 cup (120 g) oat flour
- ½ cup (50 g) protein powder
- 1½ tsp baking powder
- ¼ tsp baking soda
- Pinch of salt
Mix until everything is evenly distributed. This ensures your protein cake rises evenly and avoids clumps of dry ingredients later on.
Step 3: Mix the Wet Ingredients
In a separate bowl, combine:
- 2 large eggs
- ¾ cup (180 g) Greek yogurt
- ¼ cup (60 ml) almond milk
- 2 tbsp melted coconut oil
- 2–3 tbsp honey or maple syrup
- 1 tsp vanilla extract
Whisk these ingredients together until smooth. The Greek yogurt adds moisture, while the eggs provide structure and help your cake stay fluffy.
Step 4: Combine Wet and Dry Mixtures
Slowly pour the wet ingredients into the dry ingredients.
Using a spatula or whisk, gently fold the mixture together until just combined. Avoid overmixing — this can make your cake dense or dry.
If the batter feels too thick, add 1–2 tablespoons of milk until it reaches a smooth, pourable consistency.
Optional: Fold in your mix-ins like chocolate chips, berries, or nuts at this stage.
Step 5: Pour and Bake
Pour the batter into your prepared pan and smooth the top with a spatula.
Bake for 25–30 minutes, or until a toothpick inserted in the center comes out clean.
If you’re using a deeper pan, add a few extra minutes of baking time — but check frequently to avoid overbaking.
💡 Tip: Every oven is slightly different. Start checking your cake around the 25-minute mark to ensure perfect doneness.
Step 6: Cool and Serve
Remove the cake from the oven and let it cool in the pan for 10 minutes.
Then, transfer it to a cooling rack to cool completely before slicing.
Once cooled, cut into slices and serve as a post-workout snack, healthy breakfast, or guilt-free dessert. You can top it with a drizzle of Greek yogurt frosting, peanut butter, or melted dark chocolate for extra indulgence.
💪 Result: You’ll get a soft, moist, and perfectly balanced protein powder cake that feels like a treat but fuels your day with energy and protein.
Flavor Variations and Customizations
One of the best things about this protein powder cake recipe is its versatility. Once you master the base version, you can easily adapt it to suit your taste, dietary needs, or even your favorite protein powder flavor. Whether you love chocolatey indulgence, fruity freshness, or nutty richness, these variations will help you create a new delicious version every time you bake.
Chocolate Protein Cake Recipe Twist
If you’re a chocolate lover, this variation is for you!
Replace part of the flour with cocoa powder for a rich, decadent flavor without adding excess sugar.
To make it:
- Use ¼ cup (25 g) cocoa powder and reduce the oat flour by the same amount.
- Choose chocolate protein powder for an extra flavor boost.
- Add 1–2 tbsp melted dark chocolate or mini chocolate chips to the batter.
💡 Tip: Drizzle with a simple protein chocolate glaze (mix a scoop of protein powder with a splash of milk and cocoa) for a healthy frosting alternative.
Vanilla Almond Protein Cake Variation
If you prefer something light and subtly sweet, this vanilla almond cake variation is a great option. It’s fragrant, moist, and perfect with your morning coffee or tea.
To make it:
- Use vanilla protein powder and 1 tsp almond extract in place of vanilla extract.
- Sprinkle sliced almonds on top before baking for a crunchy texture.
- For added richness, you can mix 1 tbsp almond butter into the batter.
This version tastes like a classic bakery cake, but with a healthy, protein-packed twist.
Gluten-Free or Dairy-Free Alternatives
For those with dietary restrictions, this recipe can easily be adapted without sacrificing texture or flavor.
Gluten-Free:
- Use almond flour or gluten-free oat flour instead of regular oat flour.
- Ensure your protein powder is certified gluten-free.
Dairy-Free:
- Replace Greek yogurt with unsweetened coconut yogurt.
- Use plant-based protein powder (pea, rice, or hemp).
- Substitute honey with maple syrup or agave nectar.
These adjustments keep your protein cake moist and flavorful, while making it friendly for everyone to enjoy.
Toppings and Mix-Ins
Personalize your protein cake by adding extra flavor and texture:
- Fruits: Blueberries, raspberries, or mashed banana
- Nuts and Seeds: Walnuts, pecans, or chia seeds
- Sweet Touches: Mini dark chocolate chips, shredded coconut, or a drizzle of peanut butter
- Frosting Idea: Mix 1 scoop of vanilla protein powder with a few tablespoons of Greek yogurt for a creamy, high-protein frosting
💡 Pro Tip: Mix-ins should make up no more than ¼ cup (30–40 g) of your batter to maintain its airy texture.
Storage, Serving, and FAQs
Your fluffy and moist protein powder cake is baked to perfection — now it’s time to enjoy it and make it last! Whether you’re meal-prepping, storing leftovers, or planning to share slices throughout the week, proper storage and serving methods will help keep your cake soft, fresh, and flavorful. Below, you’ll also find answers to some of the most common baking questions to ensure your protein cake turns out perfectly every time.
How to Store Your Protein Cake
Proper storage keeps your cake moist and delicious for days:
- At room temperature:
If you plan to eat it within 1–2 days, store your cake in an airtight container at room temperature. Keep it in a cool, dry spot away from sunlight. - In the refrigerator:
For longer freshness, refrigerate your cake in a sealed container for up to 5 days. The texture may firm up slightly, but a quick reheat will bring back its softness. - In the freezer:
Want to make it ahead? Slice the cake into portions, wrap each slice in plastic wrap or parchment paper, and store in a freezer-safe bag. It will stay good for up to 2 months.
To enjoy, thaw at room temperature or warm in the microwave for 20–30 seconds.
💡 Tip: Add a small piece of bread or a damp paper towel inside your storage container to maintain moisture.
Reheating and Serving Ideas
This cake is as versatile as it is healthy! Here are some delicious ways to serve it:
- Warm and cozy: Heat a slice in the microwave for a few seconds and enjoy with a dollop of Greek yogurt or almond butter.
- Breakfast boost: Pair it with fresh fruit, a smoothie, or black coffee for a quick, protein-rich morning meal.
- Dessert twist: Add a drizzle of melted dark chocolate, a spoonful of nut butter, or a sprinkle of cinnamon and coconut flakes for an indulgent finish.
- Meal prep idea: Bake a double batch, portion it out, and keep slices ready for on-the-go snacks or post-workout fuel.
Frequently Asked Questions (FAQs)
1. Why does my protein cake turn out dry or dense?
This usually happens if the batter is overmixed or too much protein powder is added. Stick to the recipe measurements and gently fold the ingredients to keep your cake light and moist.
2. Can I bake this cake without eggs?
Yes! Replace each egg with ¼ cup (60 g) unsweetened applesauce or 1 mashed banana. This keeps the texture moist and works well for vegan versions.
3. Which protein powder works best for baking?
Whey protein isolate is ideal for soft and fluffy cakes, while casein provides more structure. Plant-based protein works too — just add extra moisture (like yogurt or milk).
4. Can I reduce or skip the sweetener?
Absolutely. If you prefer a less sweet cake, use only 1 tablespoon of honey or syrup, or substitute with stevia or monk fruit for a sugar-free option.
5. How can I make this recipe more filling?
Add fiber or healthy fats such as chia seeds, almond flour, or nut butter to increase satiety and balance the macros.
Final Tip
This protein powder cake is proof that healthy eating doesn’t mean giving up dessert. With just a few simple ingredients and smart swaps, you can enjoy a treat that’s high in protein, low in guilt, and endlessly customizable. Bake it once, and it’s sure to become a regular in your kitchen rotation.


Hi, how have you been lately?
I really like your writing style, wonderful information, regards for putting up : D.