The Best Fluffy Pancakes recipe you will fall in love with. Full of tips and tricks to help you make the best pancakes.
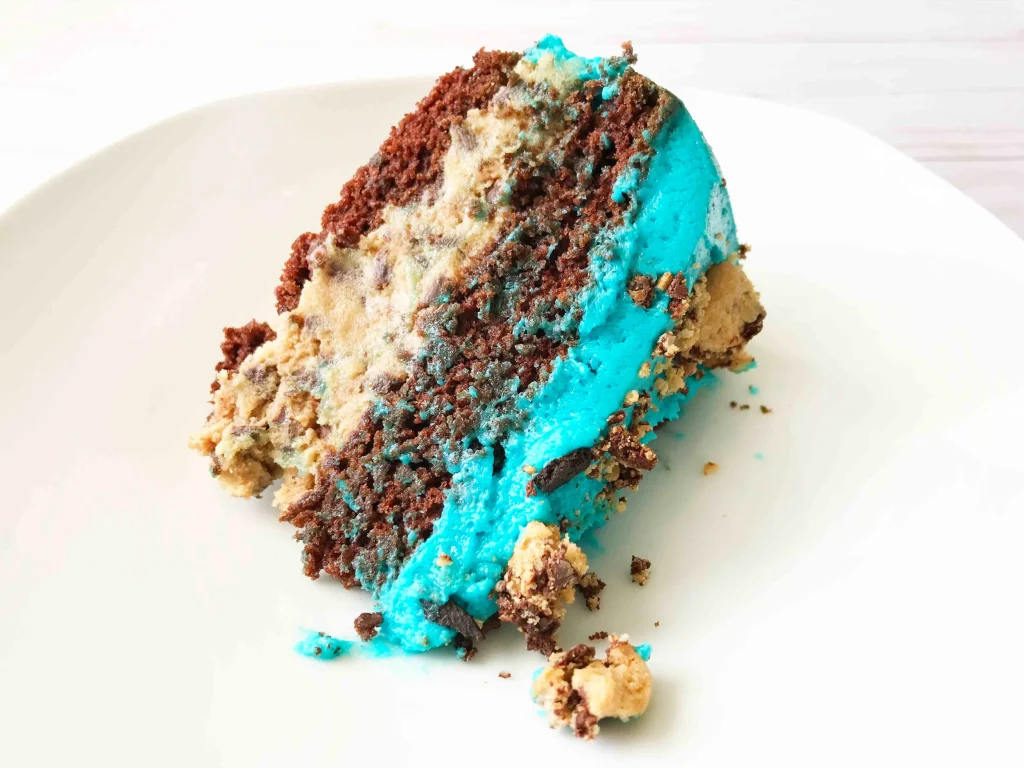
If you’re looking for a fun and eye-catching dessert for a birthday party or special celebration, a Cookie Monster Cake is the perfect choice! Inspired by the beloved Sesame Street character, this cake features fluffy layers, vibrant blue buttercream frosting, and, of course, delicious chocolate chip cookies. Whether you’re a beginner or an experienced baker, this step-by-step guide will show you how to create a Cookie Monster-themed cake with ease.
Get ready to wow your guests with a fun and delicious Cookie Monster Cake that’s perfect for kids’ parties and beyond! Let’s dive in.
Why a Cookie Monster Cake is Perfect for Any Occasion
A Cookie Monster Cake is more than just a fun dessert—it’s a creative and nostalgic treat that brings joy to any celebration. Whether you’re planning a kids’ birthday party, a Sesame Street-themed event, or simply want to surprise a cookie lover, this cake is guaranteed to be a crowd-pleaser. Here’s why it’s the perfect choice for any occasion:
1. A Fun and Nostalgic Sesame Street Theme
Cookie Monster is one of the most beloved characters from Sesame Street, making this cake instantly recognizable and exciting for children and adults alike. It adds a playful and colorful touch to any party, bringing back fond childhood memories while also delighting young guests who love the character today.
2. Ideal for Kids’ Birthday Parties and Celebrations
A Cookie Monster-themed cake is a fantastic centerpiece for a children’s birthday party. The bright blue frosting, big googly eyes, and cookie-filled mouth make it a fun and engaging dessert that kids will love. Plus, the combination of soft cake and crunchy cookies adds a delicious texture that makes every bite enjoyable.
3. Easy to Customize with Different Flavors and Designs
One of the best things about making a Cookie Monster Cake is that you can customize it to suit your preferences. Whether you prefer a classic vanilla sponge, rich chocolate cake, or even a funfetti base, this cake can be adapted to different flavors. You can also experiment with different frosting techniques, such as buttercream piping for a fluffy texture or smooth fondant for a clean look.
4. Perfect for Both Beginners and Experienced Bakers
Even if you’re not an expert baker, a Cookie Monster Cake is surprisingly easy to make. The messy, fur-like frosting means you don’t have to worry about achieving a perfectly smooth finish, and the decorations—like fondant eyes and cookies—are simple yet effective. For those with more experience, there’s plenty of room for creativity, from sculpting 3D cake designs to experimenting with different types of edible decorations.
No matter the occasion, a Cookie Monster Cake is a delightful and festive dessert that brings a touch of fun to any gathering. With its whimsical appearance and delicious combination of cake and cookies, it’s sure to be a hit with guests of all ages.
Ingredients & Tools Needed for a Cookie Monster Cake
Before you start baking your Cookie Monster Cake, it’s essential to gather all the necessary ingredients and tools. This will help ensure a smooth baking and decorating process. From choosing the right cake base to selecting the best frosting and decorations, here’s everything you need to bring Cookie Monster to life.
1. Cake Base Options: Choosing the Right Flavor
The foundation of your Cookie Monster Cake is the cake itself. While the design is important, the flavor should also be delicious and complement the decorations. Here are a few great options:
- Vanilla Sponge Cake – A light, fluffy, and classic choice that pairs well with buttercream.
- Chocolate Cake – Rich and indulgent, perfect for cookie lovers who enjoy a deep cocoa flavor.
- Funfetti Cake – Adds a festive and colorful twist, making the cake even more exciting for kids.
- Cookies and Cream Cake – A great option if you want to enhance the cookie theme, using crushed chocolate sandwich cookies in the batter.
If you prefer a homemade version, you can bake the cake from scratch, or if you’re short on time, a cake mix can also work well.
2. Frosting & Decorations: Bringing Cookie Monster to Life
The key feature of a Cookie Monster Cake is the signature blue fur. To achieve the perfect texture and color, you’ll need the right frosting and decorations:
- Blue Buttercream Frosting – The best way to create the fluffy fur effect. Use gel food coloring to get a vibrant blue without thinning the frosting.
- Fondant or Candy Eyes – Cookie Monster’s big googly eyes are a crucial detail. You can make them with white fondant and black edible paint, or use large candy eyes for convenience.
- Chocolate Chip Cookies – The ultimate Cookie Monster accessory. These are used to decorate the mouth area and can also be crumbled for added texture.
- Piping Gel (Optional) – If you want to add extra shine to the eyes or details, piping gel can help create a glossy finish.
3. Essential Tools for Decorating
To achieve the perfect Cookie Monster design, having the right tools on hand is just as important as the ingredients. Here are the essentials:
- Piping Bags and Tips – A grass piping tip (Wilton #233) is ideal for creating the fur-like texture. You can also use a star tip if you prefer a different effect.
- Offset Spatula – Helps spread the frosting smoothly before piping.
- Cake Board or Cake Stand – Provides a sturdy surface for decorating and serving.
- Turntable (Optional) – If you plan to pipe fur all over the cake, a cake turntable makes it easier to decorate evenly.
- Cooling Racks – Ensures your cake layers cool properly before decorating, preventing the buttercream from melting.
Step-by-Step Guide to Making a Cookie Monster Cake
Now that you have all your ingredients and tools ready, it’s time to bring Cookie Monster to life! Whether you’re a beginner or an experienced baker, this step-by-step guide will help you create a fun and delicious Cookie Monster Cake with ease. From baking the perfect cake to piping his signature blue fur, follow these steps to achieve a professional-looking result.
Step 1: Bake Your Cake – Choosing the Right Sponge and Baking Tips
The base of your cake is just as important as the decorations. You can choose a vanilla, chocolate, funfetti, or cookies and cream cake depending on your preference. If you want a light and fluffy vanilla sponge, you can follow this step-by-step mini vanilla sponge cake recipe and scale it up to fit your desired cake size.
Here’s how to bake your cake:
- Prepare Your Batter – If making a cake from scratch, mix your ingredients according to the recipe. For a quicker option, use a store-bought cake mix and follow the package instructions.
- Preheat Your Oven – Set your oven to 175°C (350°F) and grease your cake pans to prevent sticking.
- Bake in Two or Three Layers – Divide the batter evenly between two or three round cake pans (6-inch or 8-inch pans work well). This will make it easier to stack and decorate later.
- Check for Doneness – Bake for 25-30 minutes, or until a toothpick inserted in the center comes out clean.
- Cool Completely – Let the cakes cool in the pans for about 10 minutes, then transfer them to a cooling rack before frosting.
Pro Tip: For a perfectly even cake, trim the domed tops with a serrated knife before assembling.e stacking.
Step 2: Prepare the Blue Buttercream Frosting – Achieving the Perfect Color
The most recognizable feature of Cookie Monster is his fluffy blue fur. The best way to recreate this look is with buttercream frosting.
- Make the Buttercream – If using homemade buttercream, beat butter, powdered sugar, vanilla extract, and a splash of milk until light and fluffy.
- Color the Frosting – Add royal blue gel food coloring a little at a time until you reach a deep, vibrant blue. Avoid liquid food coloring, as it can make the frosting too thin.
- Divide for Piping and Smoothing – Set aside some frosting for a crumb coat and keep the rest for piping the fur.
Pro Tip: If your frosting is too soft, refrigerate it for 15-20 minutes before piping to help it hold its shape.
Step 3: Assemble and Frost the Cake – Creating a Smooth Base
Before adding details, it’s important to stack and frost the cake properly.
- Stack the Cake Layers – Place one cake layer on a cake board or stand. Spread a thin layer of buttercream between each layer as you stack.
- Apply a Crumb Coat – Spread a thin layer of frosting all over the cake to seal in any crumbs.
- Chill the Cake – Refrigerate for 15-30 minutes to help the frosting set.
- Add a Second Coat (Optional) – If needed, apply another thin layer of frosting before piping the fur.
Pro Tip: Using an offset spatula and a turntable makes spreading the frosting easier.
Step 4: Add Cookie Monster’s Face – Bringing the Character to Life
Now comes the most exciting part—bringing Cookie Monster to life with his signature fur, googly eyes, and big cookie-loving mouth.
Pipe the Fur Texture
Fit a grass piping tip (Wilton #233) onto a piping bag filled with vibrant blue buttercream. Start piping short, quick strokes, covering the entire cake to create a fluffy fur effect. For a more natural look, vary the length and direction of the strokes to mimic Cookie Monster’s wild, playful fur.
Make the Eyes
- Roll two small balls of white fondant and flatten them into circles, or use large candy eyes.
- Add a small black fondant circle or a chocolate chip on each to complete the eyes.
- Attach them to the top of the cake with a dab of frosting to keep them secure.
- For an authentic look, position the eyes slightly unevenly to capture Cookie Monster’s fun and goofy expression.
Create the Mouth
- Option 1: Press a chocolate chip cookie halfway into the frosting at the front of the cake to form an open mouth.
- Option 2: For a 3D effect, carefully cut a small slit in the cake’s front layer and insert half a cookie, making it look like Cookie Monster is mid-bite.
- You can also crumble extra cookies around the mouth for a messier, more playful look—just like the real Cookie Monster.
For a visual guide, watch this step-by-step Cookie Monster Cake decorating tutorial to see the piping and finishing touches in action: How to Make a Cookie Monster Cake
Final Touch: Add Extra Cookie Details (Optional)
To make your Cookie Monster Cake even more exciting, you can:
- Crumble chocolate chip cookies around the cake for a playful touch.
- Add cookie decorations on the cake board to complete the look.
- Use black fondant or melted chocolate to define the mouth shape if needed.
Once decorated, your Cookie Monster Cake is ready to impress! Serve immediately or refrigerate until the party begins.
Tips for Perfecting Your Cookie Monster Cake Design
Creating a Cookie Monster Cake is all about capturing his fuzzy blue fur, playful expression, and love for cookies. While the process is fun, a few expert tips can help you achieve a polished and professional look. Here’s how to take your design to the next level.
1. Use the Right Piping Tip for a Realistic Fur Texture
One of the key elements of a Cookie Monster Cake is his signature shaggy blue fur. To recreate this look:
- Use a grass piping tip (Wilton #233 or similar) to pipe small strands of buttercream. This will create a fluffy and textured fur effect.
- Hold the piping bag at a 90-degree angle, apply gentle pressure, and pull slightly upward to form spikes of “fur.”
- Work in small sections, rotating the cake as needed to ensure even coverage.
- If the buttercream softens, refrigerate it for 10-15 minutes to make it easier to pipe clean fur strokes.
Pro Tip: Using a darker blue for shadows and a lighter blue for highlights can add depth and realism to Cookie Monster’s fur.
2. Position the Eyes for the Classic Cookie Monster Look
Cookie Monster’s eyes are his most expressive feature. For an authentic look:
- Use two large white fondant balls, marshmallows, or white chocolate discs for the eyes.
- Place them slightly unevenly and close together to create Cookie Monster’s signature goofy and lovable expression.
- Use a small amount of melted chocolate or black fondant to create the pupils. Offset the pupils slightly for a fun, cross-eyed effect.
- Secure the eyes with a dab of frosting or melted chocolate so they don’t shift.
Pro Tip: For a more three-dimensional effect, attach the eyes slightly tilted outward instead of lying flat against the cake.
3. Create a Realistic Cookie Mouth Effect
Cookie Monster is famous for his love of cookies, so his mouth should reflect that! Here’s how to make it stand out:
- Cut a small semi-circle into the cake’s frosting layer where the mouth will be. This creates a more defined open-mouth effect.
- Use black fondant or chocolate frosting to fill in the mouth and create contrast.
- Add a half cookie inside the mouth, slightly pressing it into the frosting so it looks like Cookie Monster is mid-bite.
Pro Tip: You can also add crumbled cookies around the mouth and base of the cake to make it look like Cookie Monster has been munching away!
4. Keep Your Cake Cool for a Professional Finish
Buttercream can soften and lose its shape if it gets too warm, which can affect the fur texture and decorations. To maintain a crisp design:
- Chill the cake before piping the fur to create a more stable base.
- If you’re decorating in warm conditions, refrigerate the cake in between steps.
- If the buttercream starts melting, pop it in the fridge for 10-15 minutes to firm up before continuing.
Pro Tip: Avoid overhandling the cake, as body heat can soften the buttercream faster.
5. Add Extra Cookie Details for a Fun, Playful Touch
To make your Cookie Monster Cake even more exciting, consider adding extra cookie-themed decorations:
- Mini cookies around the cake or on the cake board.
- Cookie crumbs sprinkled on the buttercream for added texture.
- Fondant or chocolate chip cookie accents on the sides of the cake.
These small details enhance the overall playful and fun aesthetic while reinforcing Cookie Monster’s cookie obsession.
Serving & Storing Your Cookie Monster Cake
Once you’ve put the finishing touches on your Cookie Monster Cake, it’s time to serve it up and enjoy! Whether you’re presenting it at a birthday party, baby shower, or themed event, knowing the best way to slice, serve, and store your cake ensures it remains fresh, delicious, and visually appealing for as long as possible.
1. How to Properly Slice and Serve Your Cookie Monster Cake
Cutting a decorated cake, especially one with layers and buttercream details, can be tricky. Here’s how to do it neatly:
- Use a sharp, serrated knife: This helps cut through the buttercream and cake layers cleanly without dragging crumbs.
- Wipe the knife between cuts: Keep a damp paper towel nearby to wipe off excess frosting and crumbs, ensuring each slice looks neat.
- Chill the cake slightly before slicing: If your cake has been sitting out for a while, refrigerate it for 15-20 minutes before slicing to firm up the buttercream and reduce mess.
- Cut small portions first: Cookie Monster Cakes are often rich and generously frosted, so smaller slices are usually enough for each guest.
Pro Tip: If you’re serving the cake to kids, consider pre-cutting slices before presenting it to avoid a mess and make serving easier.
2. How to Keep Your Cake Fresh at Room Temperature
If you plan to serve the cake within a few hours, it’s best to keep it at room temperature to maintain its soft texture and delicious flavor. Here’s how to do it properly:
- Store it in a cool, dry place away from direct sunlight and heat sources to prevent the buttercream from melting.
- If possible, keep the cake under a cake dome or in a cake box to protect it from dust and drying out.
- If your event is outdoors, keep the cake in the shade and avoid direct exposure to sunlight, which can soften or melt the frosting.
Pro Tip: Avoid refrigerating the cake unless necessary, as refrigeration can cause the buttercream to harden and the cake to dry out faster.
3. Storing Leftover Cookie Monster Cake in the Fridge
If you have leftovers, proper storage is key to keeping your cake moist and flavorful for the next few days. Follow these steps:
- Cover the cake tightly with plastic wrap or place slices in an airtight container to prevent it from absorbing fridge odors.
- Refrigerate for up to 3-4 days, but allow slices to come to room temperature before serving for the best texture and flavor.
- If your cake contains perishable fillings like whipped cream or fresh fruit, refrigeration is necessary to keep it safe to eat.
Pro Tip: To restore moisture to a chilled cake, let it sit at room temperature for 20-30 minutes before serving.
4. Freezing Your Cookie Monster Cake for Later
Want to save your cake for a future treat? Freezing is a great option to extend its freshness. Here’s how:
- For whole cakes: Wrap the cake in two layers of plastic wrap, followed by a layer of aluminum foil to prevent freezer burn.
- For slices: Place individual slices in airtight containers or wrap them in plastic wrap before freezing.
- Label with the date: Cookie Monster Cake can be stored in the freezer for up to 2 months.
- Thawing instructions: Transfer the cake to the refrigerator for a few hours or overnight before serving. Let it sit at room temperature for 30 minutes to regain its soft texture.
Pro Tip: Avoid freezing a fully decorated cake with delicate buttercream details, as condensation during thawing can affect the appearance. Instead, freeze the cake layers separately and decorate after thawing.


[…] your child loves cookies, why not make a Cookie Monster cake? This design is fun, simple, and can even include real […]