The Best Fluffy Pancakes recipe you will fall in love with. Full of tips and tricks to help you make the best pancakes.
If you’ve only ever had marshmallows from a plastic bag, you’re in for a sweet surprise. Homemade marshmallows are a game changer — soft, fluffy, and full of real vanilla flavor. They melt beautifully in hot chocolate, toast to perfection for s’mores, and taste so much better than store-bought versions. Plus, making them from scratch is easier than you might think!
In this post, you’ll learn how to make classic homemade marshmallows with just a few simple ingredients and tools. Whether you’re a candy-making beginner or just looking for a fun kitchen project, this guide will walk you through every step — from blooming the gelatin to cutting those perfect pillowy squares. Get ready to impress your family and friends with marshmallows that are light, airy, and totally irresistible.
Why Make Homemade Marshmallows?
Store-bought marshmallows may be convenient, but once you taste a homemade marshmallow, you’ll realize what you’ve been missing. Making them from scratch is not only rewarding — it’s a fun, hands-on process that results in a treat that’s softer, fresher, and more flavorful than anything off the shelf. Here’s why you should skip the bag and try making your own:
Taste and Texture You Can’t Buy in Stores
Homemade marshmallows are incredibly light, fluffy, and melt-in-your-mouth soft, thanks to the control you have over the ingredients and mixing process. Unlike mass-produced versions that often have a rubbery or overly chewy texture, these homemade pillows are delicate and cloud-like. Once you taste the difference, it’s hard to go back to store-bought.
Customize Flavors, Colors, and Shapes
One of the biggest perks of DIY marshmallows is that you can get creative! Add a splash of vanilla extract for a classic flavor, or experiment with peppermint, almond, coconut, or fruit extracts. You can also tint your marshmallows with natural food coloring, swirl in chocolate or jam, or cut them into seasonal shapes using cookie cutters. It’s a great way to make treats that match any holiday, party theme, or personal preference.
Control the Ingredients
Store-bought marshmallows are often made with preservatives, artificial flavors, and unnecessary additives. By making your own, you control what goes in — from high-quality gelatin to organic sugar and natural flavorings. You can even opt for a corn syrup-free version if you prefer a more natural alternative like honey or agave syrup.
Perfect for Gifting and Special Occasions
Homemade marshmallows make beautiful edible gifts for birthdays, baby showers, holidays, or as thoughtful thank-you favors. Pack them in cellophane bags with a ribbon, or pair them with a jar of hot chocolate mix for a cozy winter present. Their soft texture and custom shapes will wow your recipients — especially when you tell them you made them yourself!
Ingredients and Tools You’ll Need
Before you start whipping up your homemade marshmallows, make sure you have all the essential ingredients and tools ready. Most of these are pantry staples or easy to find in any grocery store, and the equipment is probably already in your kitchen. Having everything prepared ahead of time will make the process smooth and enjoyable — and help you achieve those soft, fluffy results you’re aiming for.
Classic Ingredients for Fluffy Marshmallows
Here’s what you’ll need to make a classic marshmallow recipe from scratch:
- Unflavored gelatin – This is the key ingredient that gives marshmallows their signature structure and bounce. You’ll need powdered gelatin (usually sold in packets).
- Granulated sugar – Provides sweetness and bulk to the marshmallow base.
- Light corn syrup – Helps prevent crystallization in the sugar syrup and gives your marshmallows a smooth texture. You can substitute with honey or agave syrup if desired.
- Water – Used to bloom the gelatin and cook the syrup.
- Salt – Just a pinch enhances the sweetness and deepens the flavor.
- Vanilla extract – Adds that classic, comforting marshmallow flavor. You can swap this out for other extracts like almond, peppermint, or lemon.
- Powdered sugar and cornstarch mix – This combo is used for dusting the finished marshmallows to keep them from sticking together.
🔎 Pro tip: Using high-quality vanilla extract makes a noticeable difference in flavor, especially since marshmallows rely on just a few ingredients.
Essential Tools for Success
To ensure your marshmallows come out just right, a few tools are essential:
- Stand mixer or hand mixer – You’ll need to whip the mixture for 10–12 minutes, so a stand mixer is ideal. If using a hand mixer, be prepared for a longer mixing time.
- Candy thermometer – Critical for monitoring your sugar syrup temperature. You want to hit exactly 240°F (soft-ball stage) for the right consistency.
- Heavy-bottomed saucepan – A good-quality pot helps distribute heat evenly while cooking your syrup.
- Rubber spatula – Useful for scraping every last bit of the fluffy mixture into your prepared pan.
- 8×8 or 9×9 baking pan – For pouring and setting your marshmallows. You can line it with parchment paper or generously dust it with the powdered sugar-cornstarch blend.
- Sifter or fine mesh strainer – To evenly coat marshmallows with powdered sugar after cutting.
Optional Add-Ons and Substitutions
Want to make your marshmallows even more special? Here are a few optional ingredients and variations:
- Food coloring – Add a few drops to match themes or seasons.
- Flavor extracts – Try peppermint for winter holidays, coconut for tropical flair, or coffee for grown-up marshmallows.
- Natural sweeteners – Swap corn syrup with honey, maple syrup, or brown rice syrup for a different flavor and slightly firmer texture.
- Gelatin alternatives – For vegan marshmallows, you can experiment with agar agar or other plant-based gelling agents, but the process differs and results vary.
Equipment and Utensils You’ll Need
- Stand mixer (with whisk attachment) or electric hand mixer — a powerful and versatile option is the Ninja CI105BRN Foodi Power Mixer System
- Candy thermometer (essential for reaching the correct sugar temperature)
- Heavy-bottomed saucepan (for evenly cooking the sugar syrup)
- Silicone spatula (for scraping the mixture without damaging it)
- 8×8 or 9×9 inch baking pan to pour and set the marshmallows
- Parchment paper (optional, to line the pan)
- Fine mesh sieve or sifter (to evenly dust powdered sugar and cornstarch)
- Sharp knife or bench scraper (to cut marshmallows into squares)
Step-by-Step: How to Make Classic Homemade Marshmallows
This section includes exact measurements, clear instructions, and helpful tips for perfect results — all optimized for your blog and reader clarity.
🧁 Ingredients (for a standard 8×8 inch pan)
- 3 envelopes (21g) unflavored gelatin
- 1 cup (240 ml) cold water, divided (½ cup for gelatin, ½ cup for syrup)
- 1 ½ cups (300g) granulated sugar
- 1 cup (240 ml) light corn syrup
- ¼ teaspoon salt
- 1 tablespoon pure vanilla extract
- For dusting: ½ cup (60g) powdered sugar + ¼ cup (30g) cornstarch, mixed
🥣 H3: Step 1 – Bloom the Gelatin
In the bowl of a stand mixer (or a large mixing bowl if using a hand mixer), add ½ cup of cold water. Sprinkle 3 envelopes of unflavored gelatin evenly over the water. Let it sit and bloom for at least 10 minutes. The gelatin will absorb the water and thicken into a gel-like consistency.
🔎 Tip: Do not stir the gelatin. Just let it absorb the water naturally.
🍯 H3: Step 2 – Cook the Sugar Syrup
In a medium saucepan, combine:
- 1 ½ cups granulated sugar
- 1 cup light corn syrup
- ½ cup cold water
- ¼ teaspoon salt
Stir gently to combine, then place the pan over medium-high heat.
Attach a candy thermometer to the side of the pan and boil without stirring until the mixture reaches 240°F (115°C) — the soft-ball stage. This usually takes 8–10 minutes. Once it hits the correct temperature, immediately remove it from the heat.
⚠️ Be very careful: the syrup is extremely hot and sticky.
🧁 H3: Step 3 – Whip Until Fluffy and Tripled in Volume
Turn your stand mixer to low speed and slowly pour the hot syrup down the side of the bowl into the bloomed gelatin. Once all the syrup is in, increase the speed to high and beat for 10–12 minutes.
The mixture will become white, thick, and glossy, and it should roughly triple in volume.
At the very end, add 1 tablespoon of vanilla extract and beat for another 30 seconds.
🌀 The bowl will feel warm but not hot. Stop mixing when soft peaks form and the marshmallow holds shape.
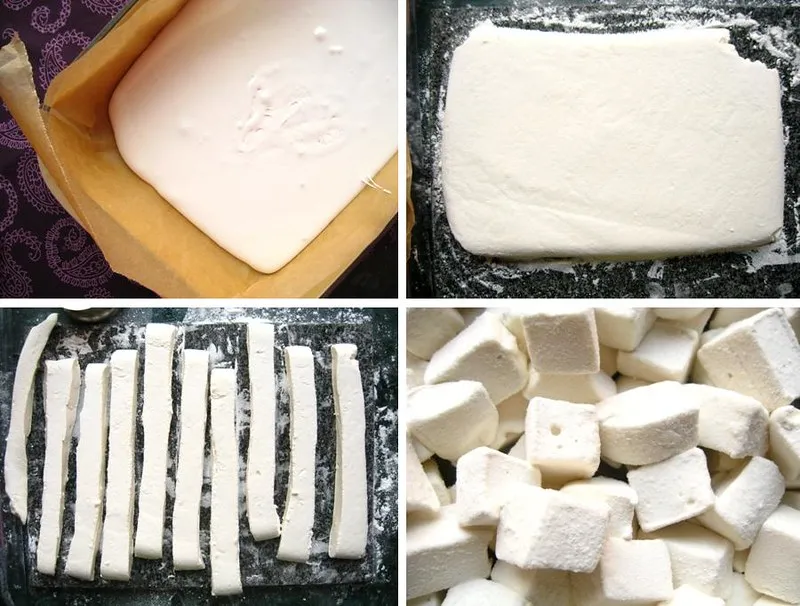
🍥 H3: Step 4 – Pour, Set, and Cut
Prepare your pan by dusting it generously with the powdered sugar + cornstarch mix or lining it with parchment paper.
Quickly transfer the marshmallow mixture to the pan and smooth the top with a greased spatula. Dust the top with more of the sugar-cornstarch blend.
Let it sit uncovered at room temperature for 6–8 hours or overnight to firm up.
Once set:
- Dust a sharp knife with powdered sugar
- Turn the marshmallow slab onto a clean surface
- Cut into squares (or fun shapes)
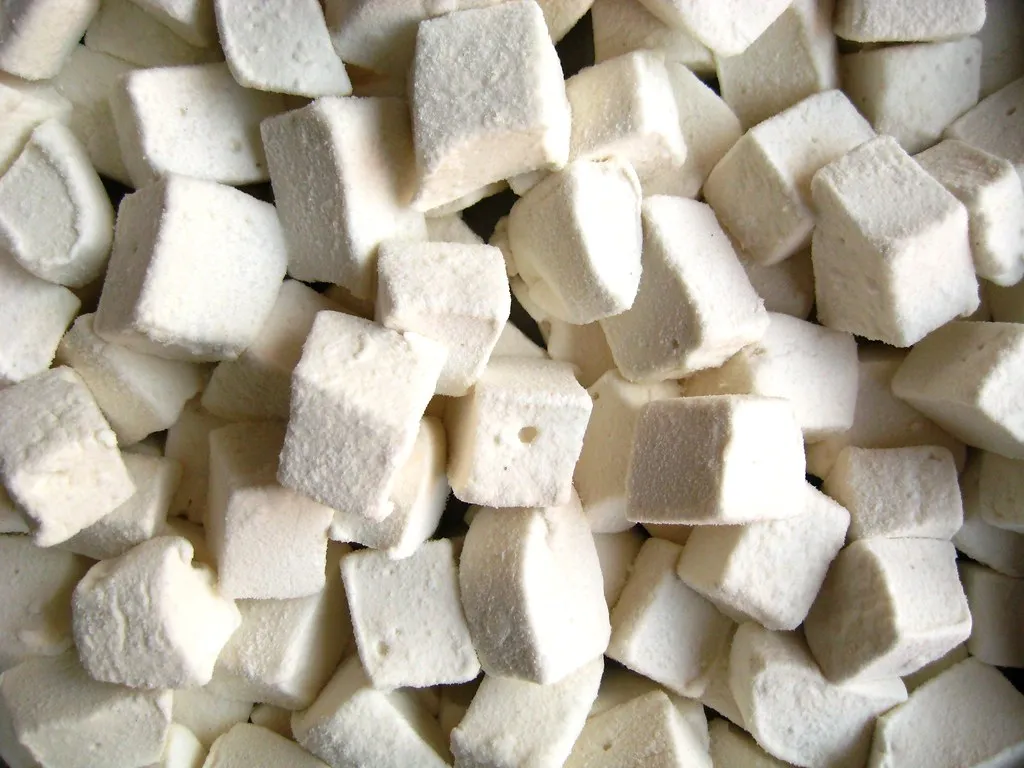
- Toss cut pieces in the sugar-cornstarch blend to prevent sticking
Tips and Tricks for Perfect Marshmallows
Making homemade marshmallows is simple once you get the hang of it, but a few smart tips can help you achieve perfect results every time. Whether you’re aiming for that dreamy, fluffy texture or trying to avoid sticky disasters, these expert tricks will make your marshmallow-making process smoother and more successful.
🧂 How to Prevent Stickiness
Marshmallows are naturally sticky — it’s part of what makes them so soft and gooey — but too much stickiness can make them hard to work with. Here’s how to keep them manageable:
- Use a powdered sugar + cornstarch coating: Combine ½ cup powdered sugar with ¼ cup cornstarch, and generously coat all sides of your marshmallows after cutting.
- Dust your knife or cutters: Every time you slice a new row, dust your knife with the sugar mixture to keep it from sticking.
- Let them dry properly: Allow the cut marshmallows to sit at room temperature for 30 minutes after dusting so the coating can set.
🧼 Avoid using oil or water to handle the marshmallows — they’ll just get stickier!
🧁 Avoiding Common Mistakes
To ensure your marshmallows turn out light and fluffy instead of dense or grainy, watch out for these common pitfalls:
- Overcooking or undercooking the sugar syrup: Use a candy thermometer and cook the syrup to exactly 240°F (115°C). Too low, and the marshmallows won’t set; too high, and they’ll be chewy.
- Under-whipping the mixture: Whip for a full 10–12 minutes until the bowl is lukewarm and the marshmallow mixture holds its shape. Cutting corners here leads to flat, sticky results.
- Pouring too slowly or too quickly: When combining the syrup with the gelatin, pour in a steady stream along the bowl’s side while mixing on low to avoid clumping or splashing.
🎯 Precision in time and temperature is key — treat marshmallow-making like candy-making, not baking.
🌈 Flavor and Color Ideas
Once you’ve mastered the basic recipe, get creative with flavors, extracts, and colors:
- Flavored extracts: Swap or combine vanilla with peppermint, almond, orange, or coffee extract.
- Natural flavor add-ins: Add cocoa powder for chocolate marshmallows or swirl in pureed berries for fruity versions.
- Food coloring: A drop or two of gel food coloring makes marshmallows festive for holidays and parties — pastel for Easter, red and green for Christmas, pink for Valentine’s Day.
🎉 For extra flair, dip your marshmallows in melted chocolate and sprinkle with crushed nuts, graham crackers, or coconut.
❄️ What to Do If They’re Too Soft or Too Firm
- Too soft? You may not have cooked the syrup long enough, or used too much water. Double-check the thermometer next time.
- Too firm or chewy? The syrup likely went over 240°F, making the marshmallows dense. Stick to the soft-ball stage next time.
Ways to Use and Store Your Homemade Marshmallows
Now that you’ve made your own soft, fluffy marshmallows from scratch, the fun really begins! These pillowy treats are incredibly versatile — you can use them in desserts, drinks, and even DIY gifts. Plus, with the right storage methods, you can keep them fresh and delicious for weeks. Here’s how to get the most out of your homemade marshmallows.
🍫 Best Ways to Enjoy Homemade Marshmallows
There’s nothing quite like biting into a fresh marshmallow — especially one you made yourself! Try these delicious ideas:
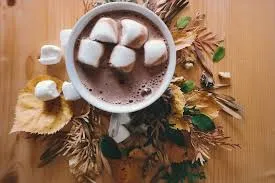
- Hot Chocolate Topper: Drop a cube (or two!) into a mug of warm hot chocolate. They melt beautifully and add a creamy vanilla flavor.
- S’mores Upgrade: Roast your homemade marshmallows over a flame and sandwich them between graham crackers and chocolate for the ultimate campfire treat.
- Straight-Up Snacking: Let’s be honest — they’re amazing all on their own. Fluffy, sweet, and satisfying.
- Toasted Marshmallow Sandwiches: Spread a bit of Nutella or peanut butter on cookies and add a toasted marshmallow for a fun twist.
🔥 Pro tip: Use a kitchen torch to toast marshmallows indoors for an easy s’mores experience at home.
🎂 Creative Recipe Ideas Using Homemade Marshmallows
Your homemade marshmallows can become the star ingredient in countless desserts. Try these fun and easy recipes:
- Homemade Rice Krispie Treats: Melt your marshmallows with butter for a gourmet version of this classic.
- Marshmallow-Topped Brownies or Cupcakes: Place a marshmallow on top near the end of baking for a gooey topping.
- Cereal Bars and Snack Mixes: Combine cut-up marshmallows with cereal, pretzels, and chocolate chips for a sweet and salty treat.
- Chocolate-Dipped Marshmallows: Dip half of each marshmallow in melted chocolate and top with sprinkles, crushed peppermint, or coconut.
🎉 These treats make great party snacks or holiday gifts!
🧊 How to Store Homemade Marshmallows
Proper storage is key to keeping your marshmallows fresh, fluffy, and non-sticky:
- Room Temperature: Store marshmallows in an airtight container at cool room temperature for up to 2–3 weeks. Make sure each marshmallow is coated in the powdered sugar/cornstarch blend to prevent sticking.
- Avoid Moisture and Heat: Keep them away from humidity, which can make them sticky or cause them to melt.
- Layering Tip: If stacking in a container, place a sheet of parchment paper between layers to keep them from sticking together.
🛑 Do NOT store marshmallows in the fridge — the moisture will ruin their texture.
❄️ Can You Freeze Homemade Marshmallows?
Yes, you can freeze marshmallows — and it works surprisingly well!
- Place marshmallows in a freezer-safe bag or container, layered with parchment paper if needed.
- Freeze for up to 3 months.
- To thaw, let them sit at room temperature for 30–60 minutes.
They’ll still be fluffy and sweet after thawing, though the coating may need a light refresh with powdered sugar.


