The Best Fluffy Pancakes recipe you will fall in love with. Full of tips and tricks to help you make the best pancakes.
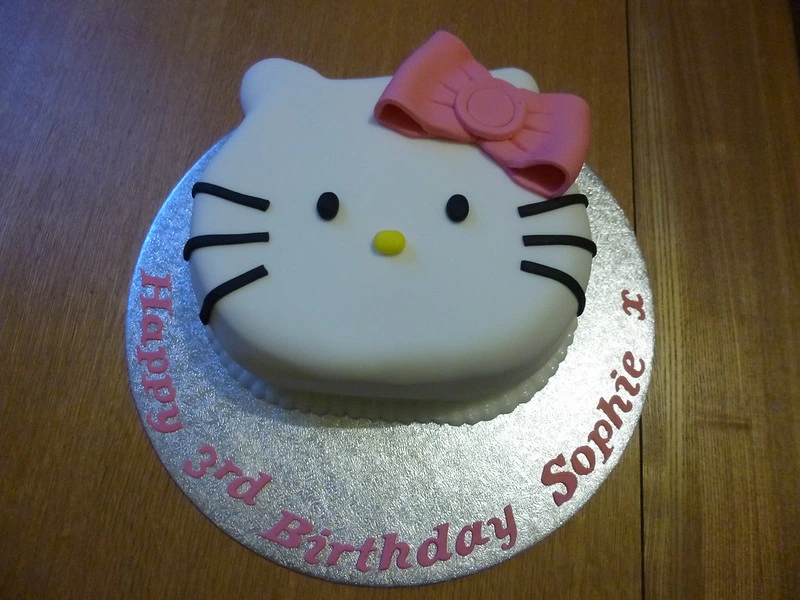
If you’re looking to add a touch of cuteness and charm to your next celebration, a Hello Kitty cake is the perfect sweet treat to steal the show. This beloved Sanrio character has captured hearts worldwide with her simple yet adorable design, making her a favorite for kids’ birthday parties and Hello Kitty fans of all ages. Whether you’re a beginner baker or an experienced cake decorator, creating a Hello Kitty cake can be a fun and rewarding project.
In this blog post, we’ll guide you step-by-step through making a delightful Hello Kitty cake—from baking a moist, fluffy cake base to decorating it with smooth buttercream and vibrant fondant details. Along the way, you’ll discover handy tips and tricks to bring this charming character to life with edible decorations, piping techniques, and cute finishing touches. Get ready to impress your guests with a slice of adorableness that’s as delicious as it is delightful!
Essential Ingredients and Tools for Making a Hello Kitty Cake
Creating a perfect Hello Kitty cake starts with gathering the right ingredients and tools. Having everything you need on hand will make the decorating process smoother and help you achieve that adorable, picture-perfect look. Here’s a breakdown of what you’ll need:
1. Cake Base Ingredients
The foundation of your Hello Kitty cake is the cake itself. While you can choose any flavor you like, some popular options include:
- Vanilla Cake: A classic choice that pairs wonderfully with colorful decorations and buttercream. It’s light and versatile, making it ideal for kids and adults alike.
- Strawberry or Pink-Flavored Cake: To match Hello Kitty’s signature pink and red colors, a strawberry-flavored cake adds a subtle fruity twist and a lovely tint to the cake layers.
- Chocolate Cake: For those who want a richer flavor, chocolate works beautifully and contrasts nicely with the bright fondant decorations.
You’ll also need the usual baking staples: flour, sugar, eggs, butter, baking powder, milk, and vanilla extract. Make sure to follow a reliable recipe for moist and fluffy cake layers.
2. Fondant and Buttercream Frosting Basics
To bring Hello Kitty to life on your cake, you’ll primarily rely on two types of icing:
- Buttercream Frosting: This creamy, spreadable frosting is perfect for creating a smooth base layer on your cake before applying fondant. Buttercream helps the fondant stick and adds an extra layer of sweetness. You can flavor and color it as you wish, typically using white or pastel pink shades to complement the design.
- Fondant: This pliable, dough-like icing is essential for crafting Hello Kitty’s face, bow, and other details. Fondant can be rolled out and shaped, and it comes in various colors, including white, pink, red, and black—perfect for replicating Hello Kitty’s signature look. If you prefer, you can buy pre-colored fondant or use gel food coloring to tint white fondant yourself.
3. Cake Decorating Tools
Having the right tools can make decorating easier and more precise. Here are some essentials:
- Piping Bags and Tips: Use these for applying buttercream borders, whiskers, or other small accents. Different piping tips allow you to create smooth lines, dots, or ruffles.
- Fondant Smoother and Rolling Pin: A fondant smoother helps you get a flawless finish on the cake’s surface, while a rolling pin is needed to roll out fondant evenly.
- Edible Markers: These are great for drawing Hello Kitty’s eyes, whiskers, and other small features directly on fondant.
- Food Coloring Gels: Gel colors are concentrated and won’t thin out your fondant or frosting. Use pink, red, black, and yellow to match Hello Kitty’s palette.
- Cake Pans: Round cake pans work best for a classic Hello Kitty face shape, but you can also use square or oval pans if you want to get creative.
4. Optional Decorations and Extras
To add that extra sparkle and charm, consider these additions:
- Edible Glitter or Pearls: These give your cake a magical finish and make it visually stunning for parties.
- Hello Kitty Cake Toppers: If you’re short on time or want to add a fun accent, pre-made cake toppers are available online or at specialty stores.
- Modeling Tools: Small tools designed for shaping fondant or gum paste help you craft delicate bows, whiskers, or flowers with precision.
Step-by-Step Guide: Baking the Perfect Hello Kitty Cake Base
Baking a delicious and sturdy cake base is the first and most important step in making your Hello Kitty cake look fabulous and hold up well during decorating. Whether you choose vanilla, strawberry, or chocolate, following these steps will ensure your cake turns out moist, flavorful, and perfectly shaped for the adorable design ahead.
1. Prepare Your Ingredients and Equipment
Before you start mixing, make sure all your ingredients are at room temperature to ensure smooth blending and a better texture. Here’s what you’ll need for the cake base:
- All-purpose flour: 2 ½ cups (about 310 grams) — for structure and body
- Granulated sugar: 1 ¾ cups (about 350 grams) — for sweetness and moisture
- Baking powder: 2 ½ teaspoons — to help the cake rise
- Salt: ½ teaspoon — to balance flavors and enhance sweetness
- Unsalted butter: ½ cup (1 stick or 113 grams), softened — adds richness and tenderness
- Vegetable oil: ¼ cup (60 ml) — keeps the cake moist and soft (optional, can replace part or all butter)
- Large eggs: 3, at room temperature — for binding and structure
- Milk or buttermilk: 1 cup (240 ml), at room temperature — adds moisture and helps activate baking powder
- Vanilla extract: 2 teaspoons — for flavor
- Optional: Strawberry extract or a few drops of pink gel food coloring if you want a pink cake base
Equipment Preparation:
- Preheat your oven to 350°F (175°C).
- Prepare your cake pans:
- Use two 8-inch round cake pans. If you need high-quality pans, check out these Ninja Round Cake Pans on Amazon — durable, non-stick, and perfect for even baking.
- Grease the pans generously with butter or non-stick spray to prevent sticking.
- Line the bottoms with parchment paper rounds for easy removal of the cake layers after baking.
2. Mix the Batter
- Cream the butter and sugar until light and fluffy. This incorporates air into the batter, helping your cake rise beautifully.
- Add eggs one at a time, beating well after each addition to ensure they are fully incorporated.
- Combine dry ingredients (flour, baking powder, salt) in a separate bowl.
- Alternate adding dry ingredients and milk to the butter mixture, starting and ending with the dry ingredients. Mix gently to avoid overworking the batter, which can make the cake tough.
- Add any flavorings or colorings here, like strawberry extract or a few drops of pink gel food coloring for a subtle tint.
3. Pour and Bake
- Divide the batter evenly between your prepared cake pans. Use a kitchen scale or measuring cups for accuracy so the layers bake evenly.
- Smooth the tops with a spatula and gently tap the pans on the counter to release any air bubbles.
- Bake in the preheated oven for about 25–35 minutes, depending on your pan size and oven.
- Check for doneness by inserting a toothpick or cake tester into the center—if it comes out clean or with a few moist crumbs, your cake is ready.
4. Cool and Prepare for Decorating
- Let the cakes cool in their pans for 10-15 minutes before carefully removing them onto wire racks.
- Cooling completely is crucial before you start frosting; a warm cake will cause buttercream or fondant to melt or slide off.
- Once cool, level the tops of your cakes with a serrated knife or cake leveler to create flat surfaces. This makes stacking and decorating easier and results in a neater final look.
- If you want to add fillings like jam or buttercream between layers, now’s the time to prepare those as well.
5. Tips for a Flawless Cake Base
- Use room temperature ingredients: This ensures better mixing and texture.
- Don’t overmix: Mix until ingredients are just combined to keep the cake tender.
- Avoid opening the oven door frequently: This can cause your cake to sink in the middle.
- Consider baking strips: These keep cake layers flat by insulating the pan edges and promoting even baking.
Decorating Your Hello Kitty Cake: Tips and Techniques
Now that you’ve baked and prepped your perfect cake base, it’s time to dive into the fun and creative part — decorating your Hello Kitty cake! This section will guide you through key techniques and tips to bring that iconic adorable face to life using buttercream, fondant, and simple tools. Even if you’re new to cake decorating, don’t worry — with a little patience and practice, you’ll create a cake that’s as charming as it is delicious.
1. Applying a Smooth Buttercream Base Layer
Before adding fondant or detailed decorations, start by giving your cake a smooth base layer of buttercream frosting. This not only adds flavor but also helps the fondant adhere better to the cake.
- Crumb coat: Apply a thin layer of buttercream all over your cake to seal in crumbs. Use an offset spatula to spread it evenly, then chill the cake for about 15-20 minutes to set this layer.
- Final coat: After chilling, apply a thicker, smooth layer of buttercream. For the smoothest finish, dip your spatula in hot water, wipe it dry, and gently smooth the frosting using long strokes. Rotate the cake on a turntable for an even coat.
- Color: Use white or very light pink buttercream as the base, matching Hello Kitty’s classic color palette.
2. Crafting Hello Kitty’s Face with Fondant
Fondant is your best friend for creating clean, sharp shapes and vibrant colors that really bring Hello Kitty’s face and bow to life.
- Rolling out fondant: Dust your work surface with a little powdered sugar or cornstarch to prevent sticking. Roll the white fondant evenly to about 1/8 inch thickness.
- Cutting shapes: Use a large circle cutter or template to cut the base of Hello Kitty’s face. Smaller cutters or a sharp knife can be used for details like the eyes, nose, and whiskers.
- Adding features: Roll out small pieces of black fondant for the eyes and whiskers, yellow for the nose, and bright red or pink for the signature bow. Attach each piece gently using a little water or edible glue.
- Edible markers: For finer details, like eyelashes or outlines, use edible black markers for precision.
3. Using Piping Bags and Tips for Decorative Accents
Piping adds beautiful textures and accents that enhance your cake’s charm.
- Whiskers and outlines: Use a small round piping tip (like Wilton #1 or #2) with black buttercream or royal icing to pipe Hello Kitty’s delicate whiskers and outline her face if desired.
- Borders and ruffles: Use star or petal tips to create pretty borders around the cake base or on the top edges for an extra festive look.
- Bows and flowers: Pipe rosettes or simple flowers to complement the fondant bow or add dimension to the cake sides.
4. Adding Finishing Touches for Extra Adorableness
These little extras make your Hello Kitty cake truly stand out:
- Edible glitter or pearl dust: Lightly brush over the fondant bow or borders for a subtle sparkle.
- Themed cake toppers: Add Hello Kitty figurines or themed picks to give your cake a professional party-ready look.
- Color palette: Stick to Hello Kitty’s iconic colors — pink, red, white, and black — to keep the design cohesive and instantly recognizable.
- Personalized touches: Add the birthday child’s name or age using piped letters or fondant cutouts for a custom look.
Bonus Tip: Practice Makes Perfect!
Don’t be discouraged if your first attempts aren’t flawless. Cake decorating is an art that improves with practice. Start simple, and as you gain confidence, try more advanced techniques like 3D fondant modeling or multi-layered designs.
Creative Ideas and Variations for Your Hello Kitty Cake
Once you’ve mastered the basic Hello Kitty cake, it’s time to let your creativity shine! There are countless ways to personalize and customize your cake to suit any celebration, taste preference, or style. Whether you want to add a unique twist or make the cake theme more elaborate, these ideas and variations will help inspire your next adorable creation.
1. Flavor Variations to Delight Every Palate
While the classic vanilla or strawberry cake flavors are crowd-pleasers, experimenting with different flavors can elevate your cake experience:
- Matcha Hello Kitty Cake: Incorporate green tea powder into your batter for a subtle, earthy flavor that pairs beautifully with white chocolate buttercream. This variation adds a sophisticated twist while keeping the cute factor intact.
- Red Velvet Hello Kitty Cake: The rich red color of red velvet cake complements Hello Kitty’s signature red bow perfectly, creating a visually striking and delicious dessert.
- Lemon or Citrus Infused Cake: Brighten up the cake with a refreshing lemon or orange zest flavor. It’s light, tangy, and perfect for spring or summer celebrations.
2. Alternative Decorating Styles
Not everyone loves fondant, so here are some creative decorating alternatives:
- Buttercream Piping Art: Use colorful buttercream to pipe Hello Kitty’s face and details directly onto the cake using various piping tips. This method is more forgiving and gives a charming, hand-crafted look.
- Edible Image Transfer: Print Hello Kitty designs on edible paper using food-safe ink. Apply the edible image to a smooth buttercream surface for a quick, detailed decoration without sculpting.
- Chocolate and Candy Accents: Use melted chocolate or candy melts to create bows, eyes, and whiskers. This adds texture and a delicious crunch to your cake.
3. Theme Party Ideas and Cake Presentation
Enhance your Hello Kitty cake by integrating it into a larger themed party:
- Hello Kitty Garden Party: Decorate the cake with edible flowers, pastel colors, and butterfly accents. Serve alongside themed cupcakes and cookies for a cohesive look.
- Birthday Bash with Character Figurines: Add small Hello Kitty figurines, balloons, and matching party favors around the cake for a festive centerpiece.
- Hello Kitty and Friends: Create mini cakes or cupcakes featuring other Sanrio characters like My Melody or Keroppi to complement the main cake.
4. Shape and Size Customizations
Adjust the cake’s shape and size to fit your event:
- Tiered Hello Kitty Cake: Make a multi-layered cake with each tier featuring a different Hello Kitty pose or accessory, perfect for larger celebrations.
- Cupcake Hello Kitty Faces: Bake individual cupcakes decorated with fondant or buttercream Hello Kitty faces for easy serving and an adorable presentation.
- 3D Hello Kitty Cake: For advanced bakers, sculpt a three-dimensional Hello Kitty figure using cake and modeling chocolate or fondant as a show-stopping centerpiece.
5. Dietary-Friendly Versions
Catering to dietary needs without sacrificing cuteness:
- Gluten-Free Hello Kitty Cake: Use gluten-free flour blends and follow gluten-free recipes to make the cake safe for guests with allergies.
- Vegan Hello Kitty Cake: Substitute dairy and eggs with plant-based alternatives like flax eggs, coconut oil, and almond milk. Use vegan fondant and frosting to keep the design intact.
- Sugar-Free or Low-Sugar Options: Opt for natural sweeteners or sugar substitutes to make a healthier version that still tastes amazing.